
Step 5 - Duplicate Data
The
Duplicate Data
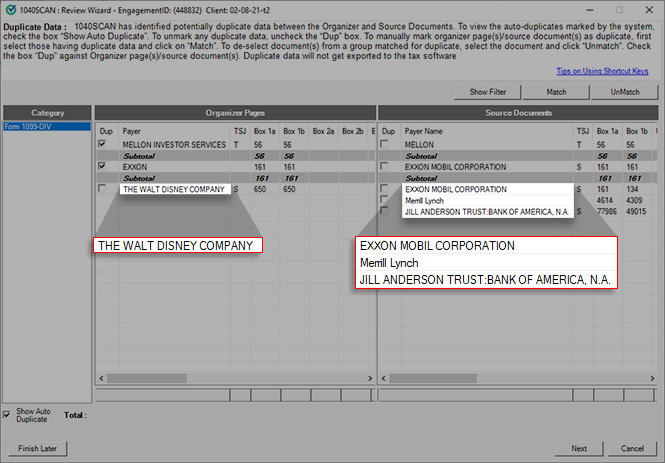
step displays potentially duplicate data between organizer pages and source documents, letting you confirm duplicate data identified by the system or mark data that you identify as duplicate. The amount marked as a duplicate won’t be exported to the tax application.1040SCAN will automatically mark the organizer pages as auto duplicates in the following 2 cases:
- If the payer and ownership codes match, the organizer items are marked as duplicates regardless of whether the amounts match or not.
- If the amounts match exactly (with a difference of $1 being allowed), the organizer items are marked as duplicate even if the payer and ownership codes don’t match.
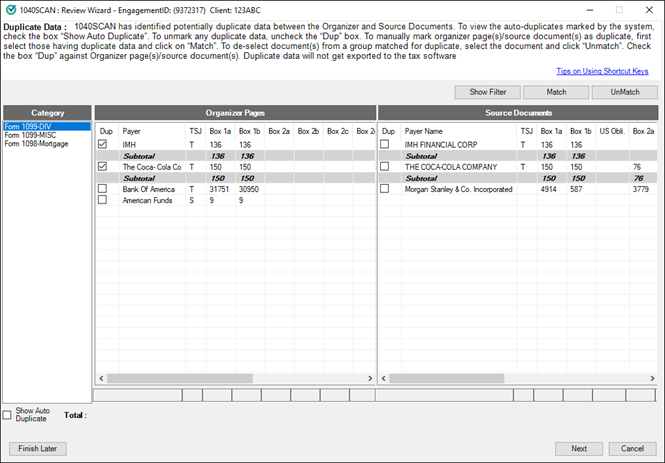
You can manually mark data as duplicate by grouping organizer pages and source documents together and then selecting documents to be excluded from export. For instance, consider an example in which the organizer page of Schedule C has gross receipts of $19,700 and 1099-Misc forms have a total of $19,660. If you want to consider the higher amount of $19,700 from the organizer, you group the documents and then mark the amounts on the 1099-Misc forms as duplicates. This ensures the data from the 1099-Misc documents doesn’t export to the tax application.
note
Double-click on the particular line of data or press
F1
to view the related images. To close the source document viewing window, select Close
or press Esc
.Marking data as duplicate
- If you need to select multiple source documents, holdCtrland select each source document (to select documents one at a time). You can also holdShiftand select the 1st and last source documents (to select a range of source documents in between).

- Follow the same procedure to select the organizer pages you want to group with the source documents you selected. This will usually be a single organizer page.
- With your organizer pages and source documents selected, selectMatch.

- Now you'll see the organizer pages and source documents grouped together with subtotals at the bottom of the group.

- Mark the documents you want to consider as duplicates, select the checkboxes under theDupcolumn. The documents you select as duplicates (that is,Dup) won’t export information to the tax application.
 If you erroneously select both the organizer page and the source documents as duplicates, none of the data will be exported to your tax application.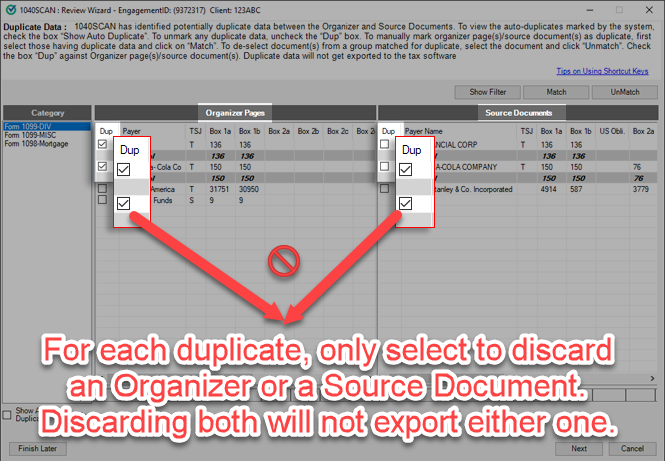
- If you erroneously select theDupcheckbox without first matching that document, you will receive an error. SelectOKand ensure it's matched before you select theDupcheckbox.

- Be sure to select each category under theCategorysection on the left so you don't miss any potential duplicates.
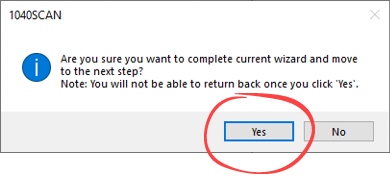
- Once you are done matching the duplicate data, selectNextto close theDuplicate Datastep. On the confirmation window, selectYes.
Unmarking data as duplicate
- Clear the checkbox in theDupcolumn to unmark that organizer page or source document as a duplicate. Now select the organizer page or source document and selectUnMatchto unmatch it from its current group.noteAn organizer page or source document doesn’t need to be unmatched to unmark it as a duplicate. Clear the checkbox will ensure that its data is exported. However, it's usually easier to understand the information if you unmatch content that shouldn't be matched.

- The document will now be unmatched and the checkbox will be cleared.

Bulk unmatch
Instead of individually unmatching every document, you can bulk unmatch everything inside a selected category.
Follow these steps to bulk unmatch all matched documents:
- Go to theCategorypanel.
- Right-click the category name, then selectUnmatch.

Verifying data automatically marked as a duplicate
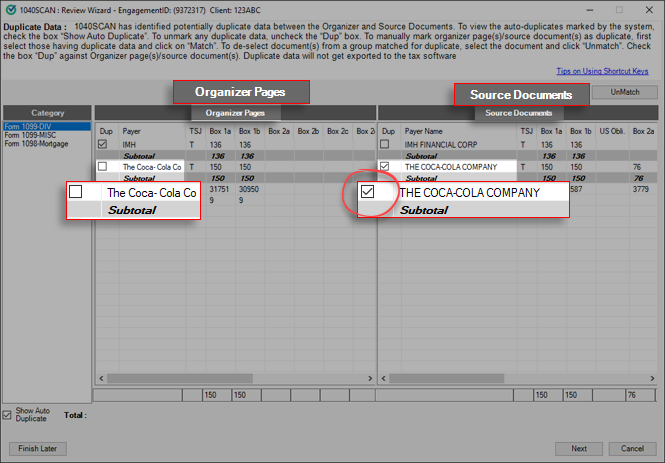
- Select theShow Auto Duplicatecheckbox on the lower left to see items marked as duplicates automatically. If data was identified as duplicate, the organizer pages and source documents will be matched, and the organizer pages will be checked as duplicate.

- If you want to change the duplicate from organizer to source document, manually clear theDupcheckbox in theOrganizer Pagessection and select it in theSource Documentssection.
- Be sure to select each category under theCategorysection on the left to see everything marked as a duplicate automatically.
- If you want any of the data that was automatically marked as a duplicate to be considered for export instead, you should select it, selectUnMatch, and clear theDupcheckbox.
- Clear theShow Auto Duplicatecheckbox to hide the duplicate data identified automatically.
Filtering data
- SelectShow Filter.

- Each column will now show an empty field at the top. Type in the fields to filter the data, showing only data that contain what you typed in that field. When you're done, selectClear Filterto remove the filter.

Tips to remember
- SelectCancelor pressAlt+Cto close the Review Wizard without saving any of the work performed.
- SelectFinish Lateror pressAlt+Fto close the Review Wizard after saving all of the work performed.
- SelectNextor pressAlt+Nto continue.
- Duplicate data won’t be exported to the tax return.
- Documents marked as a duplicate will have aDuplicatestamp next to the amount in the SPbinder.
- The items are displayed in the following sequence: 1. Automatically marked as Duplicates & manually match as duplicates:- Anything that was automatically marked as duplicate by SurePrep will appear on top, then amounts that a user manually marked as Duplicates.2. Remaining organizer/source documents that weren't matched.
- For In-house verification, refer to the matrix that will guide you on handling the documents appearing in this wizard.
Update field value
If you erroneously made a verification error in the
Step 2 Verification
wizard then you now have the ability to correct the field or value in post-verification wizards like Superseded Documents, CFA (Child Form Association), Duplicate Data, NFR (New Form Review), and Tax Exempt Income.To update the field in post-verification wizards, double-click the document to view the source document in the Document Viewer window.
Right-click the field that you want to update, then select
Edit
on the shortcut menu.
On the
Edit
window, select or enter the correct value then select Save
.Example 1:

Example 2:

Mark document as Prior Year
If you erroneously forgot to mark the page a prior year document in Step 2 Verication Wizard then you have the opportunity to mark the documents as a prior year document in post verification wizards like CFA (Child Form Association), NFR (New Form Review), and Tax Exempt Interest.
Double-click the document to view the source document in the Document Viewer window.
On the new window, select
Mark as PY
to correct the document as a prior year document. 
On the confirmation window, select
Yes
to mark the page as a prior year document.
note
Once deleted, data can't be restored.
Prior Year Information in SPbinder
In SPbinder, documents marked as a prior year document will appear in
INDEX TREE > Prior Year Information
.
Related Content
-
Review Wizard overview
Format: Article

