
Navigating the Index Tree
INDEX TREE
allows you to organize tax documents by placing them into their designated categories. For example, organizing a 'W-2' tax document in the 'Income' folder. SPbinder helps you clean up your workspace by automatically indexing/placing certain documents into their respective folders in the
INDEX TREE
tab. Depending on the document type, some tax documents may be auto-indexed to their respective categories. While some documents may require you to index them manually into the INDEX TREE
.- Standard (tax) documents scanned through OCR will automatically be associated into theINDEX TREEtab, unless the document is unrecognized or unmatched.
- Non-standard documents (documents not recognized by the OCR) will be processed through SurePrep's AI/ML technology. If a match is found, the non-standard document will be auto-indexed/placed into theINDEX TREE- saving you time from manually placing the documents to their categories folder (i,e, Indexing). If a match is not found, the document will be left as 'Not Indexed' and will need to be indexed by you.
Overview
The index tree created in the binder template will be reflected in the
INDEX TREE
tab.INDEX TREE
allows you to add, edit, delete, create, and manage the indexes.You can select the  icon next to the Client ID folder to expand the binder's index tree.
Collapse
icon next to the Client ID folder to expand the binder's index tree.
Select the Client ID checkbox to select the entire index tree under that folder. This includes folders, subfolders, workpapers, etc.

Page numbers are indicated next to the source documents' names in the
INDEX TREE
tab. The numbers are presented in the following format:"|Pg.
Index number
(Original page number in the source document
)"For example, in the page number "|Pg. 2(31)" next to a workpaper in the index tree, '2' stands for the index page number and '31' for the original page number or the page number in scanned order.

To hide original page numbers, select the  icon on the SPbinder toolbar, or go to
Hide/Unhide Original Page Numbers
icon on the SPbinder toolbar, or go to View > Hide Original Page Numbers
to turn on/off the original page numbers.
Searching the Index Tree
The search box in Index Tree allows you to search folder name, workpaper name (single, multi-page, and rolled forwarded workpapers), workpaper shortcut name, and proforma placeholder.

Type your search text in the search field. As you type, the results matching the criteria will be displayed.

Index Tree Icons
Index Tree
icons can be found along the top of the Index/Review Tree
panel.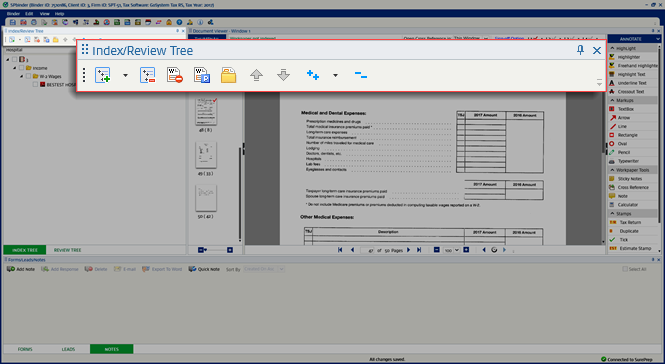
Icon/List | Name | Description |
|---|---|---|
 | Add Index | Adds indexes to the Index Tree . Its dropdown has 2 further sub-options: Add Index Section and Edit Index Section . |
 | Disassociate Workpaper/Delete Index | Deletes the selected index and disassociate the workpapers from it. The disassociated workpapers will appear in the thumbnail section. |
 | Delete Workpaper | Deletes the selected workpapers from the Index tree and sends them to the Restore pages section of the binder. Note that the pages can then be restored back into the binder if you select on the Restore Pages button on the SPbinder toolbar. |
 | Manage Predefined Workpaper | Add/edits/deletes predefined workpapers. |
 | Show Active Folders | Shows workpapers in the Index tree that have data in them. To go back to the default view (All workpapers), select on the same button again. |
 | Move Workpaper Up | Moves the selected page up in the Index tree . |
 | Move Workpaper Down | Moves the selected page down in the Index tree . |
 | Expand Folders | Expands the Index tree to show the contents of all folders and subfolders. This dropdown has 2 further sub-options to Expand Folders / Expand Workpapers and Folders . |
 | Collapse All | Collapses the Index tree to only show the main folders. |
Related Content
-
SurePrep PDF Barcodes
Format: Article

