
Xcentric installation instructions
Xcentric contact info:
Phone# (678)297-0066
Please contact your Xcentric representative and ask them to install SPbinder on your environment using the following link:
Note: If the Xcentric representative has any questions they should then they should add SurePrep Support into the installation process.
Installation steps for Xcentric
These steps need to be followed by Xcentric:
- Log in to the server.
- Put the server in install mode (Start>Run>cmd.exethenchange user /install).
- Download the .exe file at https://production.sureprep.com/PBFXInstaller/SPbinder.exe
- SelectSave aswhen prompted to download.
- Save the .exe file to your desired location.
- Run the file as an Admin once the .exe file has been fully downloaded.
- Select desired drive paths for program and download folders:For Xcentric, the installation path will be changed to:SPbinder path: T:\Program Files (x86)\SurePrepLLC\PBFX\SurePrepApps path: T:\SurePrepLocalFiles\Note: T:\represents the drive where SPbinder will be installed. You may have a different path location.
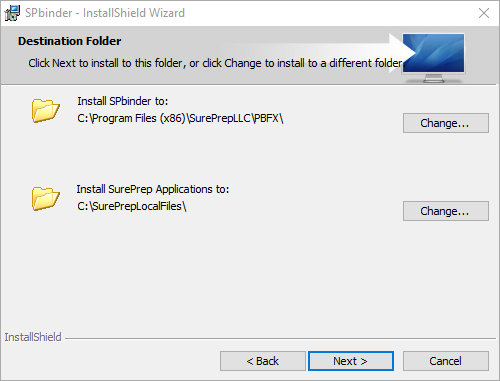
- SurePrep recommends the “Everyone” group should have full permissions to these two paths. However, “Users, Staff, or authenticated users” group are also acceptable with modified permissions.
- Login to the SurePrep file room at https://production.sureprep.com/Home/Login
- Create a new binder or open an existing binder.
- Several updates may begin.
- When the submission wizard or the binder opens, the install has been done successfully.
note
If you are on a Shared Environment, we recommend changing your update settings to use a particular version of SPbinder as opposed to "
Automatic Updates
" to avoid interruptions when multiple users try accessing SPbinder at once. For such environments, we recommend the appropriate administrator manually change the selected version and perform an action such as opening a binder to apply updates during off-hours.Related Content
-
Shared environment
Format: Article

