
Assigning Locator to SurePrep (For Outsource Only)
note
This article is only applicable for Outsource clients using GoSystem Tax RS.
For Outsource services, follow these steps to assign the locator to SurePrep:
- Login into GoSystem Tax RS.
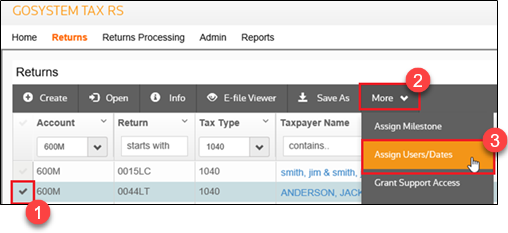
- Select the checkbox next to the locator that you want to assign to SurePrep, selectMore, then selectAssign Users/Dates.
- Select theGroupstab then select the dropdown picklist icon onLocation. Select the location added on theAdminthenTax File Activationwindow during setup (GS Group Locationcolumn).

- Once you select the location, the available groups will be loaded under that location. Select the group under which preparers created for SurePrep are assigned then select theAddbutton.

- After the group is added to the locator, it will appear under theAssigned Groupcolumn. Select theSave Changesbutton to update.

- A confirmation message will appear once the changes are saved. The locator should now be assigned to SurePrep.

Related Content
-
Integrating GoSystem accounts with SurePrep (For Outsource Only)
Format: Article

