
Create TaxCaddy clients from UltraTax CS
You can create TaxCaddy clients directly from UltraTax CS (Local and Virtual Office/SaaS). Creating TaxCaddy clients directly from UltraTax helps save you time by eliminating multiple steps and automating your workflow. Initially, you'll need to complete a one-time integration setup with SurePrep API.

Once you've created a user, you can go to TaxCaddy
CLIENT MANAGEMENT
and send them an invite to join TaxCaddy. TaxCaddy clients will be added to the 1st Office Location
option available on the list. If you want to assign the clients to a different office location, go to TaxCaddy CLIENT MANAGEMENT
and reassign them.Before you start
Your firm you'll need first complete a 1 time integration setup to enable UltraTax integration with SurePrep API.
Creating TaxCaddy clients from the current year
Follow these steps to create TaxCaddy clients for an existing client in the current tax year:
- After completing your UltraTax integration setup with SurePrep API, open UltraTax CS.
- SelectUtilities, thenSurePrep,Integration.
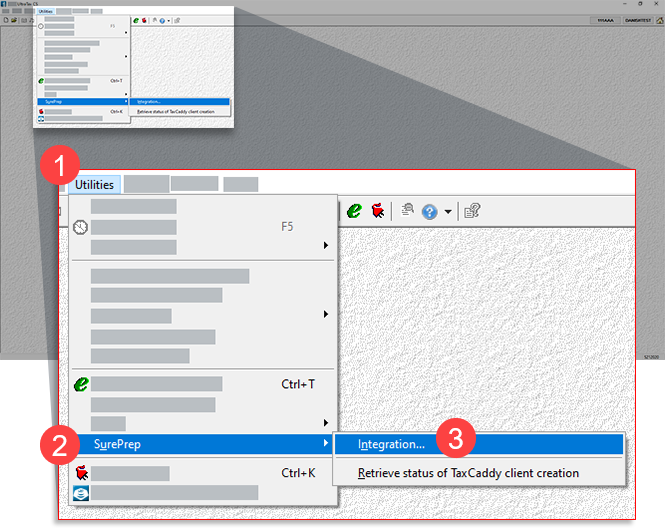
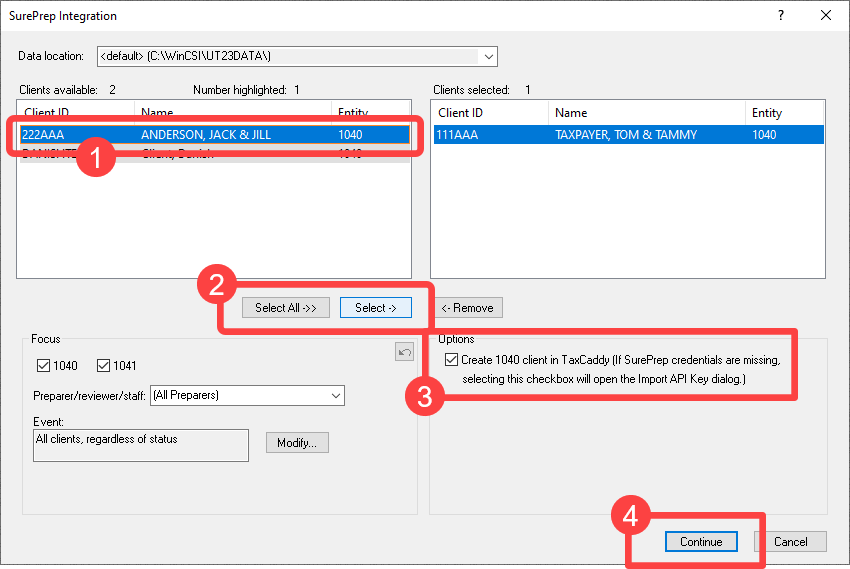
- On theSurePrep Integrationwindow, select the clients on the panel, then selectSelectto select the clients. You can also selectSelect Allto bulk select all available clients.
- Select the checkbox forCreate 1040 client in TaxCaddy. Next, selectContinueto begin creatingSurePrep Integrationtax files.
- After your client is added to TaxCaddy, go to TaxCaddy, thenAdministrative, thenCLIENT MANAGEMENT. Then send your clients an invite to join TaxCaddy.
Create TaxCaddy clients from the prior year
In UltraTax CS, clients that were added in the previous tax year can be rolled over to the current year (that is, Proforma). While you're rolling over clients to the current year, you have the option to also create TaxCaddy clients at the same time.
Follow these steps to create TaxCaddy clients for a client in the prior year:
- After completing your UltraTax integration setup with SurePrep API, open UltraTax CS.
- In UltraTax CS, selectUtilities, thenProforma.

- On theProformawindow, select the clients, then selectSelectto select the clients. You can also selectSelect Allto bulk select all available clients.
- Select the checkbox forCreate 1040 client in TaxCaddy. Next, selectContinueto begin creatingSurePrep Integrationtax files.

- After your client is added to TaxCaddy, selectAdministrative, thenCLIENT MANAGEMENT, then send your client an invite to join TaxCaddy.
Requirements
You you'll need have the following requirements to create a client in TaxCaddy:
Requirement | Description |
|---|---|
X | SurePrep Integration you'll need be complete and the Test Connection status should pass as Connected . |
X | Client's email address and Tax Client ID should not exist in TaxCaddy. |
X | Available from UltraTax CS 2023 onwards. |
*
Please note: TaxCaddy API
you'll need be enabled separately by calling SurePrep Support.Troubleshooting
Check the following If you are experiencing issues adding clients:
- Test Connection Status
- Check the client's email address
- Check if the tax client already exists. Client won’t be added if a client with the same Tax Client ID already exists in TaxCaddy
- Check Client Status
- Individually check the client status log
- Print Client Listing Reports
- Filter Client list
Test Connection Status
To test if the SurePrep API integration is working properly, select .
Select
Enable SurePrep Integration
, then Import API Key
, then Test Connection
.If the status appears
Connected
, skip this step.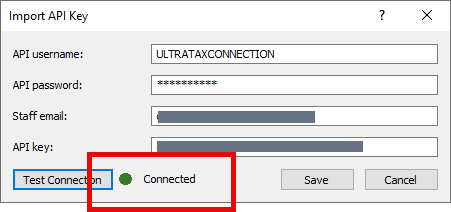
If the status fails, then you will need to fix your API credentials; check if all the fields are entered correctly.

Check the client's email address.
Check the taxpayer's email address:
- Make sure the client has an email address added to their account.
- To avoid creating duplicate clients, you won’t be able to create a TaxCaddy client if the email address already exists inCLIENT MANAGEMENT.
Open the client's return and select the
Contact
tab and then select Taxpayer email address
.
To review and update email addresses in bulk, go to
Setup
> Client Communication
. Update the Email Address
column as needed.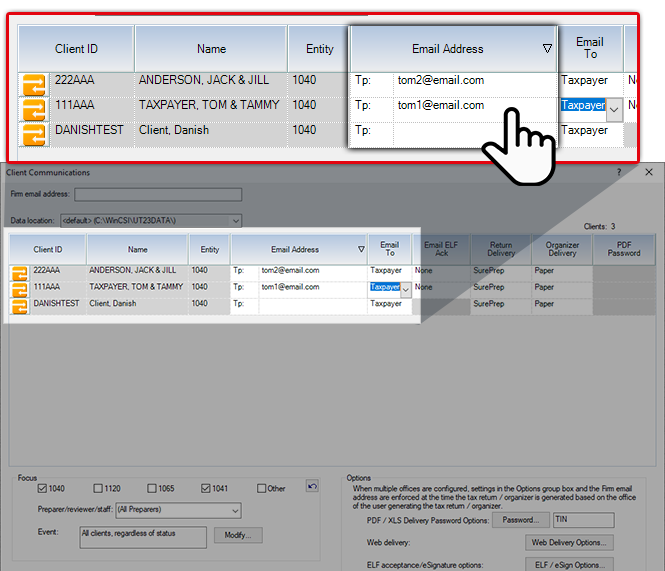
Check Client Status.
You can also check a client's status log to see if the client was added successfully.
Select
Utilities
, then SurePrep
, then Retrieve status of TaxCaddy client creation
.
Individually check client status log
Select the  icon, go to the date you attempted to create the client, then check the status. If the client creation failed, you will see the
Client Status
icon, go to the date you attempted to create the client, then check the status. If the client creation failed, you will see the Failed to create in TaxCaddy
status. 
Error message | Description |
|---|---|
Taxpayer's email address is invalid. Check the email address format. | The email address entered in UltraTax may have been incorrectly entered. Check the email address in UltraTax CS and make sure the client doesn't already exist in TaxCaddy. |
A standard client already exists with this Tax Client ID. | You can't add the same client twice in TaxCaddy. Check TaxCaddy to make sure if the client already exists. |
Print Client Listing Reports
- SelectUtilities, thenSurePrep, thenRetrieve status of TaxCaddy client creation.
- SelectUtilities, thenClient Listing Reports.
- PrintStatus SummaryorClient Status History.
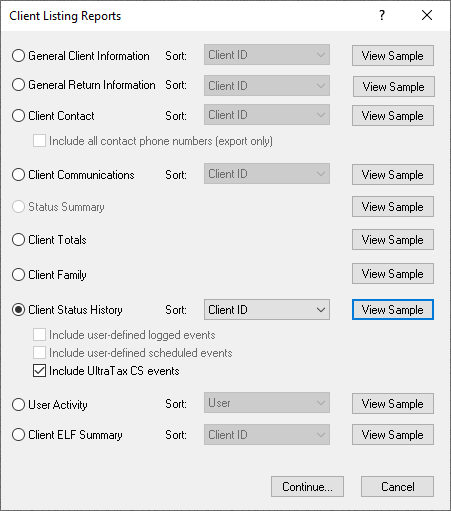
Filter Open Client list
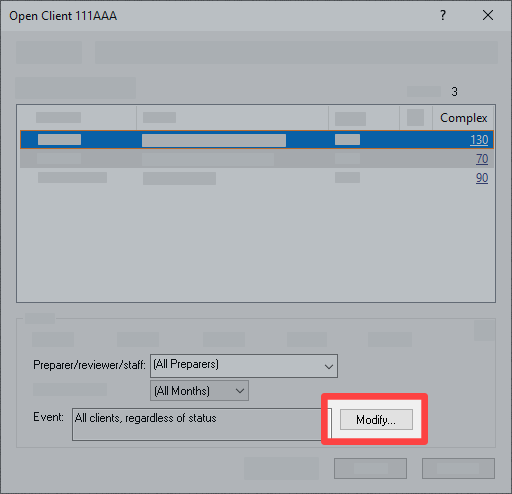
If you want to filter the client list and only view clients that failed to create TaxCaddy clients, select
File
, then Open Client
, then Modify
.
On the Modify Event Focus window, select
Logged
, then Import Export Events
on the event dropdown.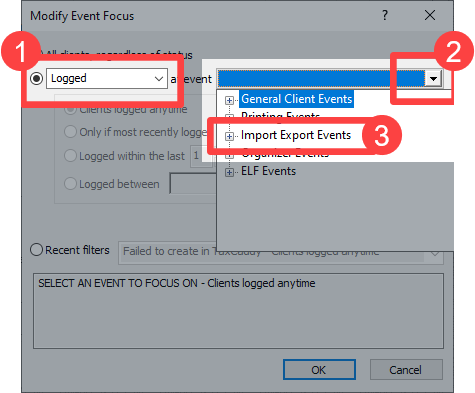
Select the filter you want to apply, then select
OK
.[Video] demo
First, your firm will need to complete a one-time integration setup to enable UltraTax integration with SurePrep API.
In the following video demo, we’ll show you 2 methods of creating clients in TaxCaddy from UltraTax. You can either create TaxCaddy clients from a list of clients in the current year or create TaxCaddy clients when rolling over clients from the prior year (that is, Proforma).

