Creating a binder is a starting point from where you can submit your client's tax documents and have them processed through OCR, get verified, and go into SPbinder for preparation. You can create a binder for your client by providing basic information about the type of binder you want to create. At this stage, you can set which firm user should be the Owner, the office location, binder access permissions, and binder tax year.
When you create a binder in FileRoom, SurePrep gets your client's information from the tax application and creates a binder specifically catered for that taxpayer client. The information fetched from your client's tax application file is used to create placeholders called “proforma” (for example, W-2 proforma placeholder for “ABCD, Inc.”). In SPBinder, you can organize documents to their respective (proforma) categories and export the data to the correct entities in the tax application.
You will need to upload the client's most recent tax application file details. Before creating a binder, make sure the client is created or proforma (roll forwarded) to the current tax year.
You can upload binders as in-house or outsource services based on the tax application configured by your firm.
note
If you are using
1040SCANverify Onshore
&
1040SCANverify Offshore
services then follow the instructions listed under the following
In-house
section.
In-house binders
Before you begin
Before you begin, complete a one-time setup between SurePrep and UltraTax CS (Virtual Office or SaaS). The integration lets SurePrep connect with UltraTax CS. You can check your integration status at
Setup
System Configuration
SurePrep & SafeSend Integrations
.
Creating UltraTax VO binders
Open UltraTax CS.
If you are starting a new tax year and rolling forward clients from the previous tax year to the current tax year:
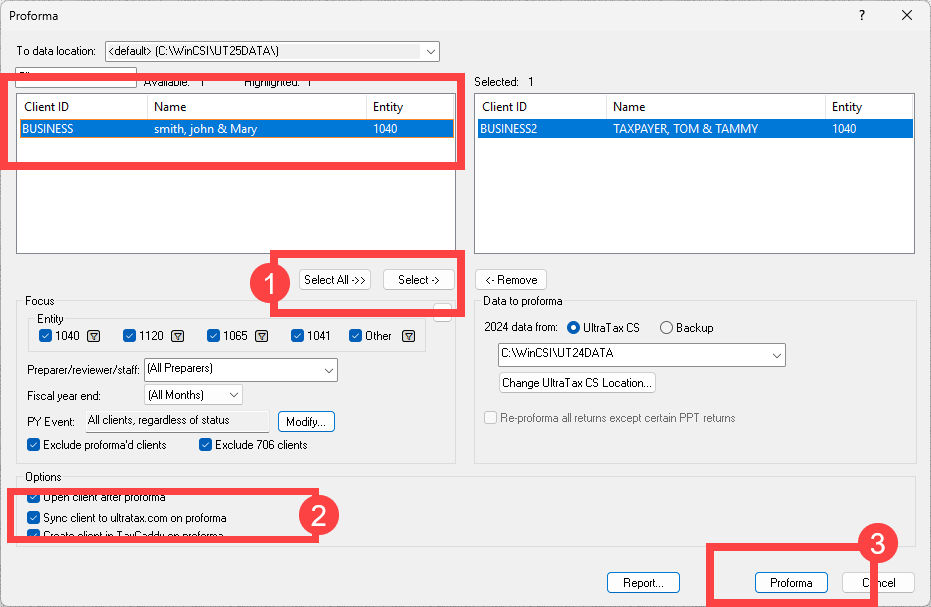
Select
Utilities
Proforma
.
Next, sync the clients to ultratax.com – you can either sync clients on the
Proforma
window (as in rolling forward previous year clients to the current tax year) or from the Utilities menu
Proforma
window (recommended): Select the clients you want to roll forward to the current year, select the checkbox for
Sync client to ultratax.com on proforma
, then select
Proforma
.
Sync clients
window: If you already used the
Proforma
feature without selecting the sync clients checkbox, then you can either redo the Proforma and start over, or go to
Utilities
Sync Clients to ultratax.com
to sync clients.
note
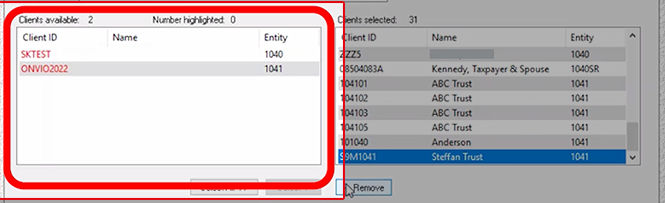
Clients in Red
- Clients that are missing the required information will be highlighted in red (for example, Name, and SSN). To create tax files for these clients, open the client’s tax return and update any missing information.
Clients not appearing
- Clients that are currently locked in UltraTax CS won’t appear in the window. To unlock your client go to
are not In-house services, the same instructions can apply as other In-house services.
PBFX will download automatically. Open the PBFX.
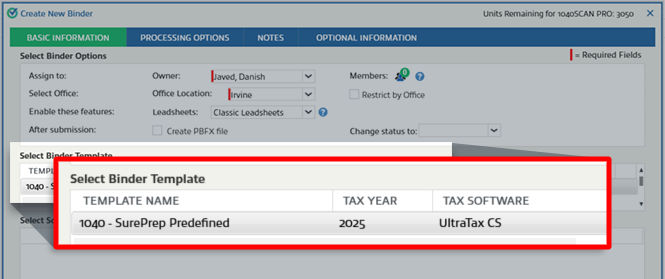
The
Create New Binder
window will appear. Under
Select Binder Template
, select the template with the tax year and
UltraTax CS
as the tax application.
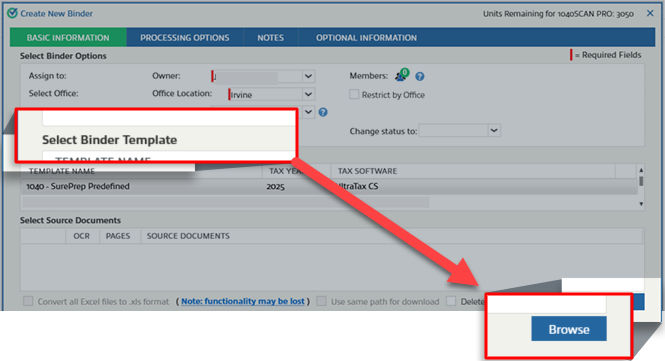
Under
Select Source Documents
, select
Browse
.
Select your source documents, then select
Open
to attach the source documents.
tip
If the name of the 1st source document's filename matches the
Client ID
in UltraTax, the
Create New Binder
window will automatically autofill the
Client ID
and fetch your client information from the tax application.
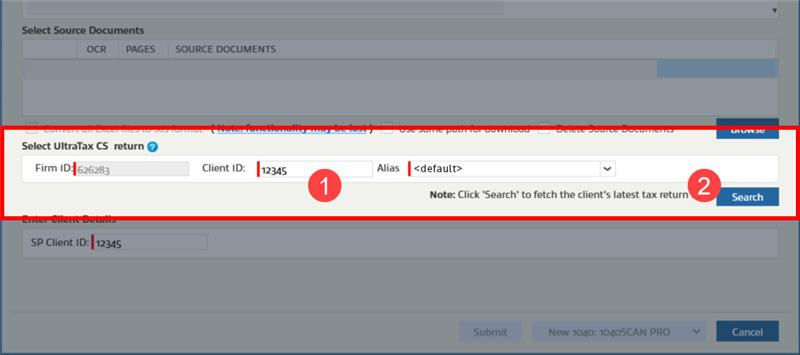
Enter the
Client ID
to search for the client in UltraTax, then select
Search
. The
Alias
field will auto-populate if the taxpayer is found.
note
Starting with Tax Year 2025 and later, the UltraTax CS binder creation no longer shows identifying fields (like First Name, Last Name, SSN, and Filing Status) when creating a 1040 and 1041 binders. Instead, you enter the Tax Client ID, and SurePrep automatically pulls the taxpayer details from UltraTax CS as part of the updated API integration.
If the name of the 1st source document matches the Tax Client ID in UltraTax, the
Create New Binder
window will automatically autofill the Client ID and fetch your client information from the tax application.
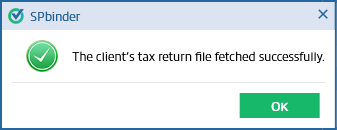
You will see a confirmation window if the client is fetched successfully.
If the client couldn’t be found then you will see the following notification message Client's tax return file not found. Confirm if the file exists for the selected tax year and Alias path.
The client's tax return file couldn’t be found due to the following reasons:
The Tax Client ID used to search the client was incorrect. The 1st source document name didn't match a Tax Client ID.
Solution
: Manually enter the
Client ID
then select
Search
.
The client was not synced to ultratax.com through
Proforma
window or through the
Utilities
Sync Clients to ultratax.com
. Solution: See the previous steps and sync the client's tax return file to ultratax.com in UltraTax CS.
Outsource binders
Open
UltraTax CS
.
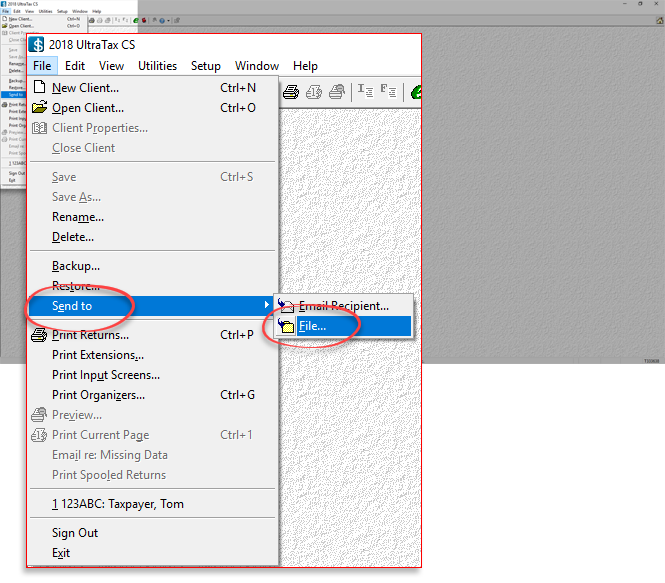
Select
File
, point to
Send to
, then select
File
.
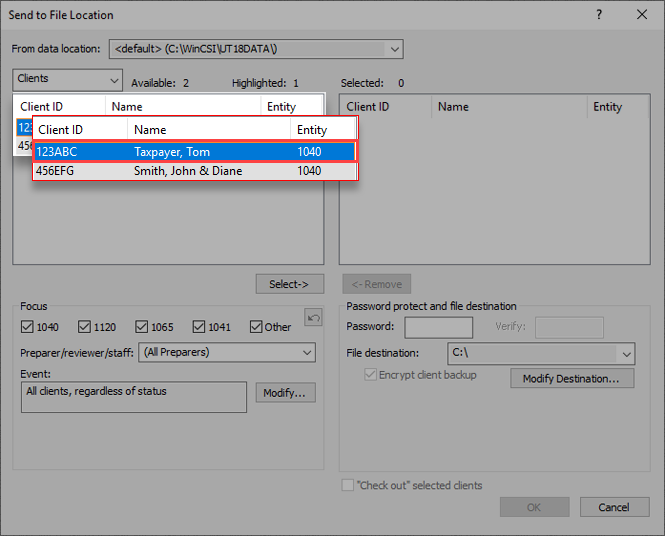
On the
Send to File Location
window, under
Clients,
select to select the client you want to submit to SurePrep.
Select
Select
.
The client will now appear under
Selected
.
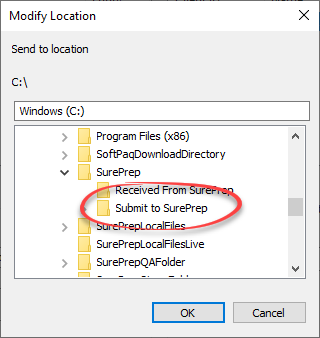
Select
Modify Destination...
to change where the file is saved.
Select the
Submit To SurePrep
folder, then select
OK
.
View details on setting up folder structure for UltraTax CS.
Once the
File destination
is set, select
OK
.
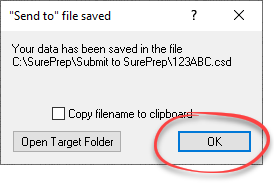
On the
"Send to" file saved
window, select
OK
.
The client's CSD file will now be saved in the
Submit To SurePrep
folder and is ready to be uploaded.
In
FileRoom
, point to the
Create New Binder
caret icon
Point to
1040
.
Select from the following services:
Outsource Onshore
Outsource Offshore
PBFX will download automatically. Open the PBFX.
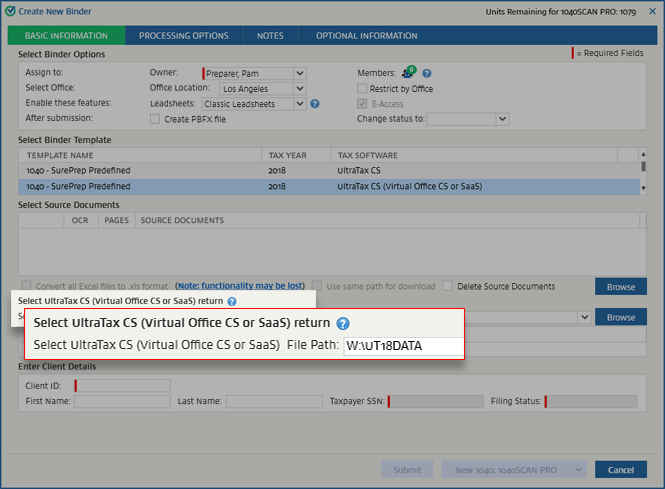
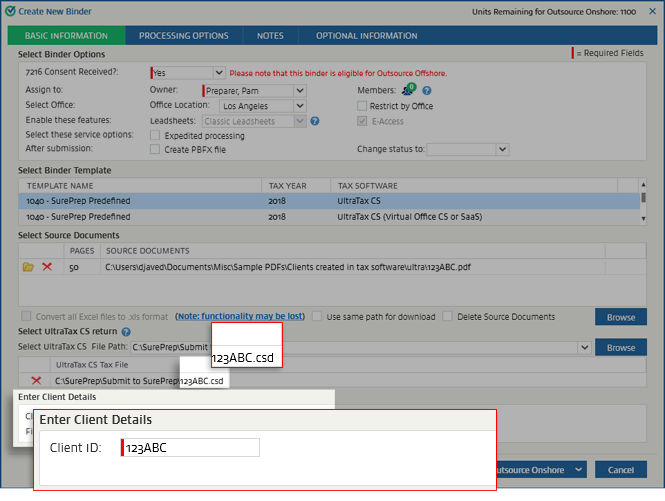
The
Create New Binder
wizard will open. Under
Select Binder Template
, select the template with the tax year and
UltraTax CS (Virtual Office or SaaS)
as the tax application.
Under
Select UltraTax CS (Virtual Office CS or SaaS) return
, the folder path set in
Tax File Activation
, then
UltraTax CS
will be displayed by default in
Select UltraTax CS File Path
. View Tax File Activation for UltraTax CS To automatically match the client tax file, select the same path (that is, Submit to SurePrep) where you saved the client's CSD file earlier.
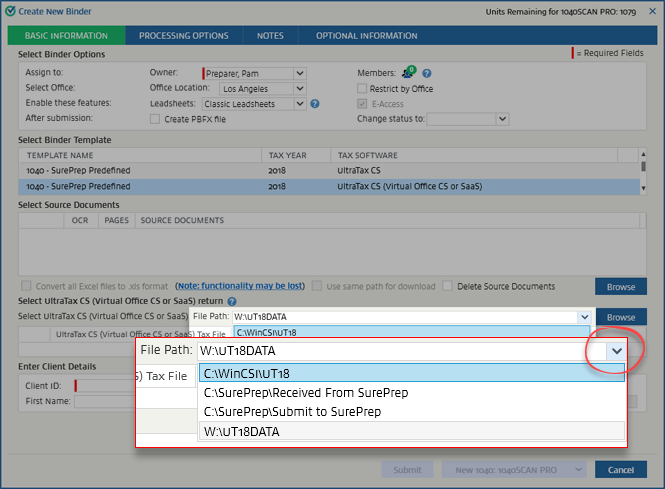
If more than 1 folder exists, choose the folder in
Select UltraTax File Path
.
note
The path that was last selected will be remembered, and you won’t be required to reselect it.
Under
Select Source Documents
, select
Browse
.
Select your source documents, then select
Open
to attach the source documents.
If the name of the 1st source document matches the client ID in UltraTax, the UltraTax CSD file is automatically selected.
If the name of the 1st source document doesn’t match the client ID, select
Browse
.
The folder selected in
Select UltraTax CS File Path
will open. Select the
UltraTax CSD file
in that folder, then select
Open
.
When the CSD file is attached, the client ID will be automatically populated.
If the UltraTax CSD file attached doesn’t belong to the selected tax year, you'll see a message similar to the following:
If the CSD file contains more than 1 client ID, the following message appears: