
Integrate SPbinder with SafeSend Gather AI
Connect Gather AI with SPbinder
Tax professionals often face the challenge of manually transferring documents between collection and preparation systems—downloading files from SafeSend Gather AI, then re-uploading them to SPbinder for processing. This multi-step workflow consumes valuable time and creates unnecessary friction in your document management process.
SPbinder integration with Gather AI allows you to seamlessly send client documents directly from SafeSend Gather AI into SPbinder (as in create a new binder). SafeSend Gather AI is an intelligent document collection platform that helps accounting firms gather tax documents from clients efficiently. With this integration, you can streamline your workflow by creating binders directly from Gather AI without needing to download the documents locally and then create a binder from FileRoom.
Prerequisites
- Have an active SafeSend Gather AI account
- You must have an active SurePrep account with SPbinder access
- Your SurePrep account must be connected to your tax software (GoSystem, UltraTax, and CCH Axcess)
- Users must have appropriate permissions in both SafeSend and SurePrep systems.
- SurePrep permissions to review:
- Binder creation rights- Firm user must be assigned to a group with permissions to be an Owner. Go toUser Managementand ensureCan be an Ownerpermission is selected.
- Binder access rights- Some firms place restrictions based on Office Location, 7216 Consent, and Assigned Members. Firm users must have permissions to access the binders. See the 'Managed Restrictions' article for more details.
note
Decimals or periods in Client IDs are not currently supported.
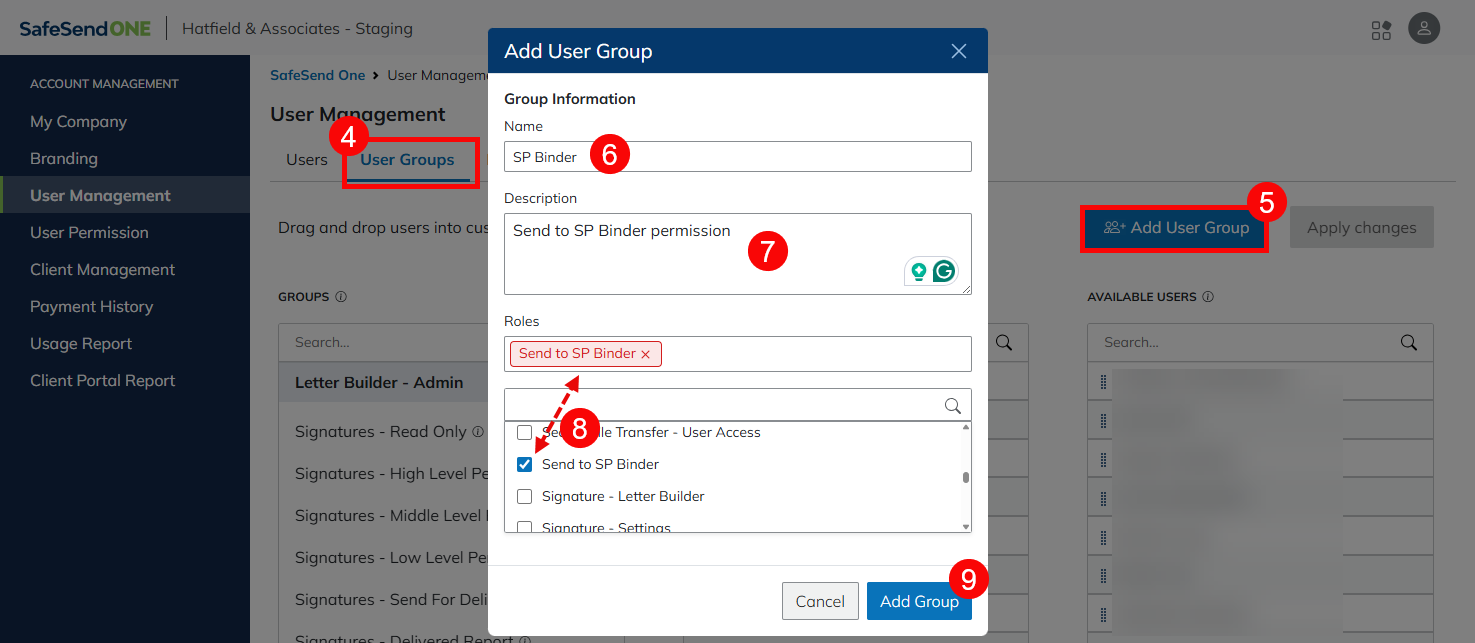
Step 1: Create a custom user group in SafeSend
Create a special user group for SPbinder Integration.
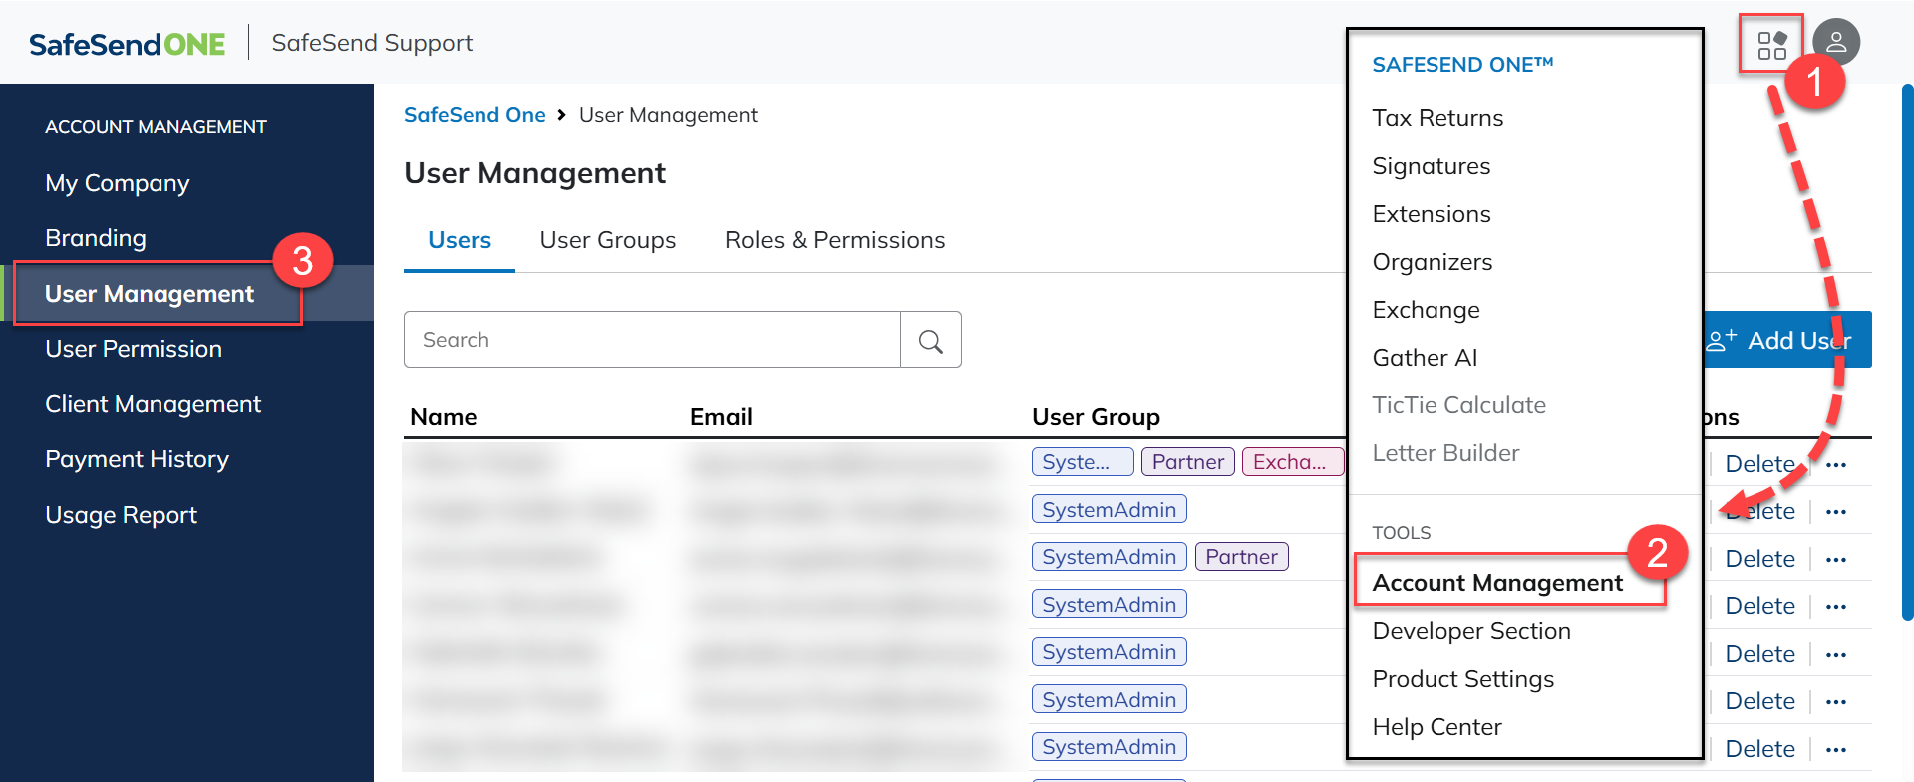
- In SafeSend, click theNavigation Widgetin the upper right.
- SelectAccount Management. A new tab opens.
- SelectUser Management.

- Click theUser Groupstab.
- ClickAdd User Group.
- EnterName.
- Enter aDescription(max character length 100).
- Select theRolesfor the group.
- ApplyonlytheSend to SPbinderrole.
- To assign additional permissions, create a custom group.
- SelectAdd Group.
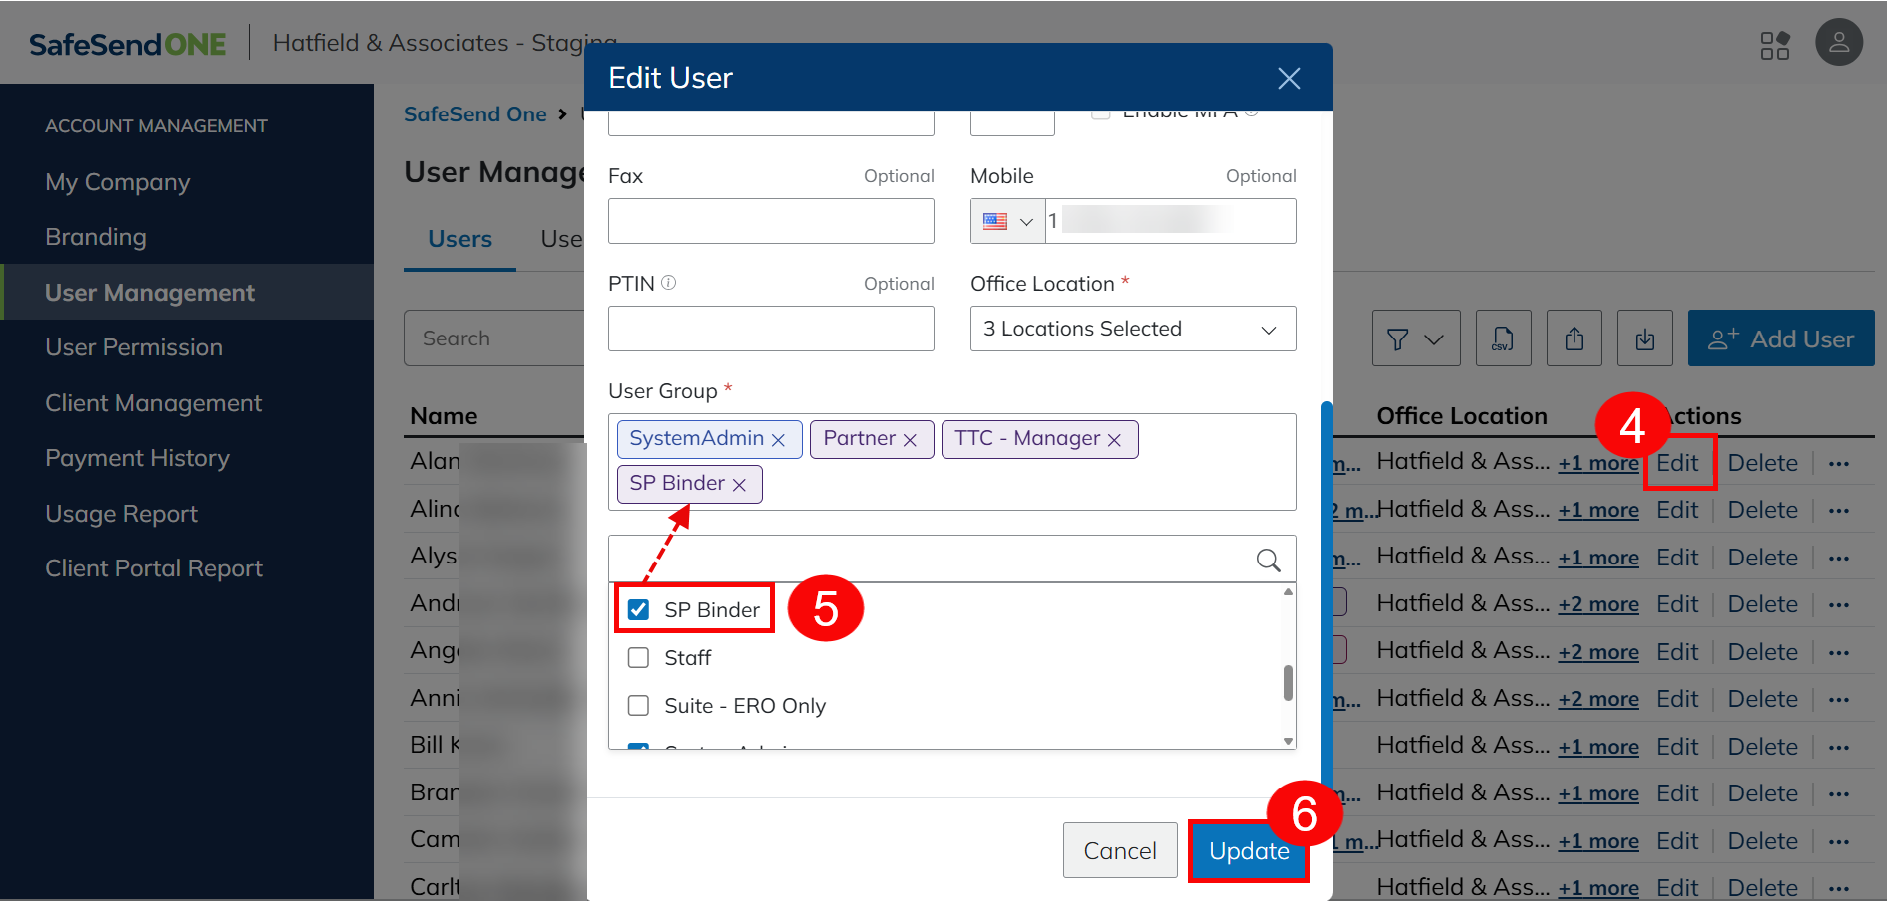
Step 2: Assign users to group
Assign users to the custom user group for SPbinder integration.
- In SafeSend, click theNavigation Widgetin the upper right.
- SelectAccount Management. A new tab opens.
- SelectUser Management.
- SelectEditin theActionsmenu for the user you want to update.
- Search for the custom user group you created earlier for SPbinder integration in theUser Groupssection, then select the checkbox next to the group name.
- Click Update
- SelectUpdateto save any changes made.
Step 3: Connect SurePrep to SafeSend
Integrate your SurePrep account with SafeSend with SurePrep API key.
Get SurePrep's API key:
- Go toFileRoom,Account Admin, theAPItab.
- Select theKey Managementtab.
- SelectCopy Key.
- If theCopy Keybutton is disabled, selectGenerateto generate a new API key, then try again.
- Set API firm defaults. Select the . tab, then select the following firm defaults;
- Account Number(required field)
- office location(optional)
- 7216 Consent(required if 7216 consent is enabled)
Save SurePrep API into SafeSend:
- Select theNavigation Widget.
- SelectProduct Settings,
- SelectIntegration Optionsin the left panel.
- SelectAuthenticatein theSPbindersection.

- PasteSurePrep API Keycopied earlier, then selectConfirm.
Configure SPbinder Default selections:
- Select theGearicon in the SPbinder section.
- Adjust your default binder options (for instance, tax software, service type, binder type, service type).
- SelectUpdateto save any changes.
note
You can adjust these selections on a binder-by-binder basis, if needed
Your SPbinder and SafeSend integration is now complete.
Send to SPbinder
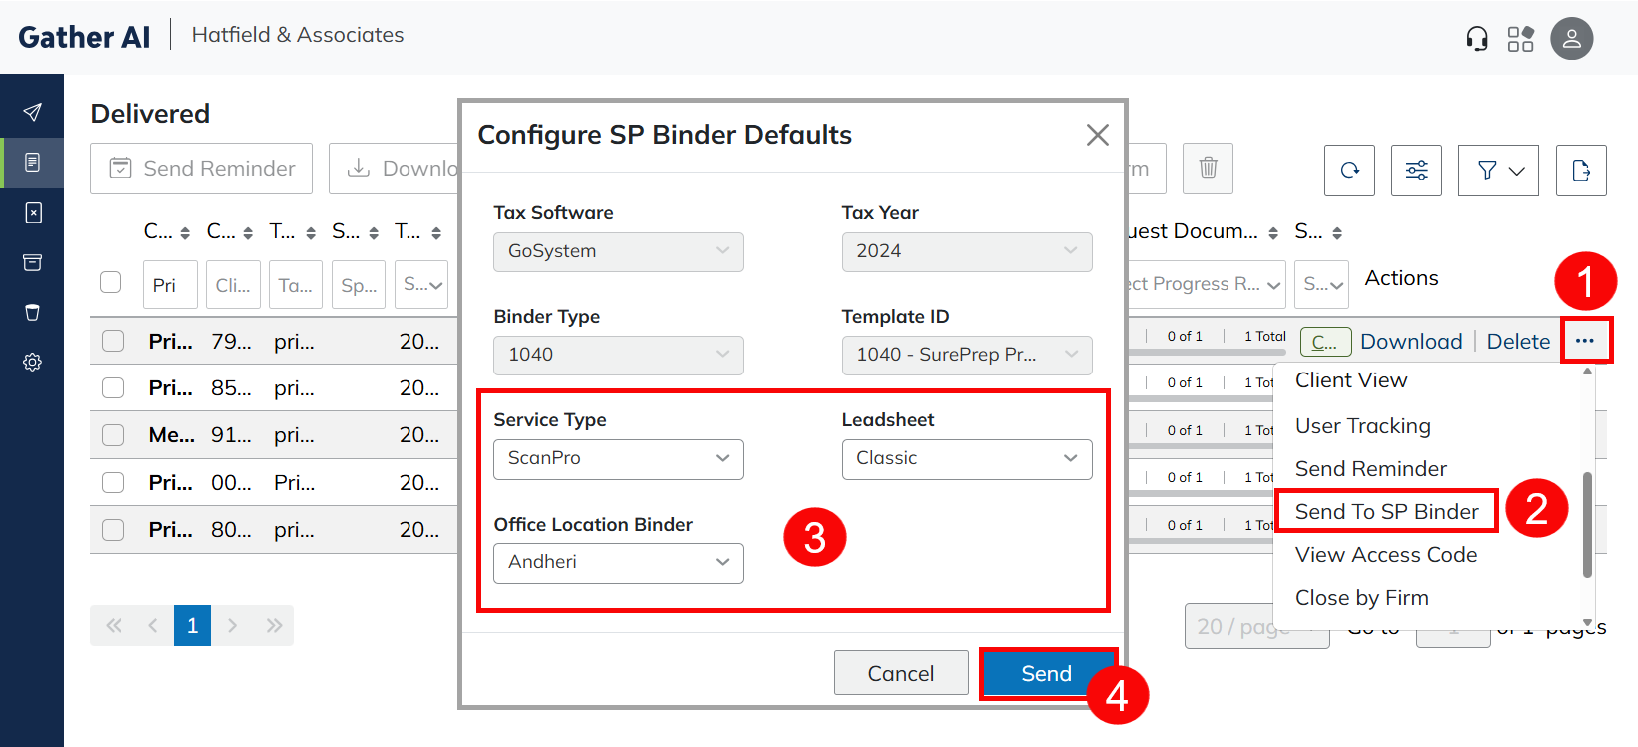
After you complete SPbinder and SafeSend Integration, you can now create and send documents to SPbinder from SafeSend's Gather AI dashboard.
- In Gather AI, locate the client. Select theMore Action Items(ellipsis) icon.
- SelectSend to SPbinder.
- Select theSPbinder Defaultsas needed.
- SelectSend.
Note:
- Ensure all relevant documents have been added before uploading to SPbinder.
- Each Gather request can only be submitted to SPbinder once; resubmission is not currently supported.
- The Client ID for the Gather request must be unique; otherwise, the transfer will fail as a resubmission.
- Each document must be under 78 MB.
- Supported file types include .PDF, .xls, and .xlsx.
- Transfers related to 2022 and 2023 tax year documents may fail. Tax year 2024 and later documents are supported.
- Currently, SafeSend does not support creating binders using theSimplified Leadsheetoption. Users will only be able to create binders with eitherClassicorNo Leadsheetoptions. IfSimplifiedLeadsheets are desired, the binder may be submitted through the SurePrep FileRoom instead.
Troubleshooting issues
If the document upload fails or displays an error, review the troubleshooting steps below.
- Ensure users have the appropriate SafeSend permissions as outlined in the prerequisites.
- Ensure your SurePrep account has enough units of the binder you are trying to submit.
- Check FileRoom to see if there is an error icon. Point to the error icon to gather more information about the error.
- Check to see if the request was already submitted. Each Gather request can only be submitted to SPbinder once. Resubmission is not currently supported.
- Ensure that the Client ID is unique. Submission will fail for duplicate Client ID.
- Tax year 2024 or later. Previous tax years' submission may fail.
- Document must have:
- File size under 78 MB
- Supported file type (.PDF, .XLS, and .XLSX)