
Step 4 - Child Form Association (CFA)
This step enables generic source documents (that is, source documents that can relate to more than 1 input form) to be associated with a parent input form. For instance, a 1099-MISC may relate to a Schedule C, E, or F entity. This step lets you define this relationship for any such document.
note
Associations between source documents and input forms are remembered and rolled forward so they don’t need to be defined every year.
Child Form Association
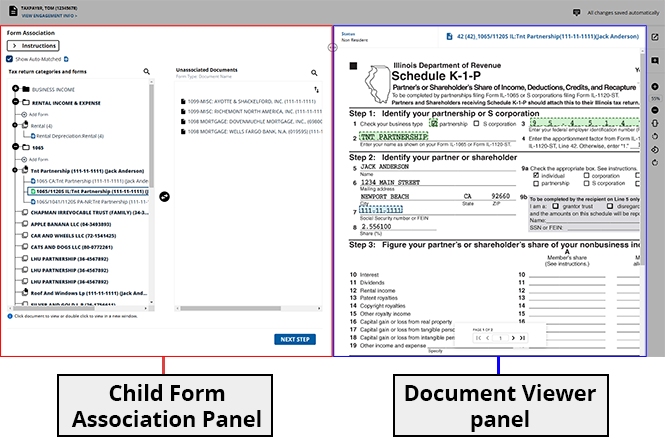
The screen is segmented into 2 parts:
- TheChild Form Associationpanel: This panel will additionally be separated into theTax return categories and formssection listing all possible parent forms, and theUnassociated Documentssection listing all unassociated source documents. You can match unassociated source documents to their parent forms.
- TheDocument Viewer panel: To review the contents of a source document before associating it to a parent form.
A summarized version of the instructions will appear in the
Child Form Association
panel. You can review these instructions, then select the -
/+
icon to collapse or expand these instructions and make space for more pages.
Every child form in the
Unassociated Documents
section will have a corresponding parent form in the Tax return categories and forms
section. Thus, you can associate all the child forms to their respective parent forms.Example: If the form
1099-NEC: FRIDAY
is not related to any of the Schedules (like Business, Rental, and Farm), then you can associate it under its own form (that is, 1099-NEC
) in the left panel.note
Child forms are displayed in the  icon to search for a specific form if you can't find it listed.
Form Type: Document Name
format. You can select the Search
icon to search for a specific form if you can't find it listed.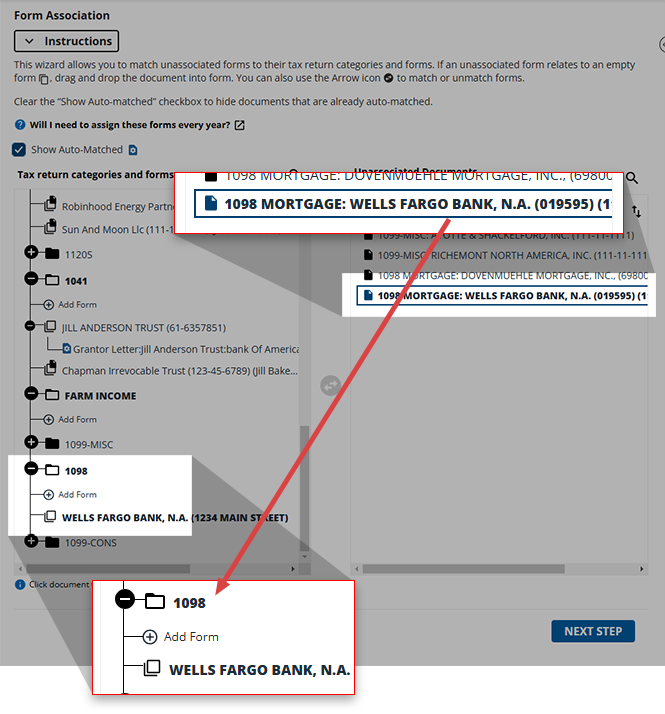
Associating child forms
You can select a child form to see its related parent forms bolded and expanded to the left. All other unrelated parent forms that don’t belong to the selected child form will remain closed.
Example: When you select a 1099-MISC document in the
Unassociated Forms
section, its potential parent forms (BUSINESS INCOME AND EXPENSES
, RENTAL OR ROYALTY INCOME & EXPENSES
) will be bolded in the left panel.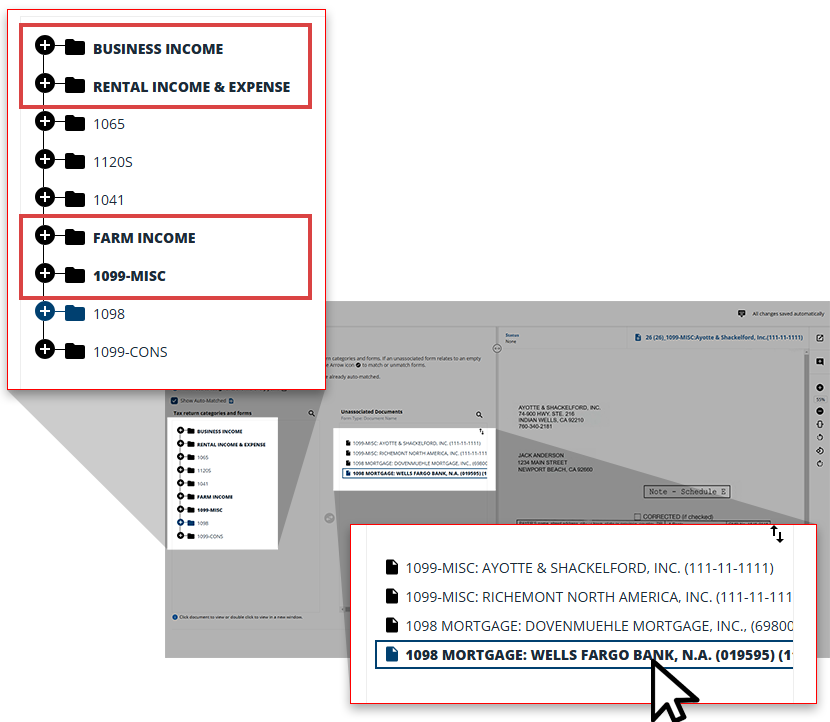
You can select the
Show Auto-Matched
checkbox to expand the Tax return categories and forms
tree.note
This checkbox will be selected by default if all source documents have been automatically matched to the parent forms by the system and no additional documents need to be matched manually in this step (that is, no source documents appear in the
Unassociated Documents
section). You can view which forms are automatically associated with source documents.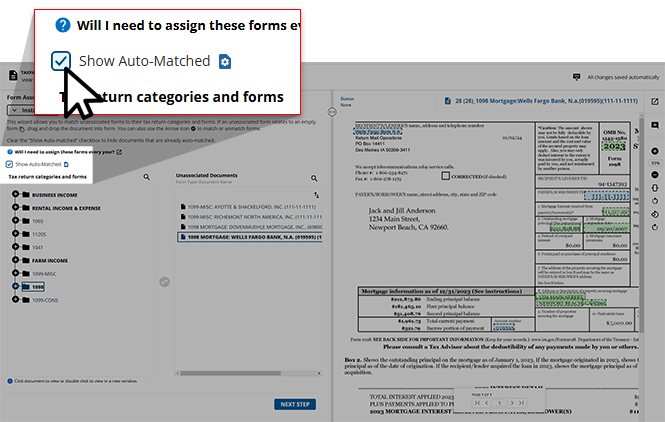
Once both the child form and the parent form are selected and displayed in green, you can select the  icon in the middle to move the child form to its parent.
Arrow
icon in the middle to move the child form to its parent.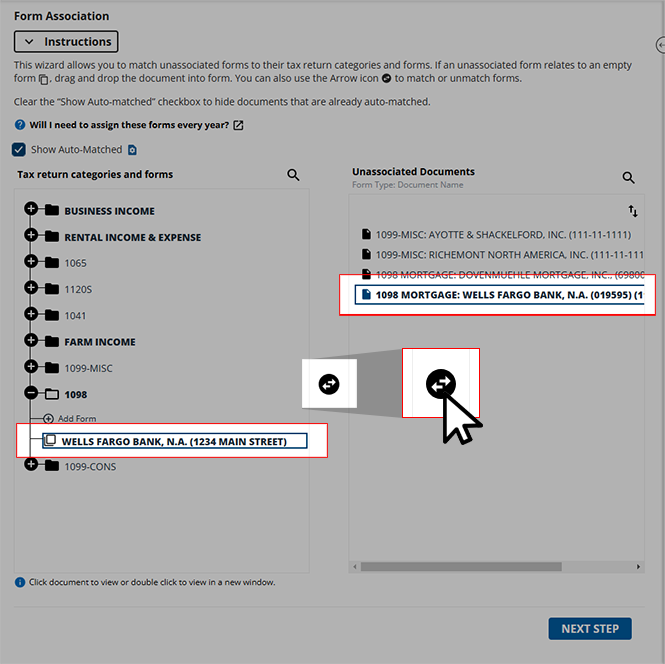
If the parent forms are not available, you can drag and drop the child form into the parent form's category. The Add/Edit Form window will appear for users to add the information for this Parent Form.
Trying to erroneously associate a child form with a parent that has no relation to it will display a warning indicating so. When you see this, you must find a new parent that can properly be associated with the intended document.
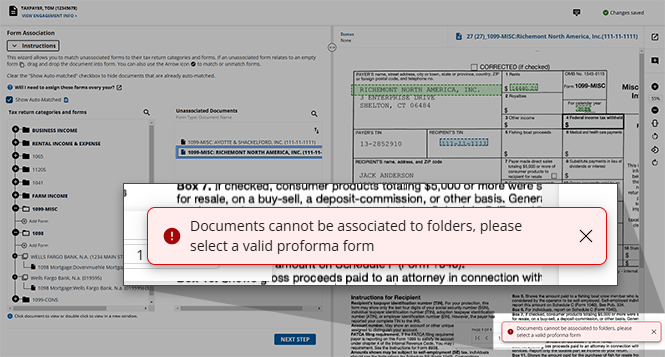
Adding a form
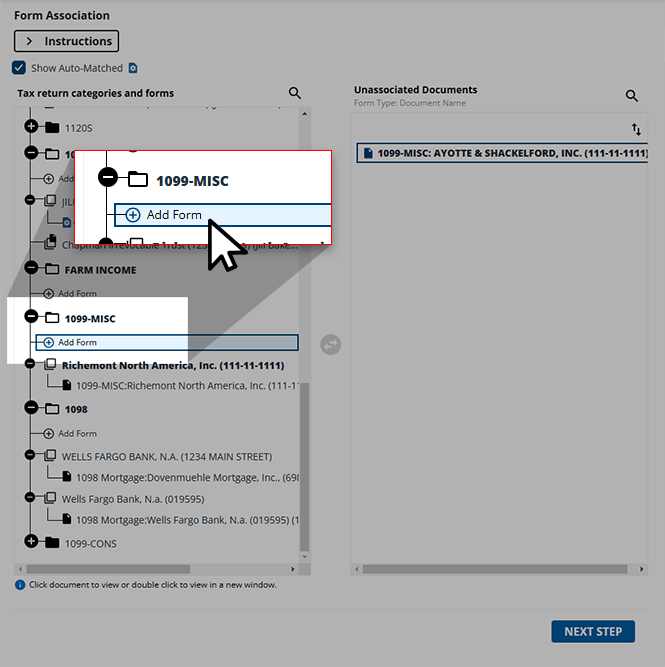
If the form you are searching for is not listed, you can manually add a form to generate the forms correctly in the binder and export the data properly into the tax application. In the
Available Parent Form
section, select Add Form
.
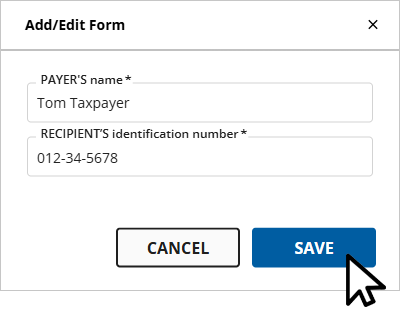
The
Add/Edit Form
window will appear. The mandatory fields will be denoted with *Required
.You can't leave any mandatory field blank.
note
If the 
Activity Number
field appears, you will only be able to enter integer values. Alphabetical and other special characters are not allowed. Similarly, for the Employer Identification
field enter a valid SSN.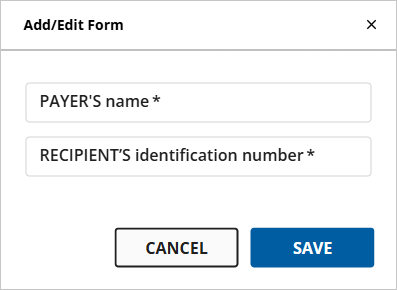
Enter the required records then select
SAVE
.
The form will be added in the
Tax return categories and forms
section.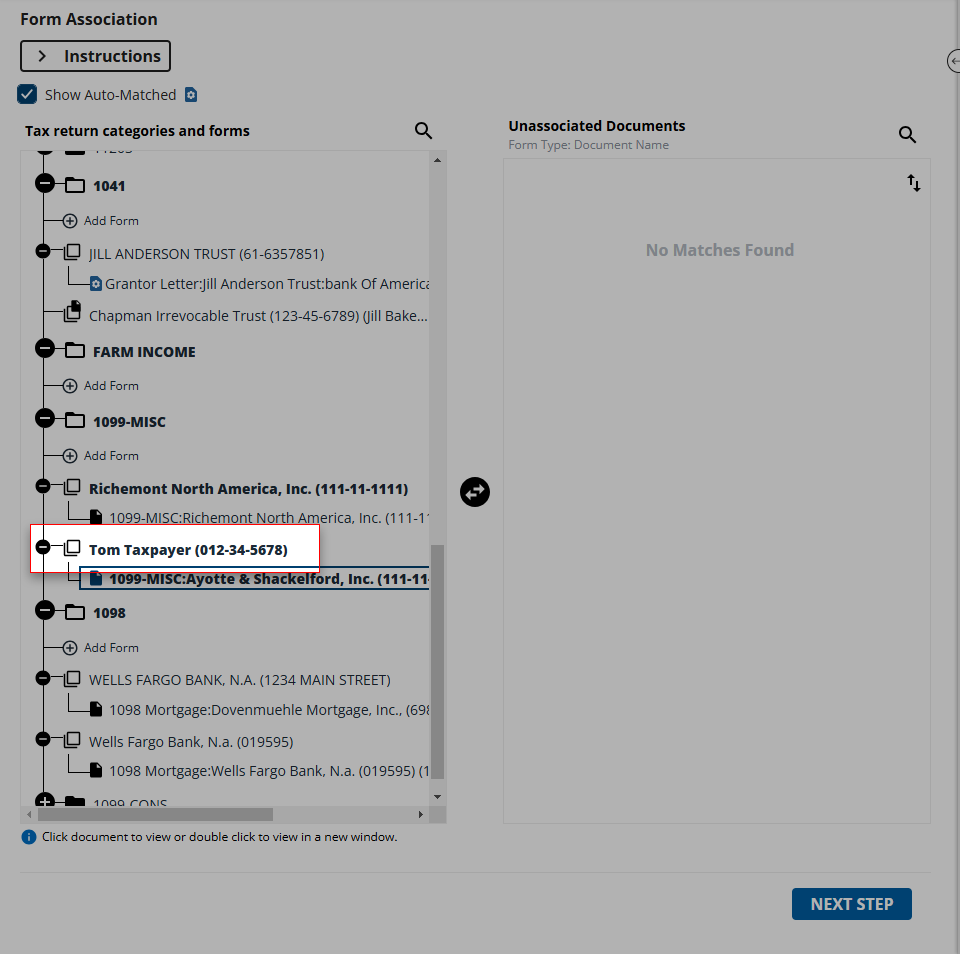
Editing a form
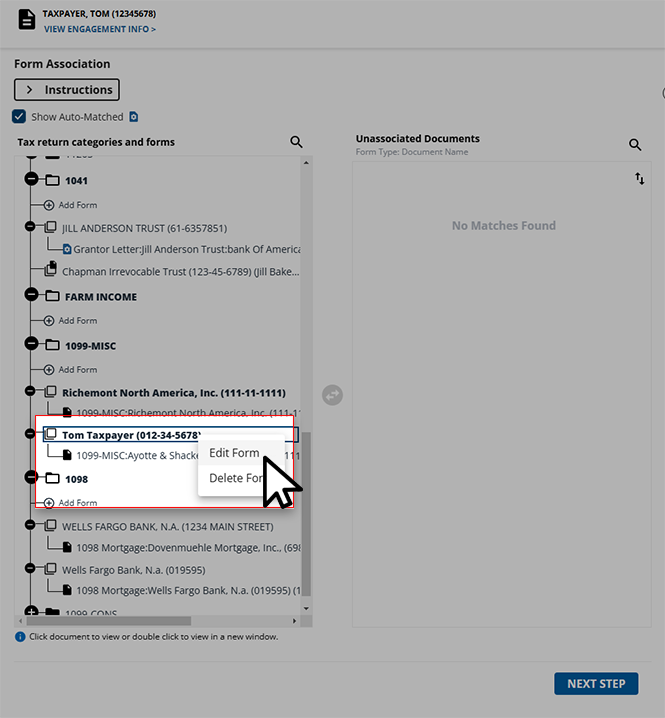
To edit a form, right-click the existing form you would like to edit then select
Edit Form
.
When applicable, the
Add/Edit
window will automatically increment the Activity number
each time it's used. If a form is added for the 1st time, then the activity number will always begin with 1
. If it is added for the 2nd time, then the activity number will increment by 1, making the updated activity number 2. If the activity number is proforma’d, then the activity number will always increment by 1 from the proforma’d activity number.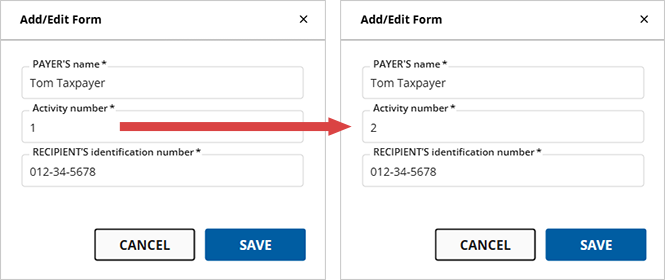
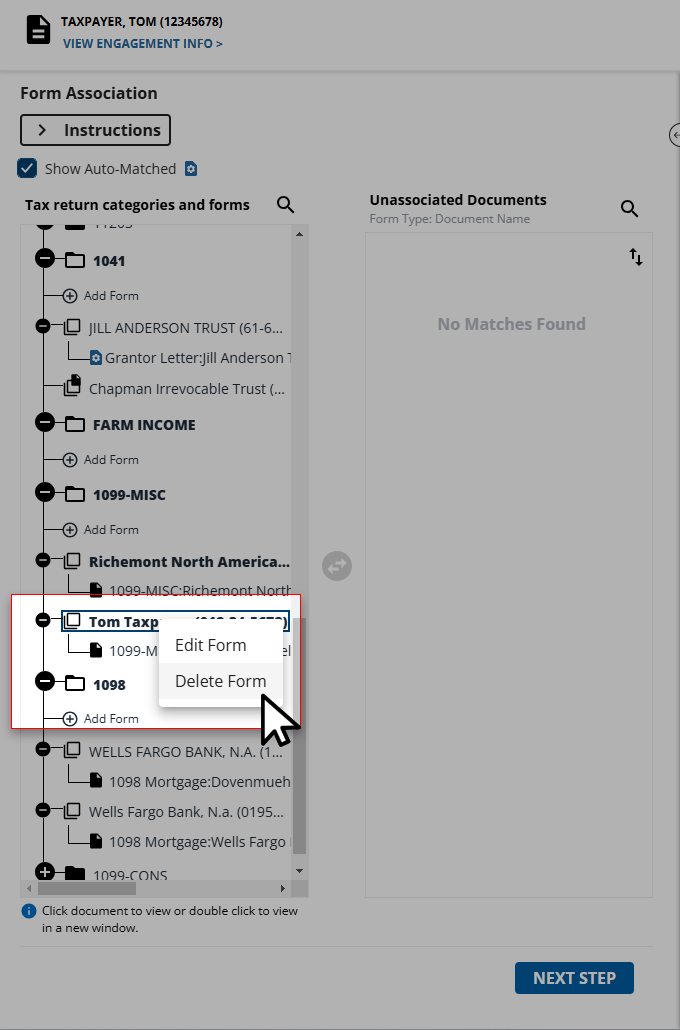
Deleting a form
If you'd like to delete a form from a client's binder, right-click the form you'd like to delete then select
Delete
from the options listed in the menu.note
Proforma forms can't be deleted.
Disassociating child forms
You can remove pages from their automatically associated parent forms. Select the form listed in the
Tax return categories and forms
section that you would like to disassociate.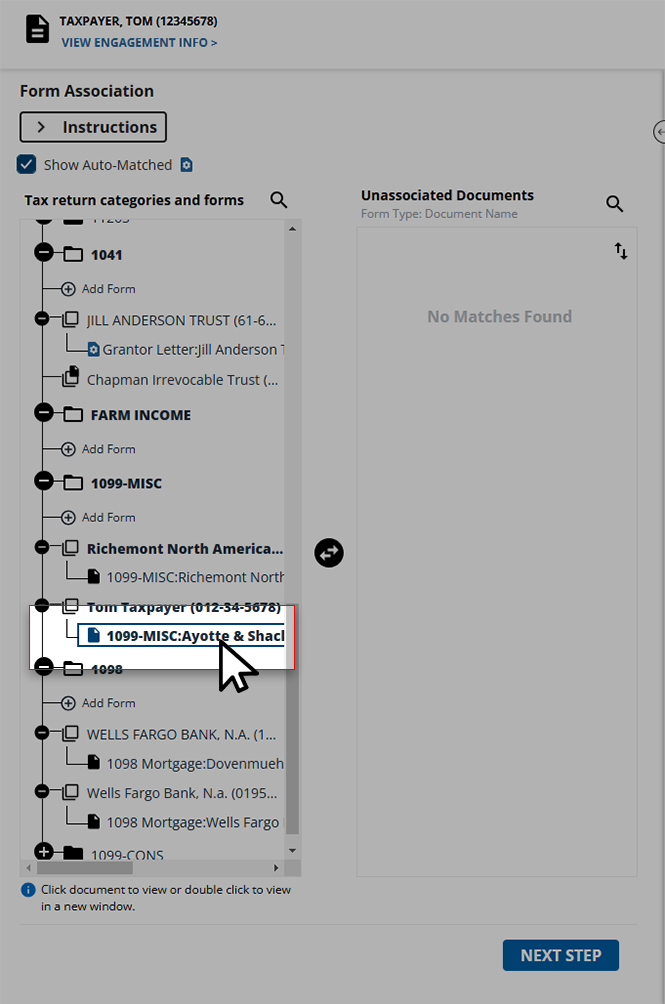
Once selected, select the icon to transfer the page to the
Arrow
icon to transfer the page to the Unassociated Documents
section.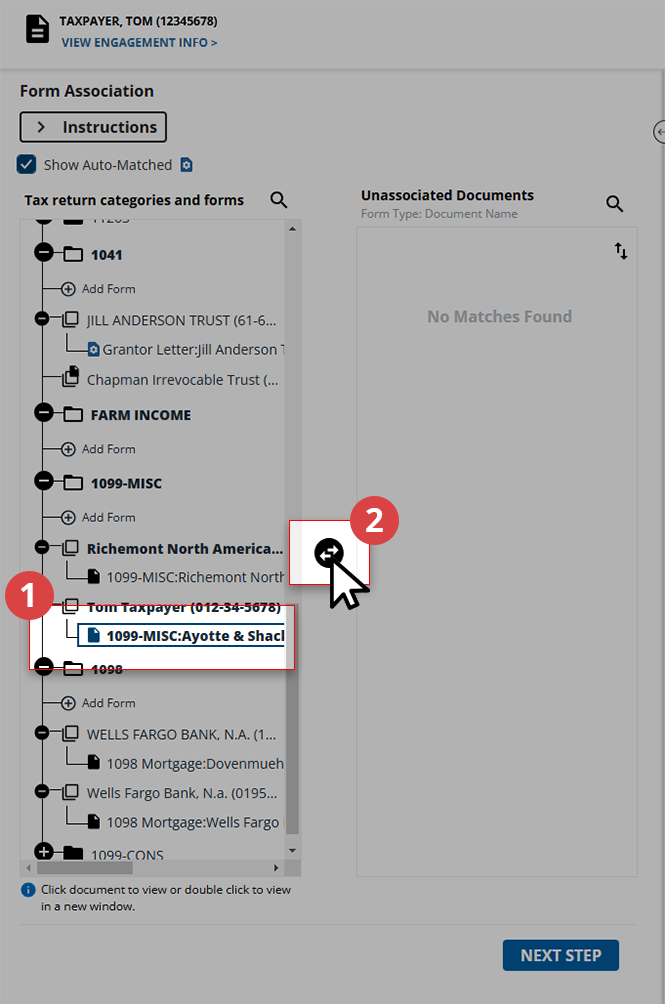
If the disassociated form is the only one in the selected parent form, you'll see the
Delete Parent Form
window asking you if you'd like to delete the empty parent form. Select DELETE
if you'd like to delete this, otherwise, select CANCEL
for the parent form to remain.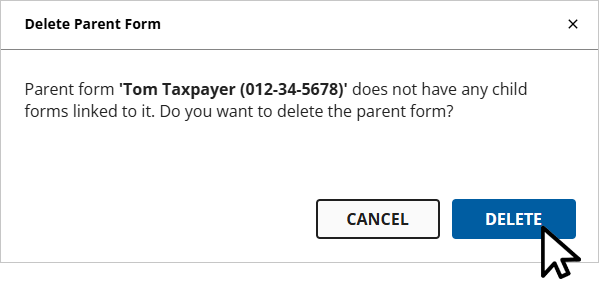
Viewing documents in their own window
An option is also available to view the pages associated with the Parent Forms in a new window. To view the document image, right-click on the parent form and select
View in new window
, the document will open in the Review Wizard Image Viewer
window.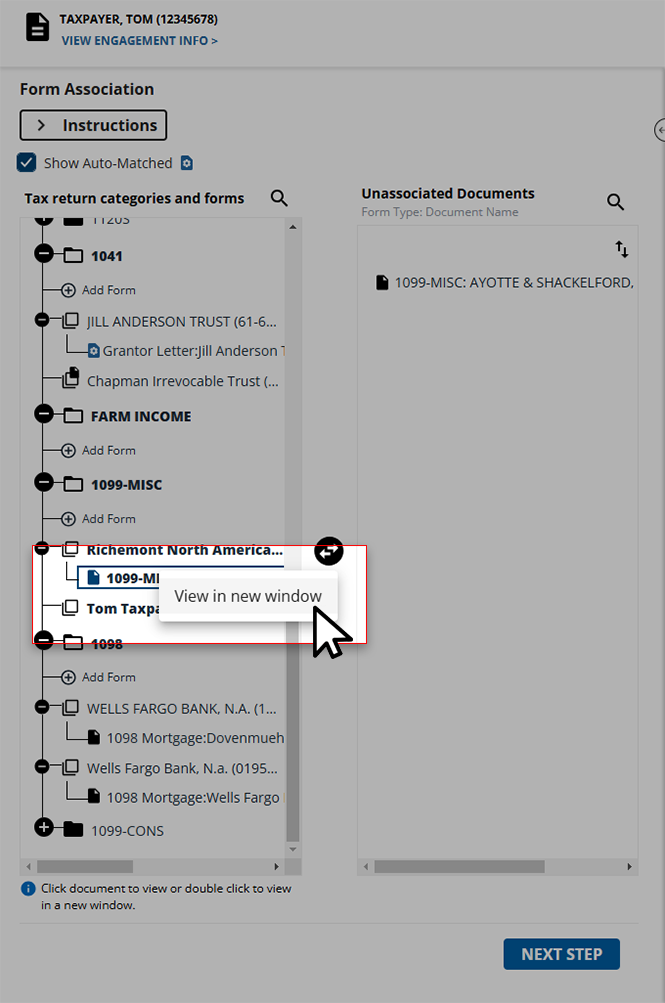
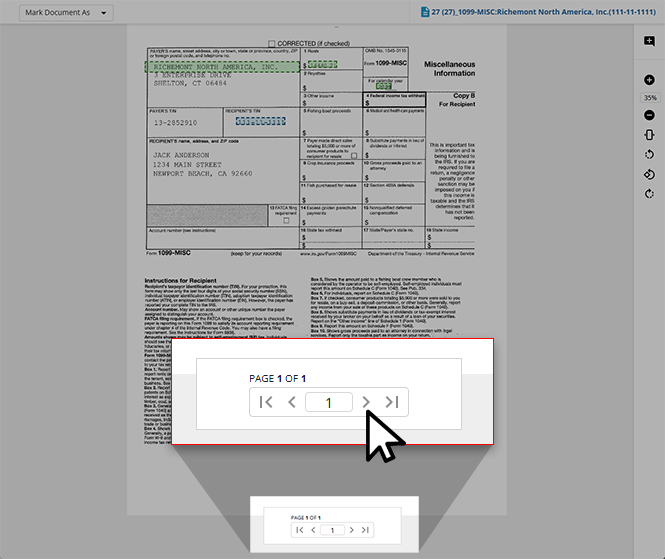
If there are multiple images associated with a particular form, then you can use the navigation bar to move between these pages.
Viewing child forms in SPBinder
All of the source documents in the
Unassociated Documents
section will be displayed under the Unassociated Workpapers
node of the Index Tree
in SPbinder.note
If 1099-MISC or 1098 Mortgage Interest are left unassociated in Child Form Association wizard for CCH Axcess tax application, they’ll be associated to their respective forms in the Index Tree, and the data from the documents will be exported to the default forms in the tax application.
In such a case, you have to manually link the source documents 1099-MISC or 1098 Mortgage to its respective form as follows:
In the binder, go to the
1099-MISC
section in the Forms
tab and link these to the respective schedule where you want the data to be linked in the binder and then exported to the tax application.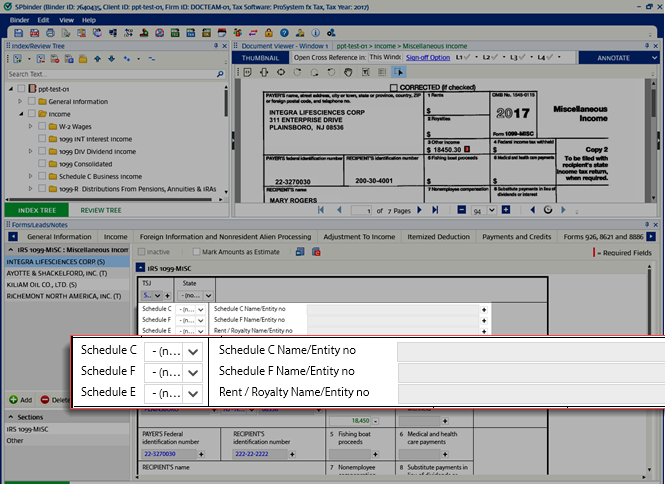
Similarly, you can link the 1098-Mortgage interest in the
Form
tab.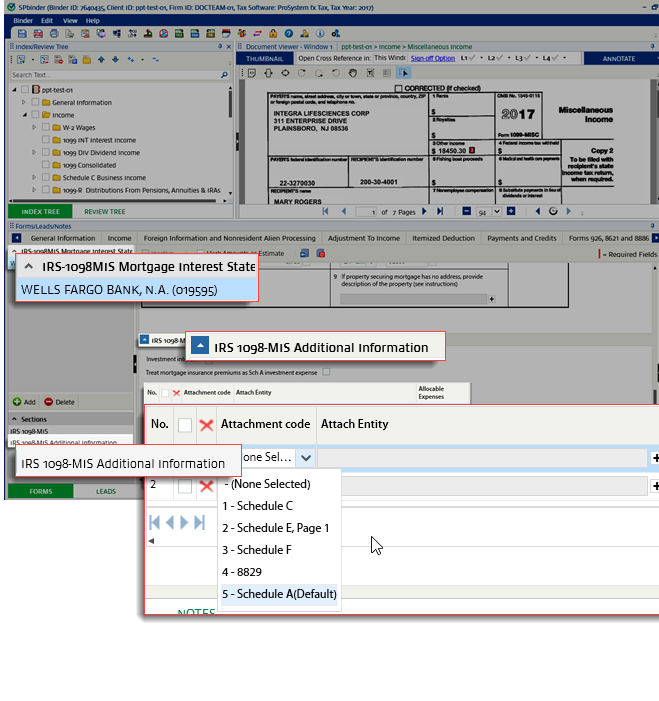
For a without the Leadsheets binder, you can link these directly in the tax application in a similar manner.
note
All the forms under the
Unassociated Workpapers
folder won’t have any populated values. Hence it will neither export to tax application nor populate in Leadsheets. You can move the unassociated forms to its corresponding form to enable its values for reverse porting and to populate in Leadsheets. As soon as the form is moved from the Unassociated Workpapers node to the form, then all data in the form will be enabled. To view the shortcut keys for this review wizard, select the  icon.
icon.
Keyboard Shortcuts
icon.Important Note:
Form type | Auto-associated based on |
|---|---|
Grantor Letter | Auto-associated based on primary and secondary identifiers - depending on the proforma data. Either in Schedule K-1 1041 or in the Consolidated 1099 category. Example: If the EIN present on the Grantor Letter matches with the EIN of Parent Form Schedule K-1 1041, then it should get auto-associated. |
Schedule K-1 PTP | Auto-associated on the basis of primary and secondary identifiers, and PTP Check Mark. If the PTP K-1 is proforma'd then it will get associated with it, or else it creates a new entity. In this respect, the system will determine PTP K-1 based on PTP Check Mark (if checked) and will be auto-associated if the proforma'd information is available. The association of PTP K-1 is based on EIN and PTP Check Mark (if checked) as per the proforma'd information. If the proforma'd information is not available then it creates a new entity in the Schedule PTP K-1 category under the Tax return categories and forms section and associates all the related pages in it. |
Update field value
If you erroneously made a verification error in the
Step 2 Verication
wizard, then you now have the ability to correct the field or value in post-verification wizards like Superseded Documents, CFA (Child Form Association), Duplicate Data, and NFR (New Form Review).- To update the field in post-verification wizards, open the document you'd like to update in the document viewer panel.
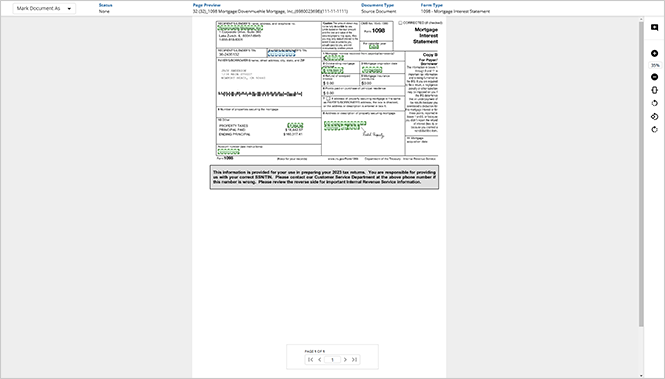
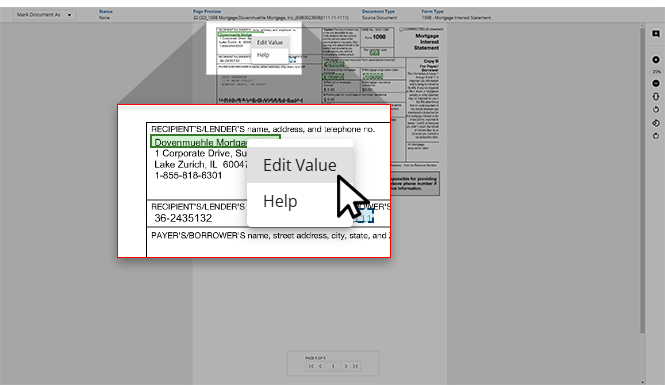
- Right-click the field that you want to update, then selectEdit Value.
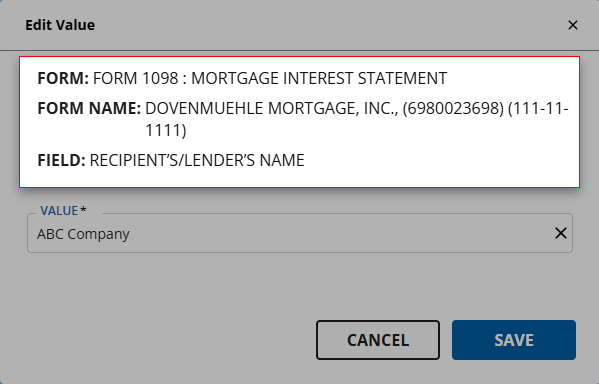
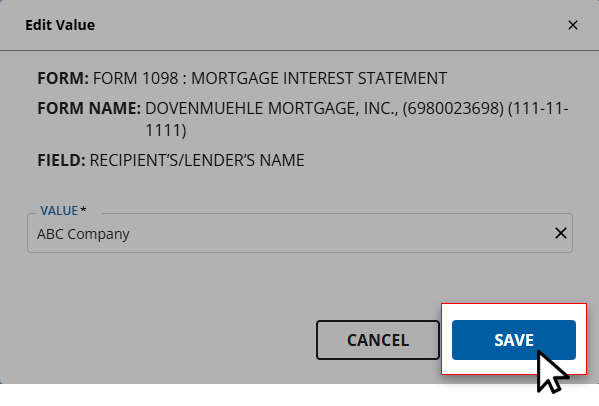
- TheEdit Valuewindow will appear. Here, you can review theFORM,FORM NAME, andFIELDfor further context.
- Select the correct value from the options listed in theVALUEdropdown menu. If the correct value is not listed, you can type the correct value instead.
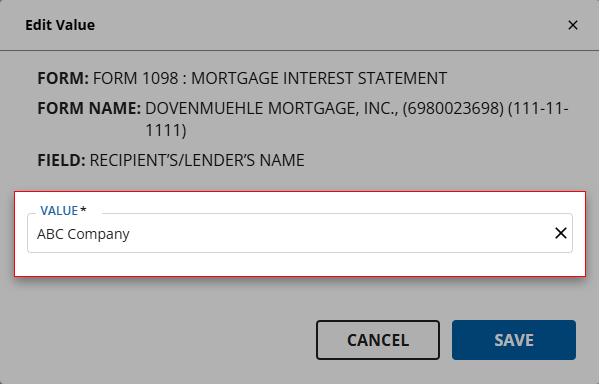
- Once the correct value is provided to theVALUEfield, selectSAVEto save your changes and return to the wizard.
Mark the document as Prior Year
Prior Year
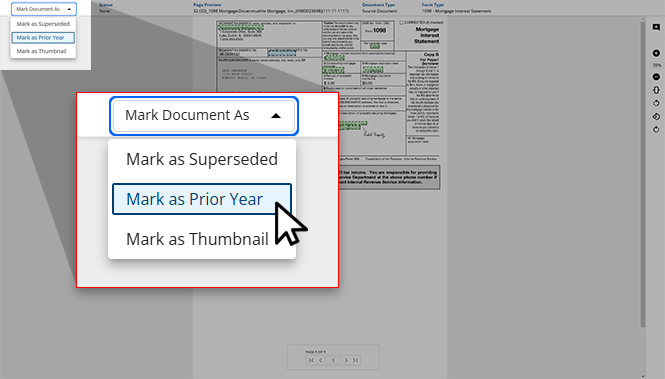
If you erroneously forgot to mark the page as a prior year document in Step 2 Verication Wizard then you have the opportunity to mark the documents as a prior year document in post verification wizards like CFA (Child Form Association), and NFR (New Form Review).
- Open the document you'd like to mark as a prior year document in the document viewer panel.
- SelectMark as Prior Yearfrom theMark Document Asdropdown menu.
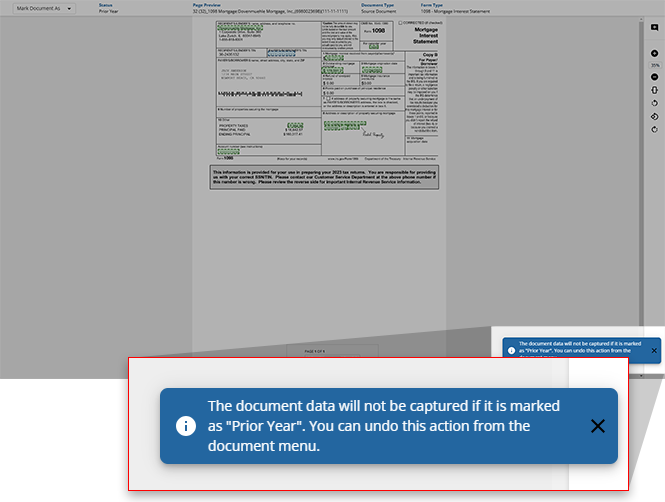
- A toast notification will appear indicating that this document has been marked as aPrior Yeardocument.
Mark the document as Superseded
Superseded
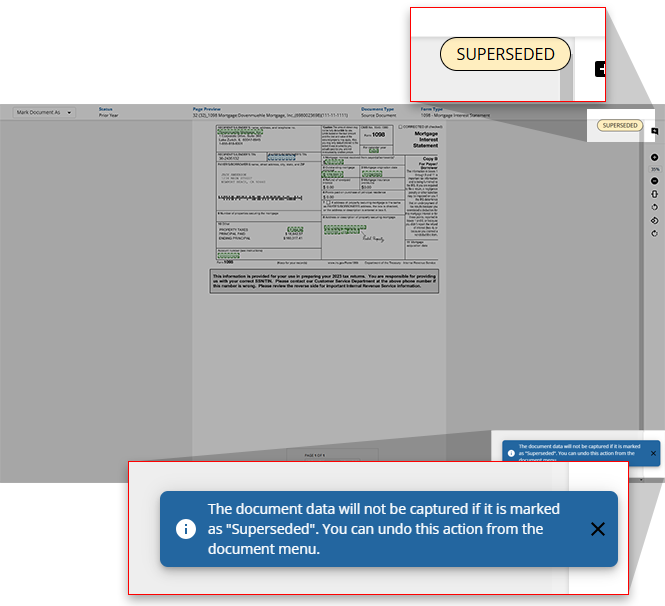
If you erroneously forgot to mark the page a superseded document in Step 2 Verication Wizard, then you have the opportunity to mark the documents as a superseded document in post verification wizards like CFA (Child Form Association), and NFR (New Form Review).
- Open the document you'd like to mark as superseded in the document viewer panel.
- SelectMark as Supersededfrom the options listed.
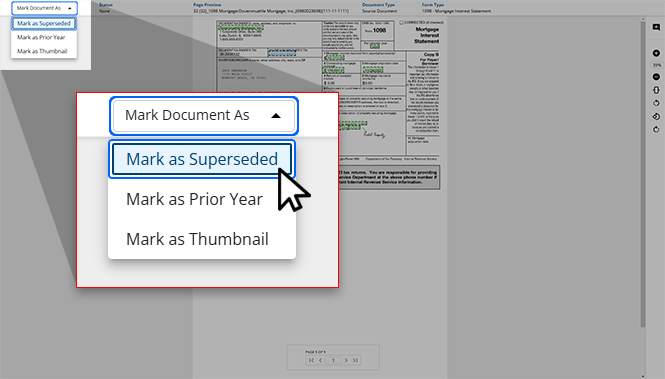
- TheSUPERSEDEDstamp will appear on the document, and a toast notification will appear indicating that this document has been marked as superseded.
Mark the document as Thumbnail
Thumbnail
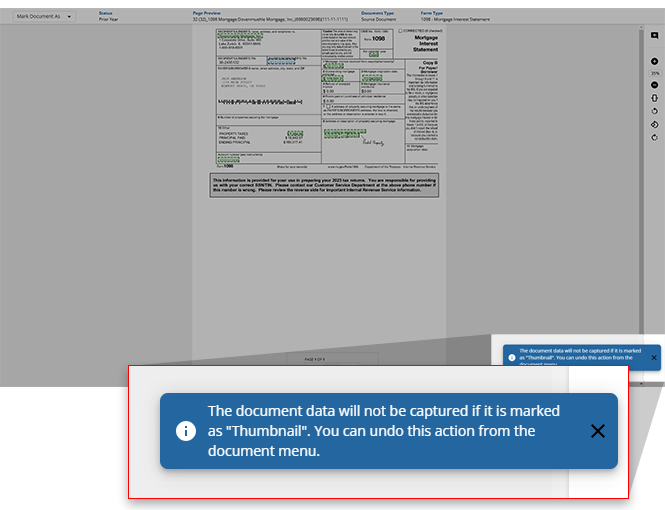
If you erroneously forgot to mark the page a thumbnail document in Step 2 Verication Wizard, then you have the opportunity to mark the documents as a thumbnail document in post-verification wizards like CFA (Child Form Association), and NFR (New Form Review).
- Right-click on a listed Child Form, the document's menu will appear.
- SelectMark as Thumbnailfrom the options listed.
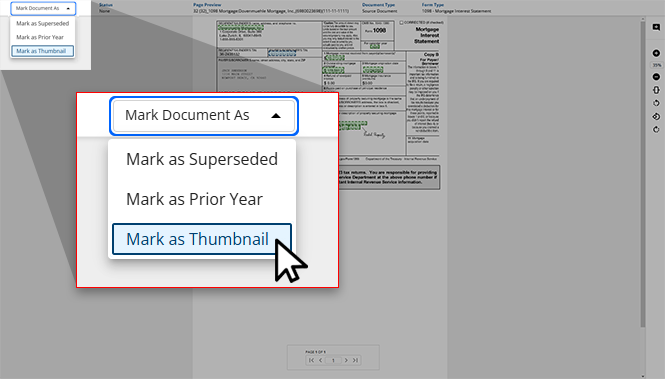
- A toast notification will appear indicating that this document has been marked as aThumbnaildocument.
What's next?
Once all of the values have been verified for accuracy, this binder is ready for the next step - Duplicate data. Users can select
NEXT STEP
at the bottom of the screen to move this engagement to the next wizard.note
Once a binder advances to the next step, it can't return to the Child form association wizard so confirm that you are ready to proceed.
Related Content
-
Review Wizard on Web is here!
Format: Article

