
Canon DR 7550C with Capture Perfect 3
note
This legacy scanner is not recommended but can be used with SurePrep. Its software might not be updated and could be deprecated.
Use Capture Perfect 3.0 to create PDF files to upload to SurePrep. Once you've installed, Capture Perfect 3.0, open this program and follow the instructions to set SurePrep's Recommended Settings for your Canon scanner:
Canon DR 7550C and Capture Perfect 3
- Open Capture Perfect 3.0 and selectStart, thenPrograms, thenCapture Perfect 3.0.
- SelectScan, thenSelect Scannerat the top.
- A window opens listing the Scanner Name. SelectCanon DR-7550Cand selectOK.
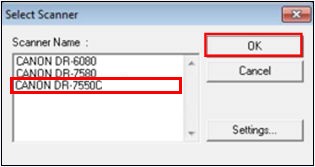
- SelectScan, thenScanner Setting.
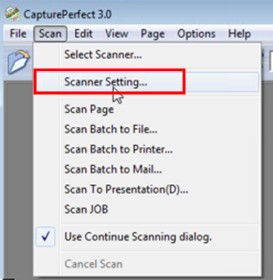
- A window will open for Canon DR-7550C on STI – 002. Adjust the settings in this window to the following.
- Mode: Advance Text Enhancement
- Page Size: Letter – 8.5 x 11 in
- Dots per inch: 300 dpi
- Scanning Side: Skip blank page
- Deskew: Check the checkbox
- Moire Reduction: None
- Select theBrightnesstab and select theGammabutton.
- On the Gamma Settings window, adjust the settings to the following and selectOK:
- Custom: Check the checkbox
- Select: Font Gray
- Input method: Factor 3.0
- Select theImage processingtab and adjust the settings to the following:
- Select the
- Document Orientation: 0 degrees
- Erase Dot: Check the checkbox
- Border Removal: Check the checkbox
- Punch Hole Removal: Check the checkbox
- Color: drop-out
- Front: None
- Back: None
- Select theOtherstab and adjust the settings to the following:
- Staple Detection: Check the checkbox
- Feeding Option: Standard Feeding
- There is no need to make any changes to theImprinter/Addontab.
- Once you've selected the settings, select theBasictab again. SelectSave.
- TheSave User Preferencewindow opens. EnterSurePrepand selectOK.
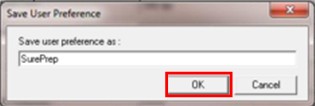
- SelectOKto save the settings for your SurePrep profile.
- SelectScanand thenScan Batchto file to scan the documents.
- Save the file to your machine.
Related Content
-
Canon scanner setup
Format: Article

