
Print Options
Print Options
sets default print settings for PDFs generated from SPbinder (for example, SPbinder workpapers, DreamWorkpapers). The settings you set up on the Print Options
page will be preselected for all firm users when initiating binder print. Preselected options can save users time by avoiding the need to manually adjust the print options each time they print. Furthermore, binders printed through API and or printed via binder status change will follow the same firm-level settings. note
Print Options
settings are used to set default print settings at the firm level. These settings don’t prevent the user from changing the options individually. To configure
Print Options
, go to .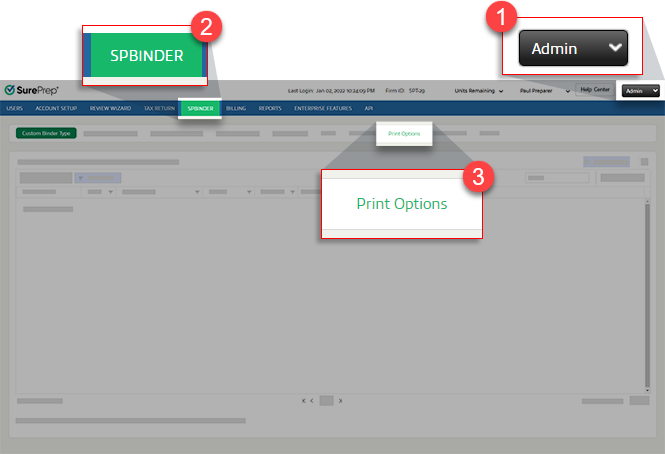
Print SPbinder workpapers (without Leadsheets)
This section provides options for printing SPbinder workpapers:
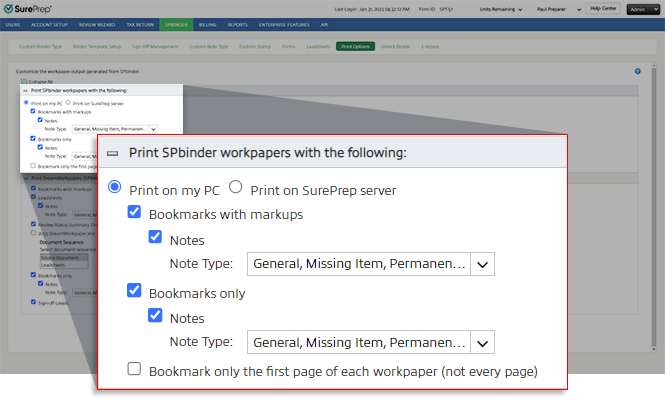
Select the following print options:
- Print on my PC- Prints SPbinder workpapers on your local machine. Once the print completes, SPbinder PDFs are saved atSurePrep Download Folderpath.noteSet the file path from . You can view both PDFs (bookmarks with and without markups) here.
- Print on SurePrep server- Prints SPbinder workpapers on SurePrep server. Once the print completes, you will receive an email stating that the documents are printed and you can download it from SurePrep FileRoom.Printing on SurePrep server lets you print SPbinder PDF for binders without Leads. You may also want to use this option when you are having issues printing locally. For example when your print drivers are not installed or updated.noteThe SPbinder PDF won’t open automatically on your local machine.
 noteTo print the SPbinder PDF on the SurePrep server, the binder should have E-Access enabled.When binders without leadsheets are created from GoFileRoom (GFR), printing the SPbinder PDF on the SurePrep server will automatically upload the PDF toGFRon theDOCUMENTStab. TheDocument Typewill be assigned asDREAMWORKPAPERS.
Print on SurePrep server
If you selected
Print on SurePrep server
, you may see the following messages appear when you attempt to print:- The following message appears if E-Acess is not available.

- The following message appears if the binder is already printing on the SurePrep server.

Bookmarks
The following options let you print with or without Bookmarks:
- Bookmarks with markups
- Bookmarks only

To print a bookmarked SPbinder workpaper with stamps and annotations, select
Bookmarks with markups
.
To print a bookmarked SPbinder workpaper without any markups, select
Bookmarks only
.
You can also choose to print both options, with and without workpaper markups.
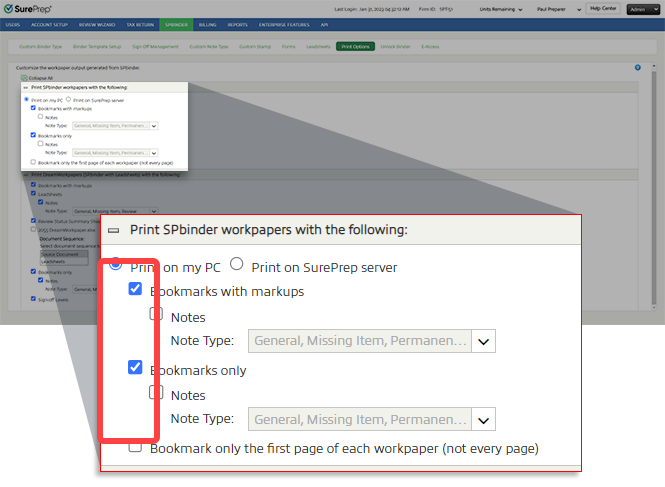
When both options are selected, and you selected
Print on my PC
, the system saves both the printed workpapers at the set file path. Once printed, the Bookmarks with markups
PDF will open automatically. The Bookmarks only
PDF won’t open automatically.You can select the
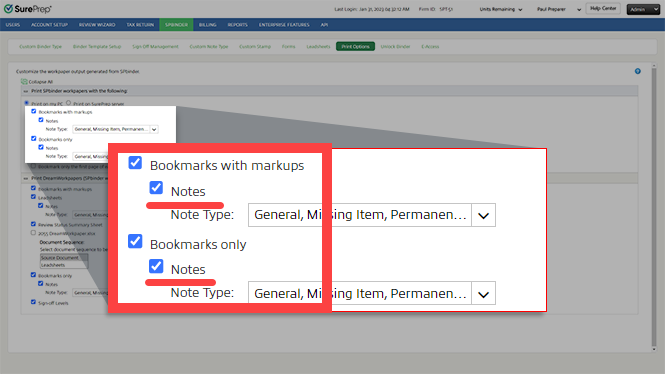
Notes
checkbox under both options to print SPbinder:- Bookmark with markupsandNotes
- Bookmark onlywithNotes
note
The
Notes
checkbox is only available if the parent options are selected.Furthermore, you can select default firm options to include or exclude certain note types in the printed copy of the binder. Select/clear the checkbox to include/exclude note types. You can customize
Note Type
options for with and without Leadsheet binders.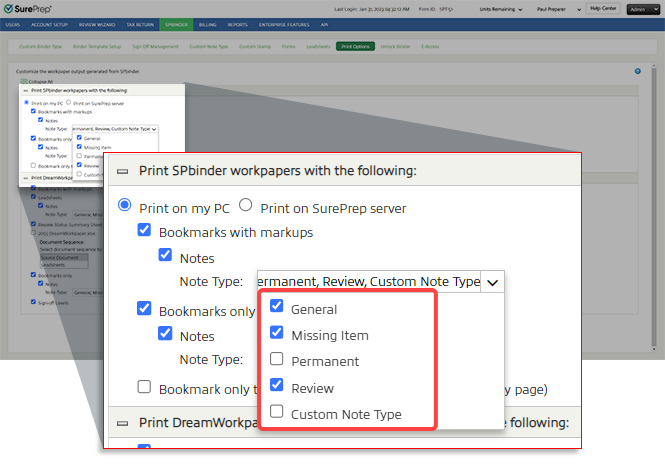
note
- By default, the binder will only print the note types that were selected. However, users can change which notes they want to print when printing the binder from printed via status change will follow the firm-level settings.
- Custom notes can't be selected/removed individually. Clearing theCustom Notecheckbox will exclude all custom notes from being printed.
You can also select to bookmark only the 1st page of each workpaper and not every page.

Print DreamWorkpapers (SPbinder with Leadsheets)
This section provides options for printing the DreamWorkpapers:
- Bookmarks with markups
- Bookmarks only
note
The following print options can also be modified individually when generating DreamWorkpapers in SPbinder or FileRoom.
Bookmarks with markups
When you select
Bookmarks with markups
, the 2050 DreamWorkpapers PDF is printed with references, annotations, and markups.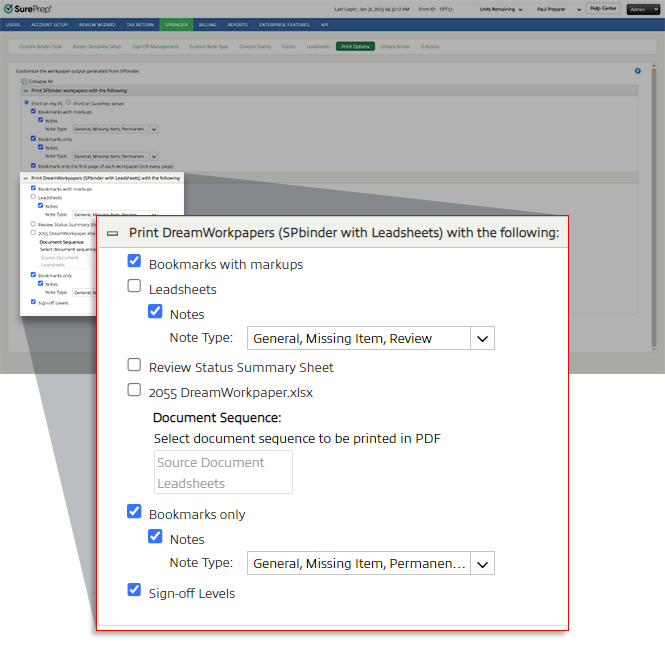
Select the checkbox for the type of documents you want to include in the printed DreamWorkpapers. You can select from any of the following options:
- Leadsheets
- Notes
- Review Status Summary Sheet
- 2055 DreamWorkpaper.xlsx
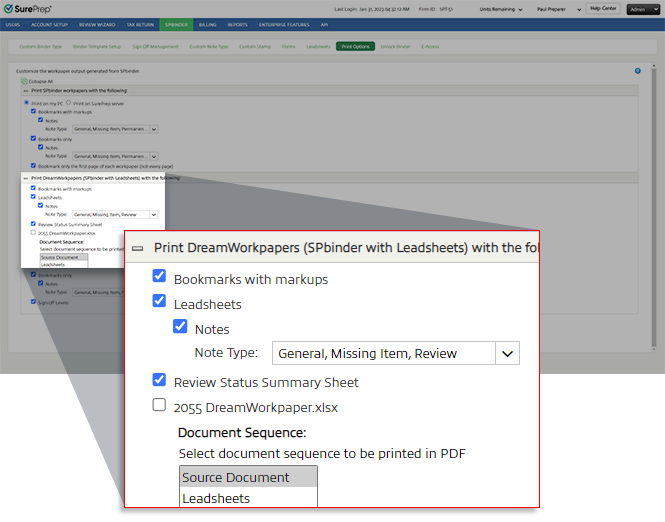
note
You can print the
2055 DreamWorkpaper.xlsx
file, but you cannot send it to GFR.You can select default firm options to include or exclude certain note types in the printed copy of the binder. Select/clear the checkbox to include/exclude the note types. You can customize
Note Type
options for with and without Leadsheet binders.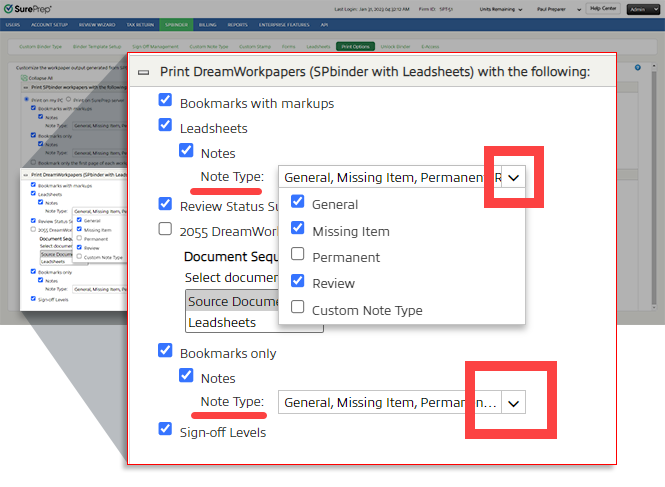
note
The binder will only print the notes that were selected.
You can choose the document sequence for the printed PDF to be in
LeadSheets
or the Source Document
. The highlighted option in Document Sequence
is placed first in the DreamWorkpapers print setup.
Bookmarks only
When you select
Bookmarks Only
, the 2050 DreamWorkpapers PDF is printed without any references, annotations, or markups.
Notes
Notes that are linked will have red cross-references next to them with the page number of the document they are linked to.
Sign-off Levels
If you selected the
Sign-off Levels
checkbox under Bookmarks only
, then the PDF will print with sign-off options on the top of the PDF.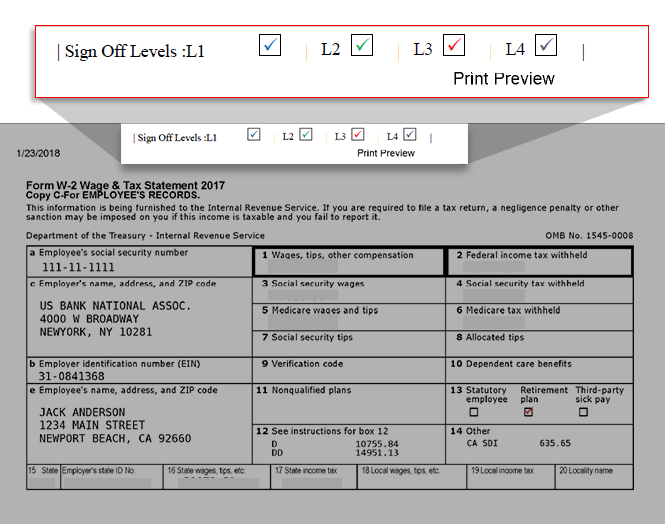
note
You can use the
Print Clean PDF
feature on the 1st page of each PDF to remove annotations, sign-off, and bookmarks from an existing PDF without printing a new copy from FileRoom or SPbinder. If you selected both
Bookmarks with markups
and Bookmarks only
then both files will be printed simultaneously.note
Select the  to visit the help page.
Help
icon to visit the help page.Print on status change
You can also set up your domain to automatically print binders when the binder status changes to a specific status. Contact SurePrep Support at SurePrep.Support@thomsonreuters.com to enable this feature.
note
- After the print on status change feature is enabled, you will be able to print any previous or new binder by changing the binder status.
- PDFs are printed on SurePrep servers; print time may vary.
- The 'Print on status change' feature is only available for 1040 and 1041.
When contacting SurePrep Support, provide the following information:
- FileRoom status - Provide status that should trigger automatic printing of the binder (for example, Blank Status, Custom Status).
The binder is printed based on your firm's setting in
Account Admin
(for example, Bookmark only, Notes, Leadsheet).note
You can download the printed binders locally.
Print binders with custom file names
PDF documents are printed based on a default naming convention set by SurePrep. However, firms can also customize file names for printed PDF based on personal preference. Contact SurePrep Support to customize the file name output for a printed PDF.
You can decide what information to include or exclude from the printed file name.
Before:
- SPbinder PDF - 2019(I) - Anderson, Jack_1000100 .pdf
After (excluded clients' name and binder ID):
- SPbinder PDF - 2019(I) - Jack001_.pdf
note
Contact SurePrep support to update your print option.
Step 1: Select informational items to Include in the filename
Firms can include or exclude the following items from the printed file name and reorder items in a specific order:
- Print type
- DreamWorkpapers: 2050 DreamWorkpapers ("2055 DreamWorkpapers" for XLSX)
- SPbinder PDF: SPbinder PDF ("SPbinder Bookmarks PDF" for Bookmark Only)
- Tax Year
- Binder Type Initial
- Binder Type
- Client ID
- Binder ID
- Client Name
- Binder Status
- Your choice of custom text (for example, BL and Associates, logo). You can select 20 characters max.
note
"SPbinder Bookmarks PDF" can’t be excluded for SPbinder PDF when printing a Bookmark Only PDF.Bookmark Only PDF for DreamWorkpapers will also include "Bookmark only" in the file name. Example:
Bookmark only 2050 DreamWorkpapers-2019I-Tom001-BL-Associates.pdf
Step 2: Select a character that should appear at the end of each informational item
You can also select the character that should appear after each item. You can select space, hyphen, underscore, or none(that is, no space or character).
Example: Client ID-Client Name_Tax Year
Result:
123-Tom Taxpayer_2020.pdf
Step 3: Select the sequence order
You can also indicate the sequence order for each part of the file name.
Example: Tax year -> Client Name -> Client ID
Result:
2020 Tom Taxpayer 123.pdf
Step 4: Provide your template to SurePrep
Once you have everything prepared, contact to SurePrep Support and provide them with your template.
Sample template:
Sequence Order | Informational Item | Append character |
|---|---|---|
1 | Tax Year | Hyphen |
2 | Client Name | Underscore |
3 | Custom Text (for example, Firm Name) | None (No Space or Character) |
4 | Client ID | Space |
5 | Binder Status | Space |
Output Sample:
2020-Tom Taxpayer_BL1234 Completed
Print order
Binder pages can either be printed in the order they were scanned in or based on the
INDEX TREE
layout in SPbinder. Firm-level setting
:Go to , select the checkbox for
Re-order pages to follow the workpaper index
to organize workpapers and print them according to INDEX TREE
. Conversely, you can clear the checkbox, if you don't want SurePrep to re-organize the pages and want pages to be printed in the order they were scanned.Binder-by-binder basis
: On the
Create New Binder
window, you can select the Re-order pages to follow the workpaper index
checkbox to organize workpapers and print them according to INDEX TREE
. Clear the checkbox, if you don't want SurePrep to re-organize the pages and want pages to be printed in the order they were scanned. Firm-level settings will be applied by default.
