Custom Stamps

SPbinder lets you add various different annotations to your workpapers, which include stamps. By default, SurePrep comes with many predefined stamps out of the box. You can use these predefined stamps or create your own custom stamps for your firm users.
To configure Custom Stamps, go to
Admin
SP Binder
Custom Stamps
.
Select AdminSP, Binder, then Custom Stamps

Configure Stamps

There are 2 types of stamps:
  • Predefined Stamps
    - Lets you select/clear stamps provided by SurePrep.
  • Custom Stamps
    - Lets you create and add custom stamps for your firm users.
Predefined Stamps
The SurePrep
Predefined Stamps
will be displayed in this section. Stamps that are selected will appear for all firm users in the
Annotation
panel of SPbinder . Conversely, stamps that are cleared won’t appear in the
Annotation
panel.
note
Users can also manually configure which stamps appear on the
Annotation
panel in SPbinder.
There are 4 default stamps that are auto-checked and disabled. These stamps are displayed for all binders:
  • T/R
    T/R icon
  • D
    D icon
  • Checkmark
    Checkmark icon
  • EST
    EST icon
To select a predefined stamp, select the checkbox.
Select the checkbox for the stamp
All the selected stamps will be displayed in the SPbinder.
note
The stamps placed from the Predefined Stamps list will display the name, date, and time on the stamps when placed.
Custom Stamps
Follow these steps to add, edit, or delete a custom stamp.
  1. To expand the custom stamp section, select
    Custom Stamps
    .
    Select Custom Stamps
  2. To add or design a new stamp, select the 
    New Custom Stamp
    button.
    Select New Custom Stamp
  3. A new row will be added. Enter the description of the stamp in the input field under the 
    Description
     column.
    note
    The
    Description
    field is restricted to a maximum limit of 30 characters.
    Enter info into the Description column
  4. Under the 
    Images
    column, you have the option to
    Select files
    or
    Design stamp
    .
    Select files
    The
    Select files
    button lets you create a stamp by importing an image from your computer.
    To import an image successfully, it must meet the following criteria:
    • The image file must have a *GIF, *BMP, *JPEG, *PNG *TIFF or *TIFF extension.
    • The file size should not exceed 100 KB.
    • The width and height of the image should not be more than 65x15 pixels.
    Follow these steps to import an image as a stamp:
    1. Choose
      Select files
      .
      Select Select files
    2. On the
      Open
      window, select an image then select
      Open
      .
    3. The following message may appear if the image was not successfully imported:
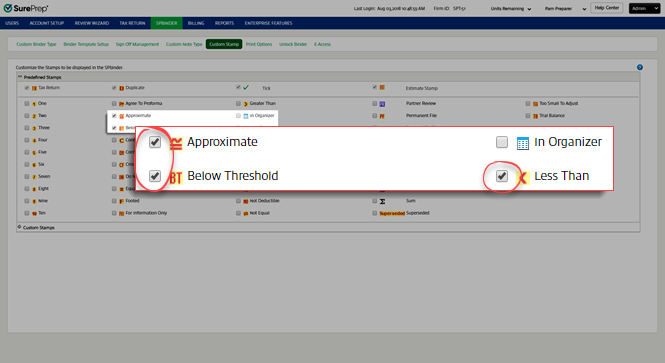
      Please import *.gif, *.bmp, *.jpg, *.png *.tif and *.tiff extensions file.
      Notification that you have to import images
      Please Import maximum 100 KB file.
      Notification the import a max 100 KB file
      Height and width of Image size cannot exceed 15 * 65 pixels.
      Notification that the plate cannot exceed 15 by 65 pixels
    4. Select the
      Display
      checkbox to make the stamp available to users in SPbinder, then select the
      Save
       Save icon icon. If the
      Display
      checkbox is selected then the stamp can be selected from the Select Stamps window and added to the Annotations toolbar.
      Edit, Delete or DISPLAY checkbox
      Select Test
    5. The saved stamp will be added to the
      Custom Stamps
      list.
      IMAGES column
    Design
    Follow these steps to design a stamp:
    1. Select
      Design stamp
      .
      Select Design stamp
    2. Custom Stamps Designer
      window will appear. You can design a custom stamp by text or a predefined style.
      To design a custom stamp from text, select the 
      Text
      option, then enter the text into the
      Text
      input field.
      Enter Text in the Text field
      note
      The text can be a maximum of 10 characters.
      You can select the font, size, format, alignment, color, and opacity of the text from the options provided. The image preview automatically updates to reflect any changes.
      Configure settings in the Custom Stamps Designer window
    3. To design a custom stamp with a predefined style, select
      Style
      .
      Style section of the Custom Stamps Designer window
      There are 3 predefined types of signs:
      • Single tick
      • Double tick
      • Cross mark
      Select a sign to select it. To choose a color, select
      Style Color
      .
      Style and Style Color section of the Custom Stamps Designer window
    4. Select
      Save
      to save the stamp to the custom stamp list. Select
      Close
       to close without saving.
      Select Save or Close
    5. Select the
      Display
      checkbox to display this stamp in the Stamps list under the
      Annotations
      toolbar of SPbinder. To save the stamp, select the
      Save
       Save icon icon.
      Select the saved stamp
    6. Your stamp will appear in the saved list.

Edit a Custom Stamp

To edit a particular stamp, select the
Edit
icon Edit icon on the
Custom Stamps
list. Once you edit the stamp, select the
Save
icon Save icon to save changes. Or select the
Cancel
icon Cancel icon to close edit mode without saving any changes.
Select the Edit icon

Delete a custom stamp

To delete a particular stamp, select the
Delete
icon Delete icon on the
Custom Stamps
list.
Select the Delete icon

Clear Filter

The Clear Filter button button removes all filters that have been either applied on individual columns or when the search option has been used.
note
The
Clear Filter
button turns on when the filters are applied on columns, or when the search field is used for searching a specific row. Otherwise, it remains inactive or grayed out.

Search

Use the search field Search bar to search for data. The search functionality only applies to the
Description
 column under the 
Custom Stamps
tab.
Search for a stamp
Select the
Help
icon Help icon to view the help page.

Related Content

error-icon

Triva isn't available right now.

Check out the support page for our phone number and hours

error-close