Beta release: Document auto-categorization in TaxCaddy
note
Open to beta testers
: This article provides an overview of the Auto-Categorization feature, designed for both our current and prospective beta testers. If you're interested in joining our beta testing program, please contact SurePrep Support.
As a tax professional, you receive hundreds of tax documents from your clients, and organizing these documents into their respective categories can be time-consuming. What if you could snap your fingers and organize documents automatically? Introducing AI-powered Auto-Categorization.
Document Auto-Categorization leverages TaxCaddy's AI to analyze each document page and automatically sort them into their tax categories and forms. It also finds a matching item on the Document Request List (DRL) and marks the task as complete.
Additionally, if you or your client upload a single PDF containing multiple tax documents, Auto-Categorization will analyze each page, separate the individual tax documents, and organize them into their respective categories within the client profile.
Auto-categorize documents
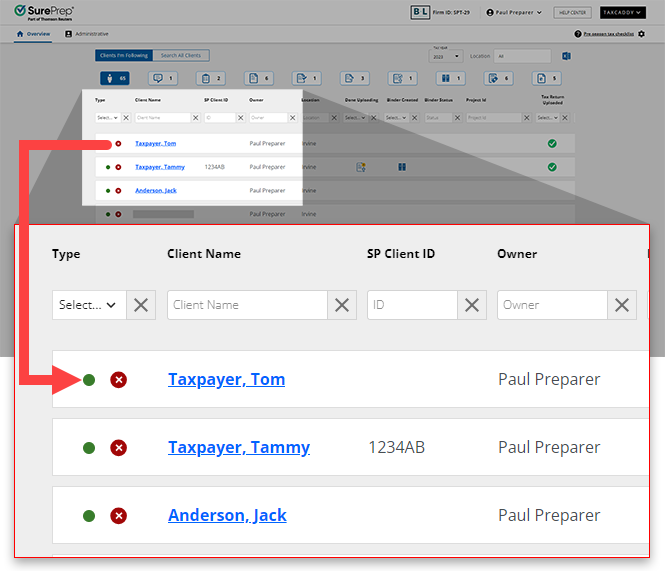
Sign in to TaxCaddy.
Select a client tile to view that client’s profile.
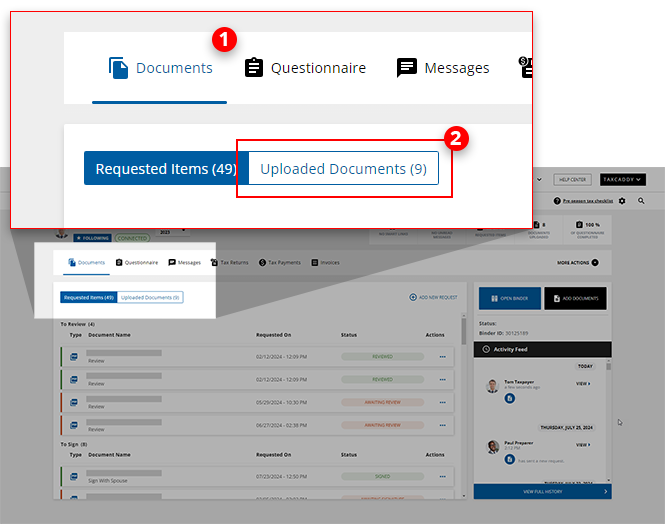
Select
Documents
, then select
Uploaded Documents
.
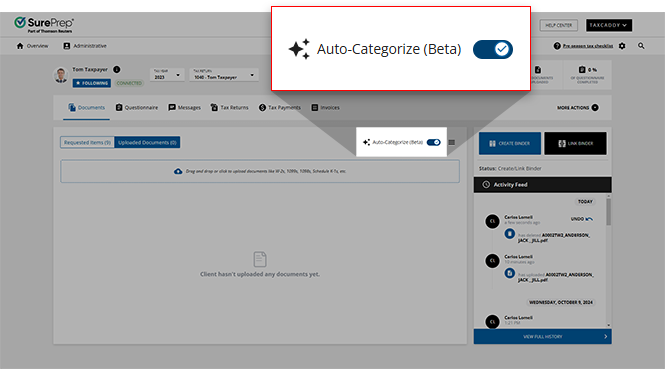
Select the
Auto-Categorize
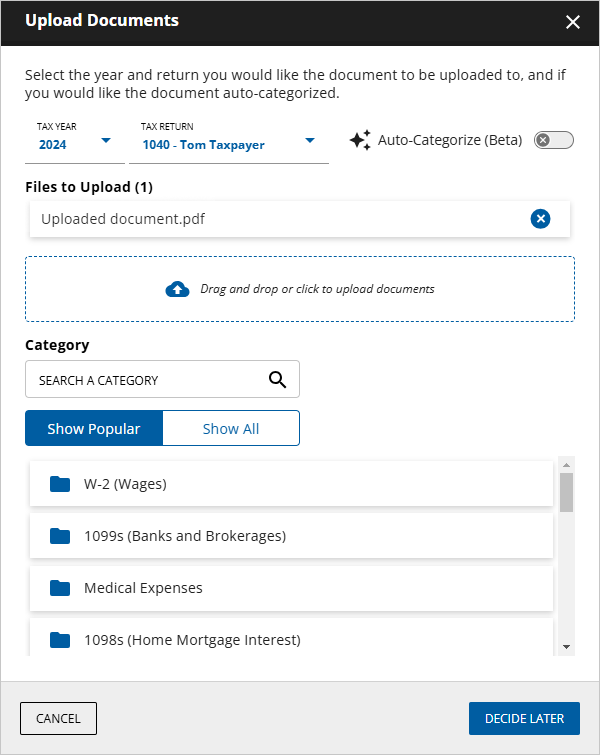
switch to turn the feature on or off. When enabled, Auto-Categorize will use AI to find a match and categorize any tax document you upload. You can also upload a single PDF with multiple tax documents, and auto-categorization will extract all the tax documents to categorize individually.
note
When necessary, you can select the
Auto-Categorize
switch to turn off the Auto-Categorization feature for yourself. You can manually select categories when uploading documents.
.
note
Improve your Auto-Categorization results
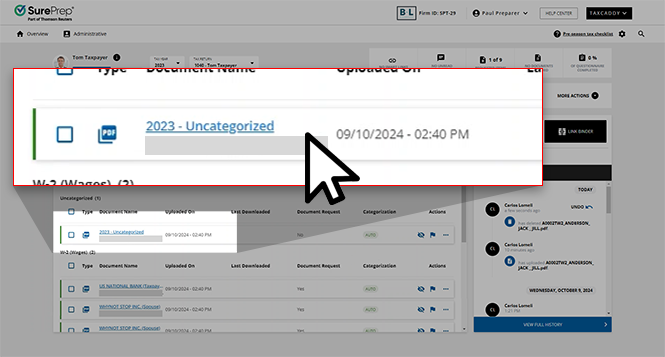
TaxCaddy's AI-powered Auto-Categorization learns from your actions and improves the results over time. For example, when a document match is not found, Auto-Categorization places it in the
Uncategorized
section. Moving these
Uncategorized
documents to their correct categories will help the AI learn how to categorize them in the future.
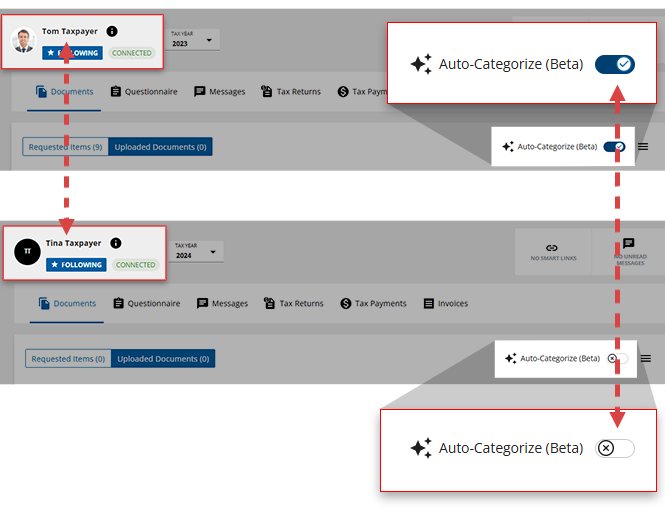
The
Auto-Categorize
switch settings will be specific to your preference. Enabling or disabling this switch within 1 client profile will also apply to you in all other client profiles.
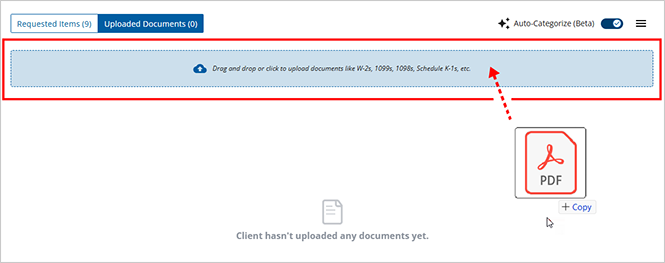
With the
Auto-Categorize
switch enabled, select
Drag and drop or click to upload documents
to select the document you'd like to Auto-Categorize.
You can also locate this file in your workstation, then drag and drop it into the upload area.
Once a document is selected, a toast notification will appear to indicate the file's upload percentage.
When the document upload reaches 100% complete, the toast notification will update to indicate that the Auto-Categorization process has begun.
The toast notification will be updated to
Auto-categorization is complete
once the document has been categorized.
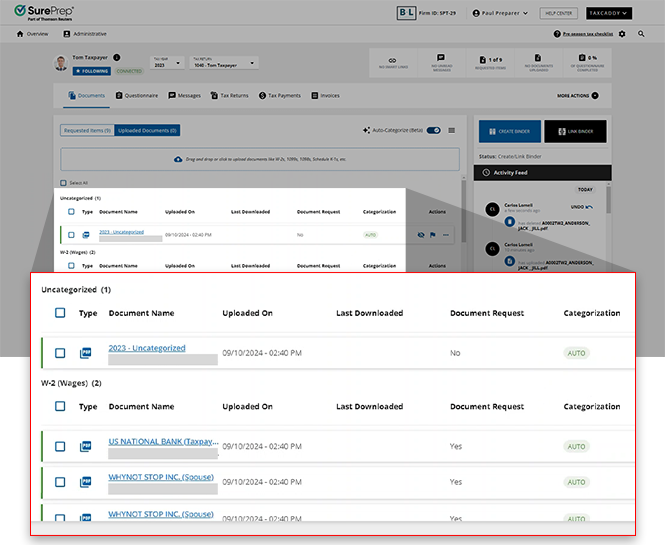
The documents that TaxCaddy's AI has automatically categorized will appear in their respective categories in the
Uploaded Documents
tab. It will also mark corresponding DRL task items as uploaded.
In the
Categorization
column, Auto-Categorized documents will show the
AUTO
badge.
note
Documents that have been manually moved to a different category will show the badge as
Manual
instead of
Auto
.
Users can select these documents in the Document Viewer panel to verify that TaxCaddy's AI accurately grouped the document's pages and placed them in the correct categories.
Common questions
Review these common questions regarding this Auto-Categorization feature:
How will Auto-Categorization know which categories to file each document into?
TaxCaddy's AI-powered Auto-Categorization learns from your actions and improves the results over time.
How can users enable Auto-Categorization for your firm?
If you're interested in having Auto-Categorization enabled within your firm, contact SurePrep Support team to integrate this feature into your daily workflow.
Does Auto-Categorization have to be used for all clients when enabled? Can this feature be enabled on a case-by-case basis?
No, Auto-Categorization within TaxCaddy doesn’t need to be the go-to categorization method for all clients. To turn this feature off, select the
Auto-Categorize
switch within a client's profile.
The Auto-Categorization feature will remain unavailable for you across all clients until you enable it again.
What document types are accepted when using the Auto-Categorize feature?
Auto-categorization works on PDF file formats.
How long does the categorization process take?
There is no determined amount of time that the categorization process takes as multiple factors can contribute (that is, uploaded file size). We ask that users be patient as the categorization process takes place. You can go away from this client profile during categorization and return later.
Does the client's DRL need to be created and sent before Auto-Categorization?
No, a client's DRL doesn’t need to be created before Auto-Categorizing their document uploads.
What are some key benefits of using Auto-Categorization?
Some of the key benefits include:
Auto-Categorize
: Automatically scans and recognizes the uploaded tax documents and organizes them into their tax categories. Saving you time from manually organizing each uploaded document.
Automatically splits pages
: You can upload a single PDF file containing various types of tax documents (that is, W-2s, 1099s, 1098s) and Auto-Categorization will separate PDF files for each document.
Automatically addresses DRL
: items on the Document Request List (DRL)
Taxpayer experience
Your clients will also have access to Auto-Categorization when uploading their own tax documents from their account.