
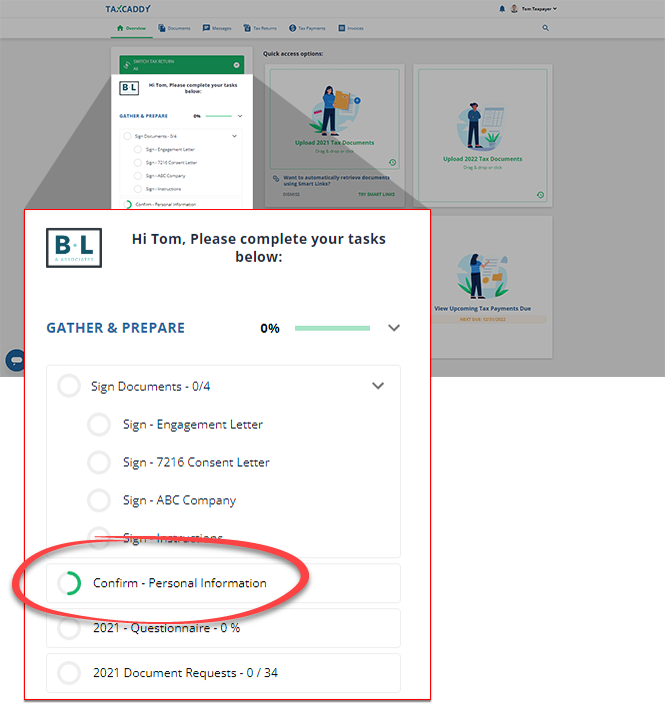
Confirm personal information
Show all hidden content
Gathering personal information helps your tax professional prepare your tax returns. The
Personal Information
screen in TaxCaddy lets you conveniently share your personal information without filling out paperwork and then sending it back to your tax professional. Filling out personal information in TaxCaddy can be especially useful if this is your first year with your tax professional.note
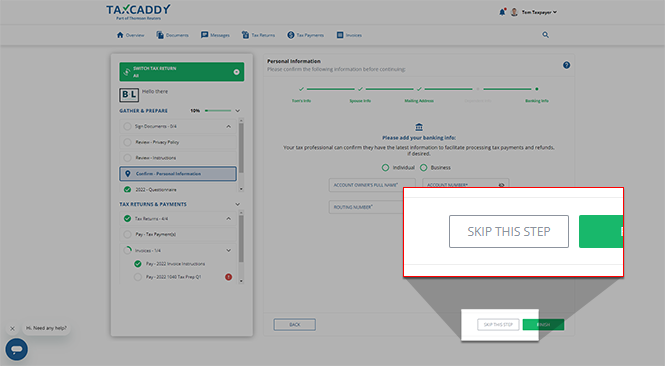
At any point in this task, the
SKIP THIS STEP
feature will give you the ability to proceed to the next screen if you choose to opt out of providing any information requested.TaxCaddy.com on PC, Mac, or tablet
- Open the Personal Information screen:Follow these steps to confirm your personal information when using TaxCaddy.com on your PC, Mac, or tablet.
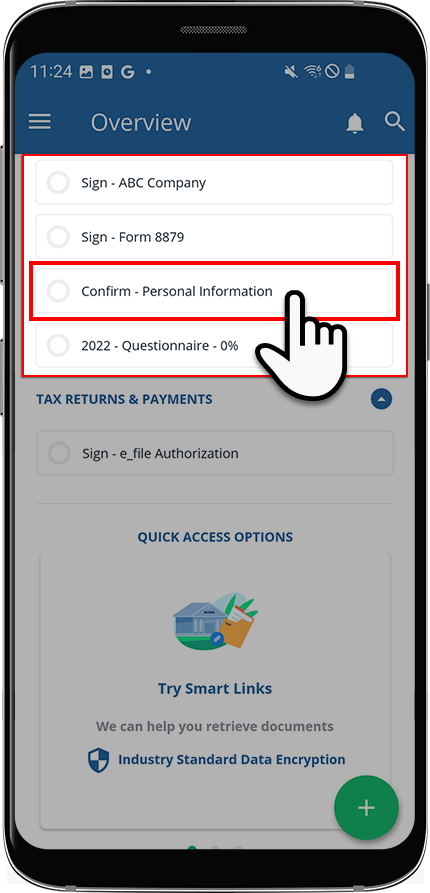
- Sign in to TaxCaddy.com.
- In theTask List, selectConfirm - Personal Information.noteYour progress in completing yourPersonal Informationtasks will be denoted with theProgressicon. Once you've completed this task, you will see theCompletedicon.
- YourPersonal Informationtask will open next to yourTask Listin theOverviewscreen.
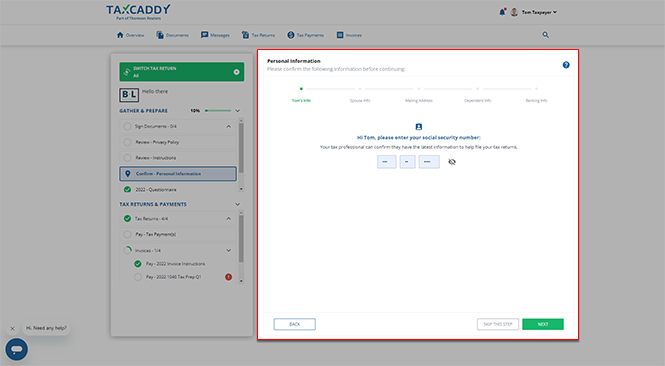
- Enter Social Security Number:Enter your Social Security number, then selectNEXTto proceed to the next step.To skip this step, selectSKIP THIS STEPwithout entering any information.
 noteThe characters you provide will be hidden (masked) by default, you can select theShow/Hideicon to show or hide the social security number.
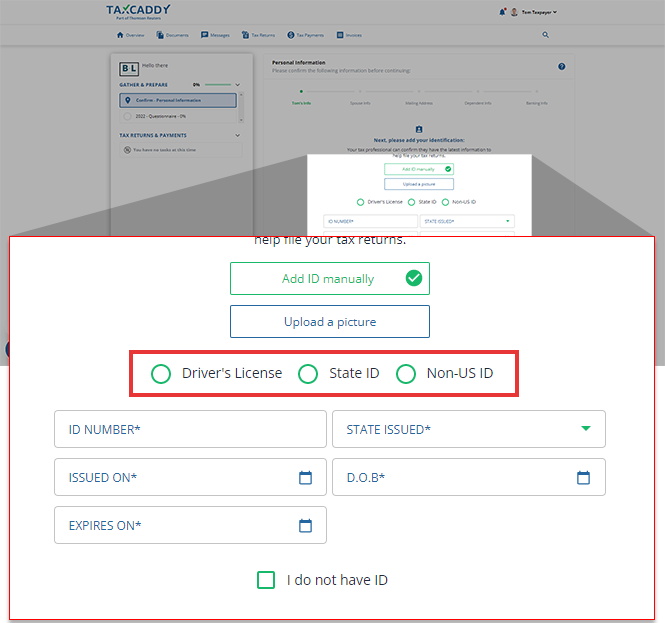
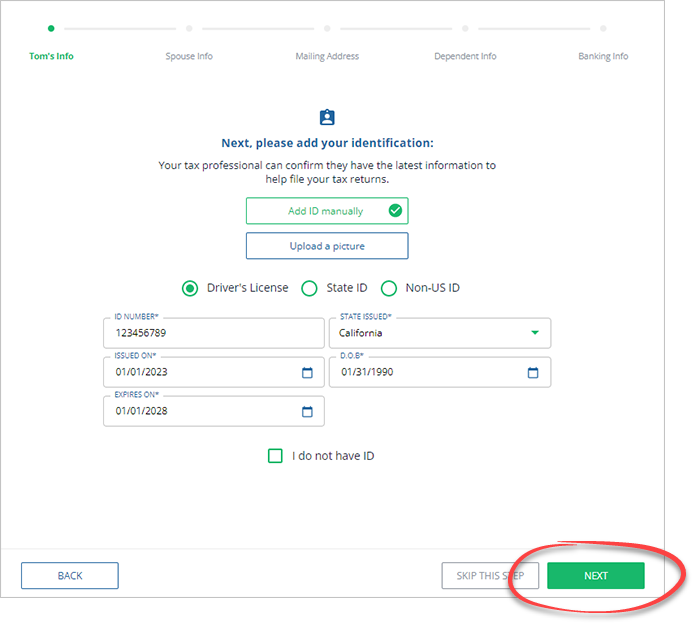
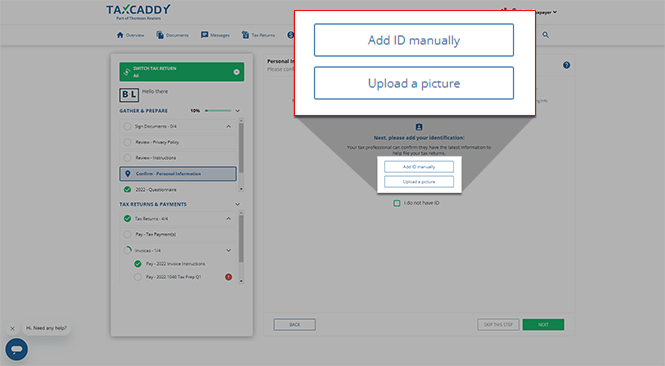
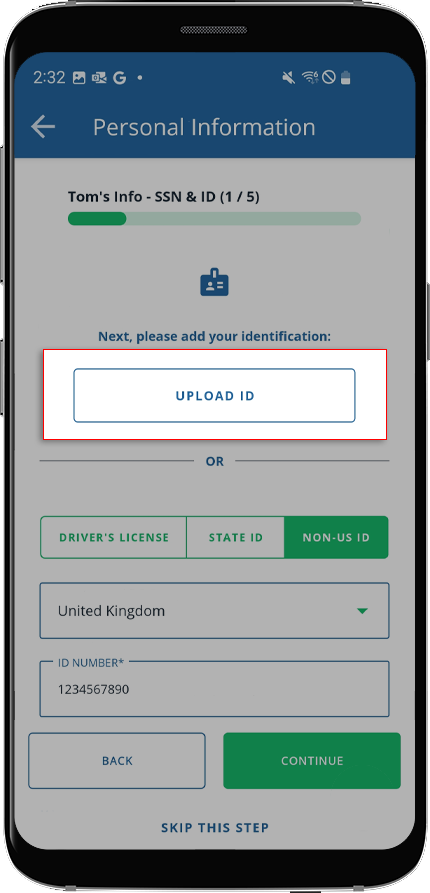
 - Enter state ID:Enter the personal information of the main taxpayer user.Select one of the following options:Description of each upload optionIdentification methodBrief descriptionAdd ID manuallySelect this to enter the information from your Driver's License or State ID.Upload a pictureSelect this to add a photo of your driver's license or state ID.I DON'T HAVE AN IDSelect this if you don’t have an identification card, then selectNEXT.

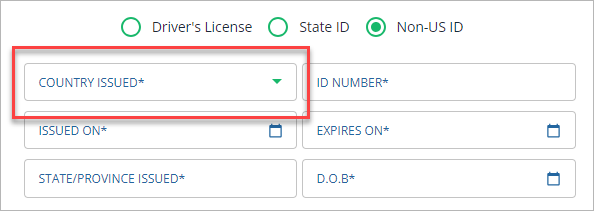
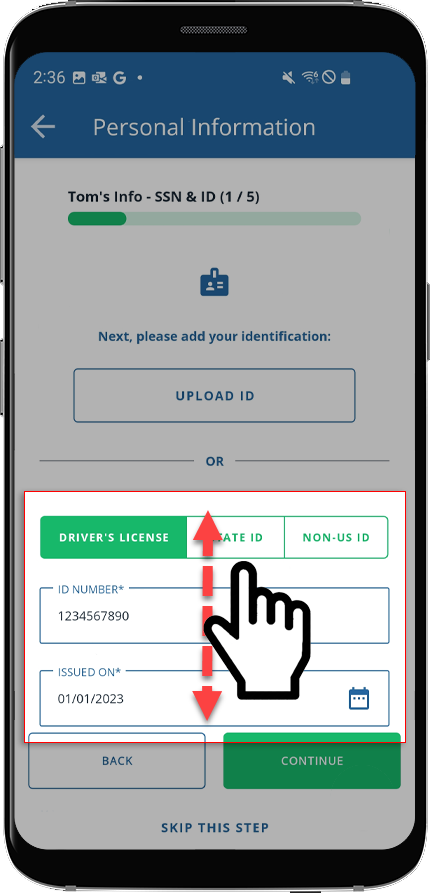
- Add ID manually:To identify your ID type, selectDriver's License,State ID, orNon-US ID.noteIf you selectNon-US ID, you'll need to provide the country from which this ID was issued.
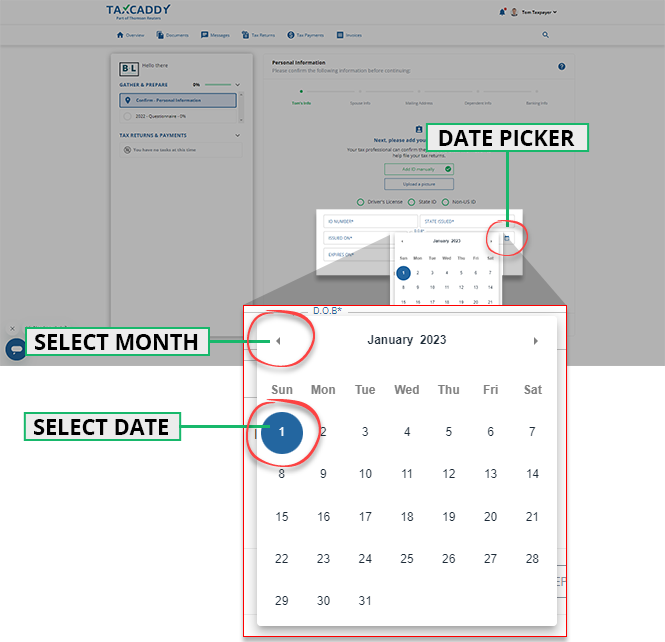
- Use theDate Pickerto select the date. You can also select the calendar title to switch quickly between months and tax years.
- Once you've entered the necessary information, selectNEXTto proceed.
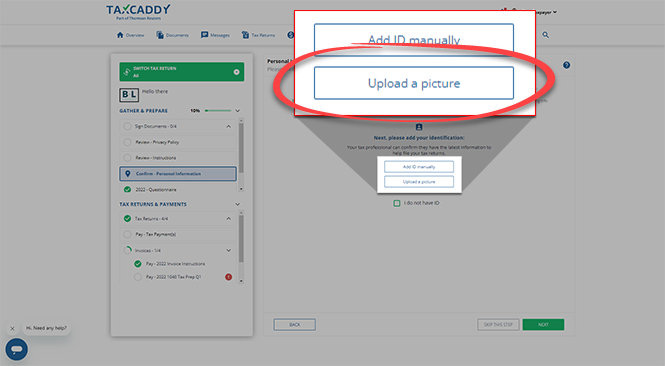
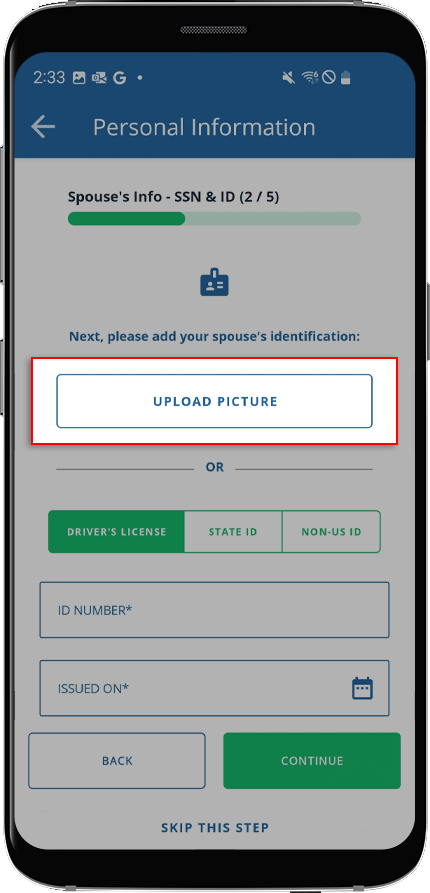
- Upload a picture:
- If you prefer to upload a photo, selectUpload a picture.
- Select a photo of your diver's license, thenOpen.
- SelectAdd Phototo submit your ID. You can also adjust the uploaded photo by using the zoom and rotate feature.
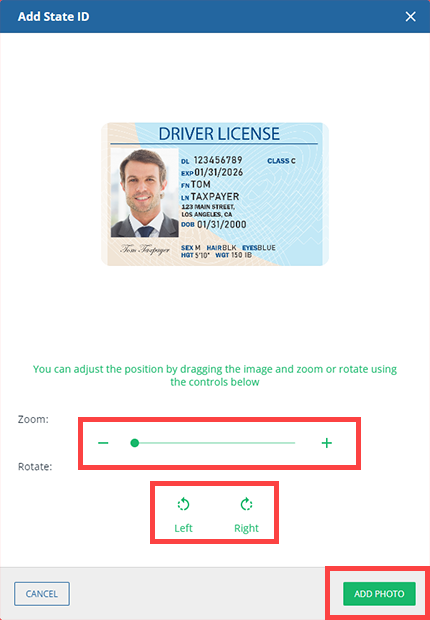
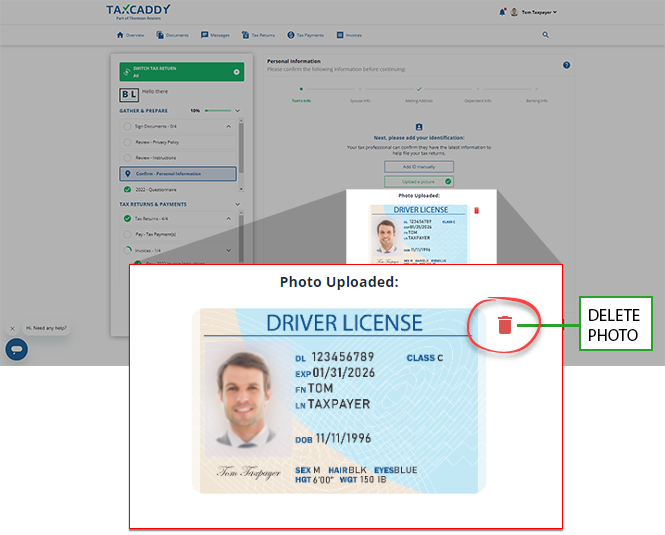
- The uploaded ID will appear at the bottom. Select theDeleteicon to remove the uploaded photo and try again.
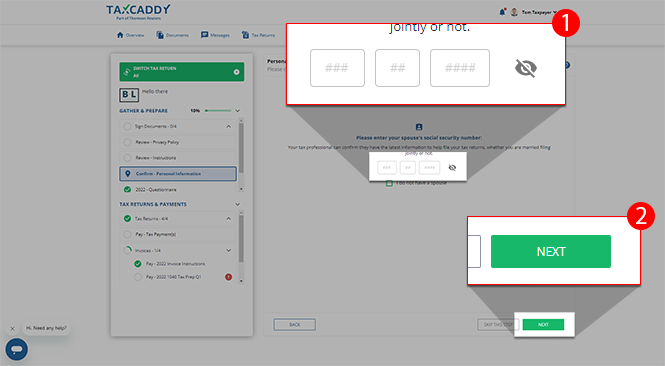
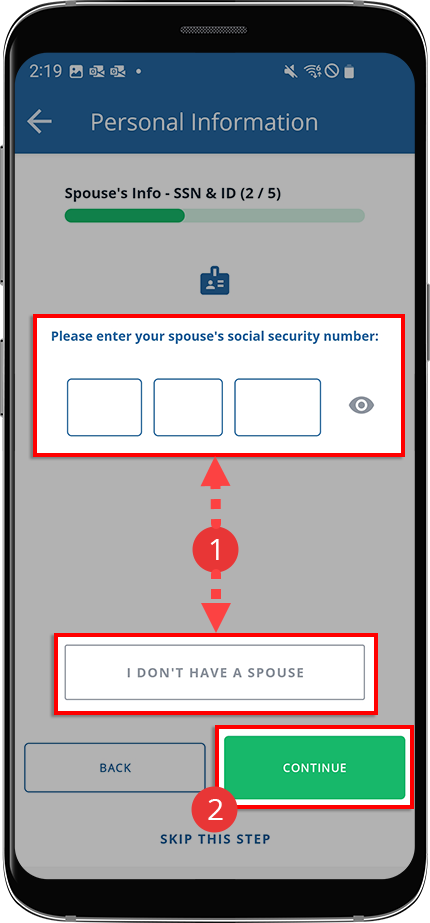
- Enter spouse social security number:Enter your spouse's Social Security number and selectNEXT.
 If you don’t have a spouse, mark theI do not have a spousecheckbox and continue..
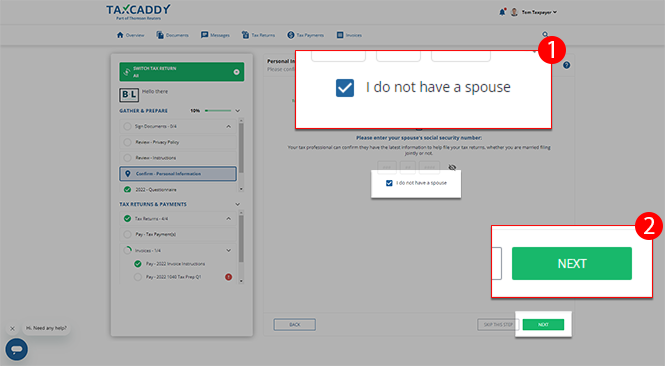
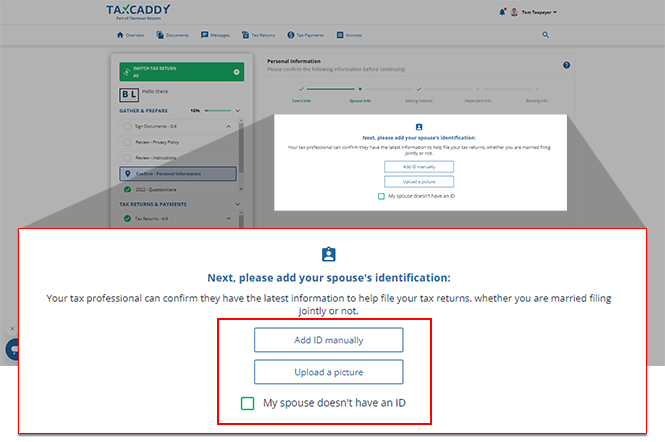
- Enter spouse state ID:Provide your spouse's ID. Choose from the following options:Description of each upload optionIdentification methodBrief descriptionAdd ID manuallySelect this to enter the information from your spouse's Driver's License or State ID.Upload a pictureSelect this to add a photo of your spouse's driver's license or state ID.I DON'T HAVE AN IDSelect this if your spouse does not have an identification card, then selectNEXT.
- Add ID manually: Select this to enter the information from your spouse's Driver's License or a State ID.
- Upload a picture: Select this to add a photo of your spouse's Driver's License or State ID.
 SelectMy Spouse doesn't have an IDif your spouse doesn’t have a Driver's License or a State ID. Once selected, selectNEXT.
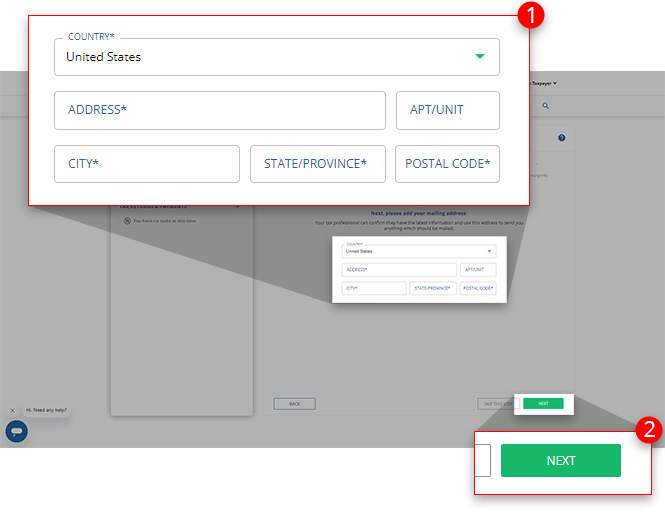
 - Enter Mailing Address:Provide the address information requested, then selectNEXTto proceed to the next step.
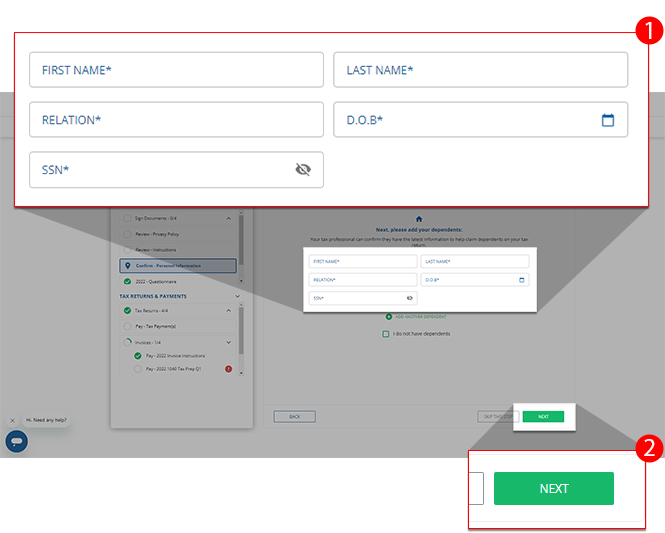
- Dependent Information:Enter dependent information and selectNEXTto continue.
 If you have more than 1 dependent, selectADD ANOTHER DEPENDENTand enter the information for another dependent.
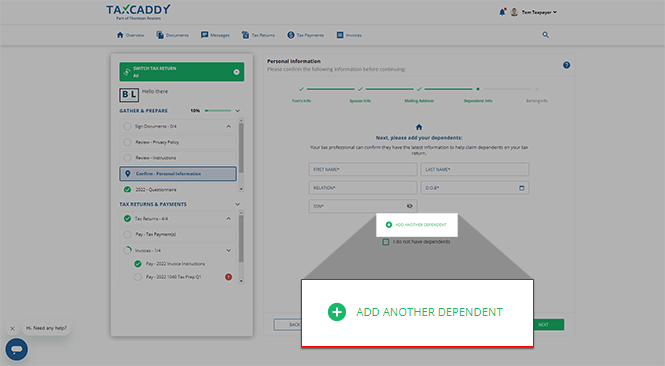 If you don’t have any dependents, mark theI DON'T HAVE ANY DEPENDENTScheckbox, then selectNEXTto proceed.
 - Banking Information:You have the option to provide your banking information. Providing this information speeds up processes like paying for tax payments and invoices that require payment information.If you don’t want to provide your banking information, selectSKIP THIS STEPto proceed to the summary screen.
 To provide your banking information, select whether the banking information is yourIndividualinformation or if this is aBusinessaccount.
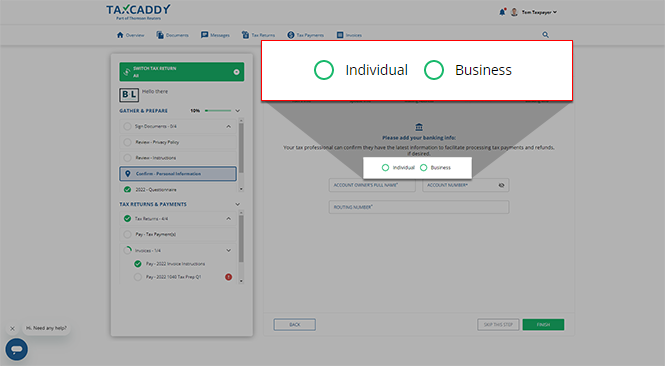 FINISH
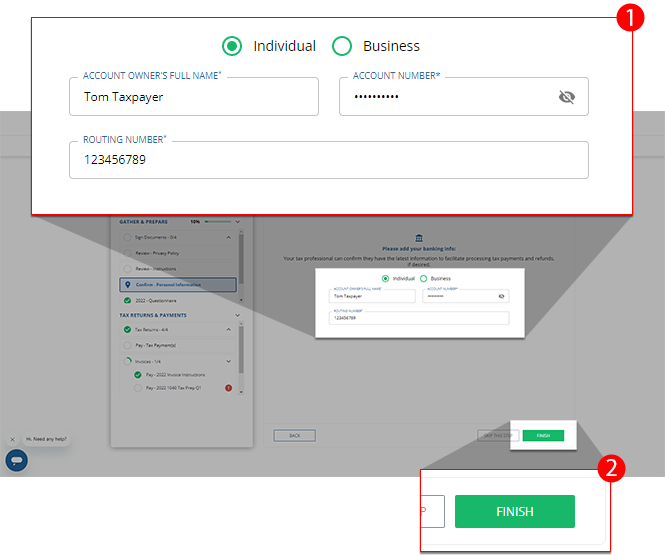
- Summary:Before you submit your personal information, review all your records. If you need to update any information, selectEDIT.
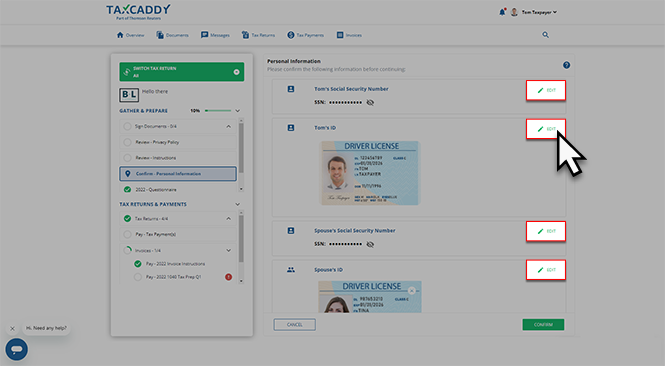 Once you're sure that all information displayed is correct, selectCONFIRM. You'll receive a notification on your screen that you've confirmed your personal information.
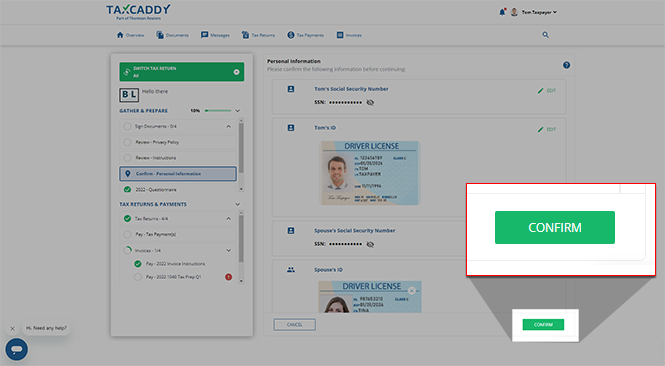 Once submitted, yourConfirm - Personal Informationtask will be updated with a checkmark in yourTask Listto indicate that it's been completed. If you want to reopen this task to update your information, select the listed task to be directed to the summary screen.
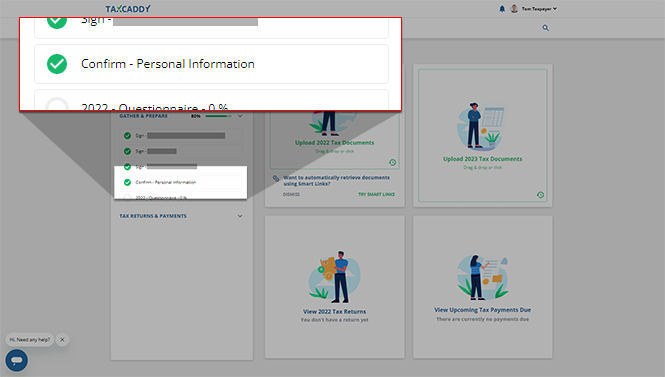 You and your tax professional will be able to view a copy of your personal information in the section of your .
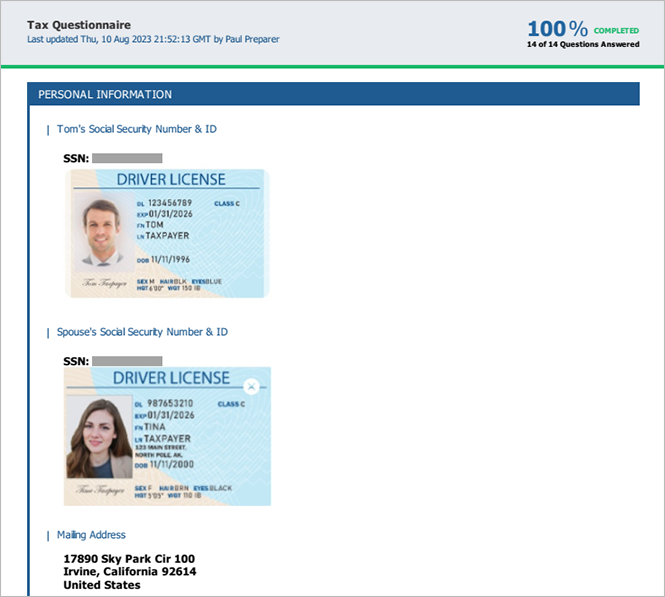 Edit Data:After submitting your personal information, you can go back and edit or remove data entered in each step. SelectEDITto edit the information on the selected panel.
iOS mobile app
Follow these steps on your iOS mobile phone app:
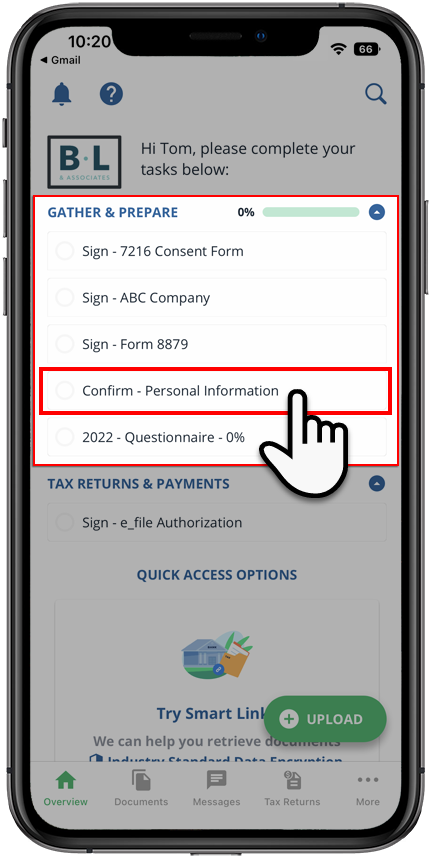
Sign in to the TaxCaddy mobile app, then select
Confirm Personal Information
underTax Pro Request
. 
Enter Social Security Number
:
Enter your Social Security number, then select
NEXT
to proceed to the next step.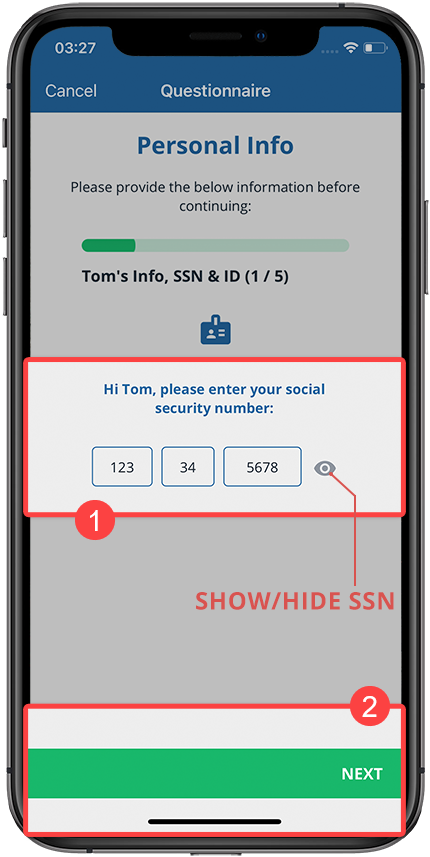
tip
The characters you provide will be hidden (masked) by default. Select the
Show/Hide
icon to show or hide the Social Security number.State ID
:On the
State ID
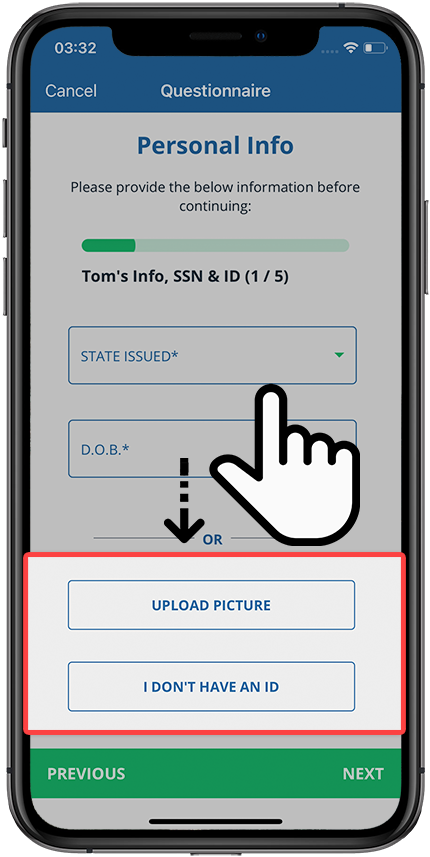
panel, you have the option to enter information manually, upload a photo of your ID, or indicate that you do not have an ID. If you choose to add a State ID then you can:
- Add manually: to manually enter information from your Driver's License or State ID.
- Take a Photo: to take a photo of your Driver's License or State ID.
- Upload a Photo: to upload a picture of your Driver's License or State ID from your device.
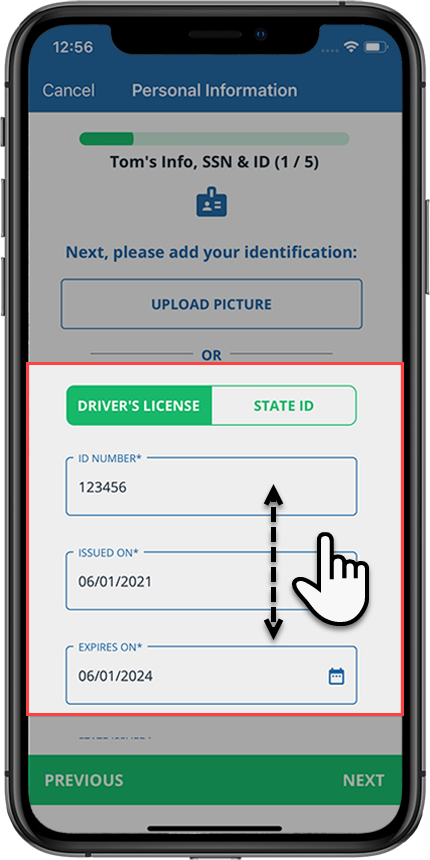
(iOS) Add Manually
To enter your information manually, select
Driver's License
or State ID
to indicate your type of ID, then enter all the details from your ID. You may need to swipe up to see all the fields, once you're done, select NEXT
.
You will see an error message(s) if a required field is missing information. You can enter the missing information then select
NEXT
again.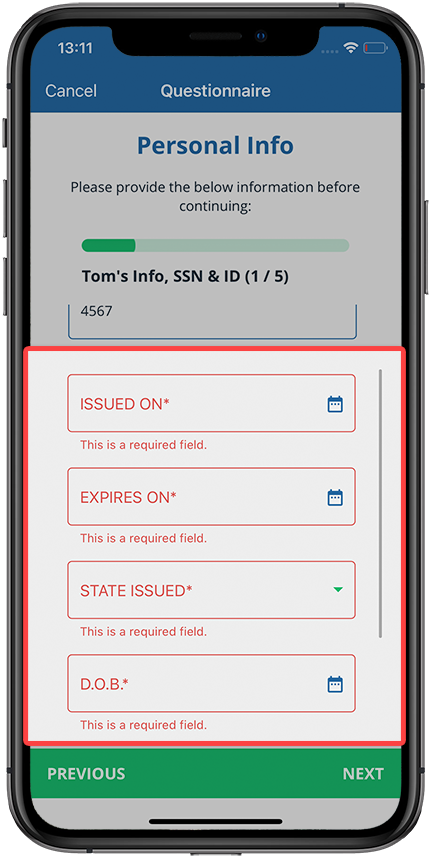
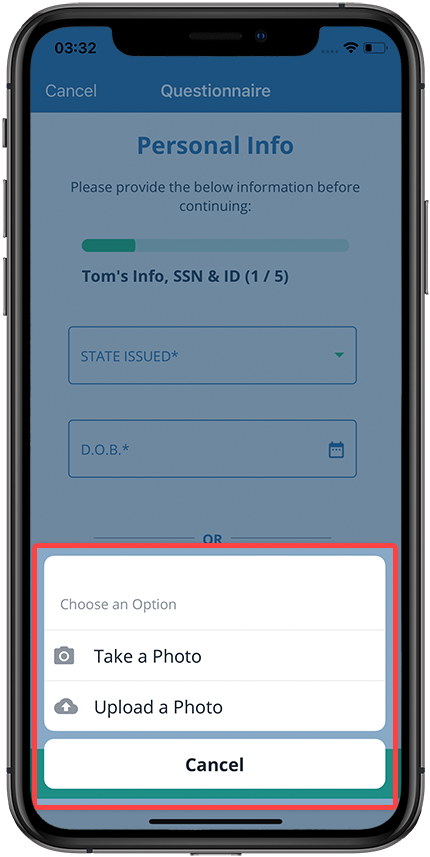
(iOS) Take a Photo
To upload a picture of your ID, swipe up to see the bottom of the screen, then select
UPLOAD PICTURE
.
Indicate whether you want to take a new photo of your ID or upload 1 already saved to your device.
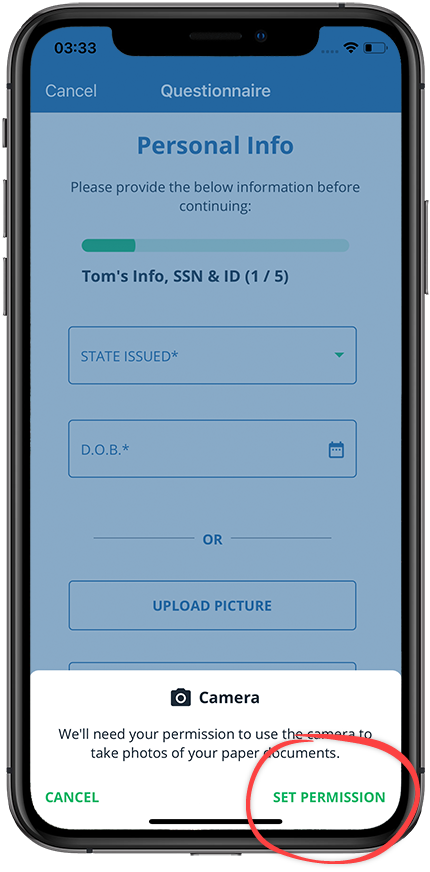
If you selected
Take a Photo
, then TaxCaddy may ask permission to access your camera. Select SET PERMISSION
.
Select
OK
to continue.Take a photo of your ID.
Select
Use Photo
to use the photo. Select Retake
to take a picture again.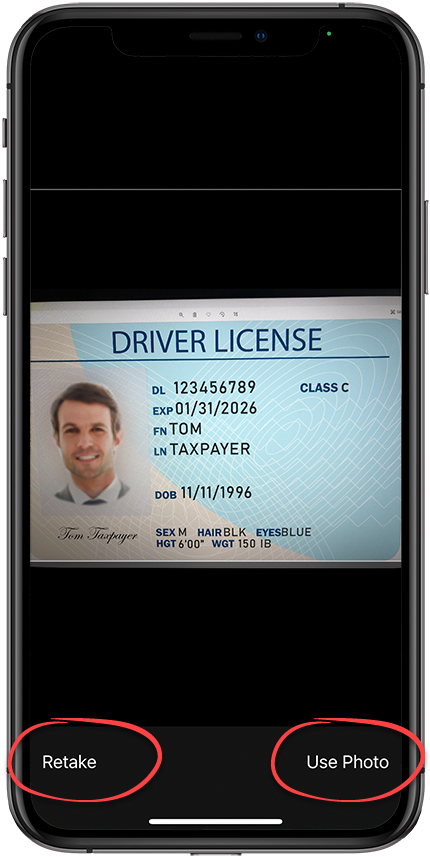
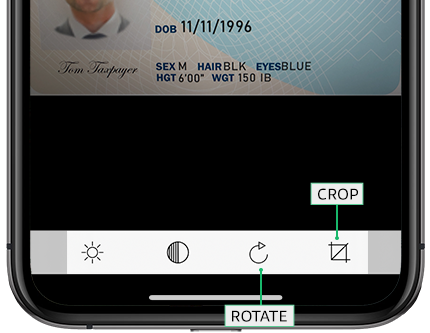
If necessary, you can adjust the uploaded photo by using the zoom and rotate feature.
Select
Save
to upload the photo.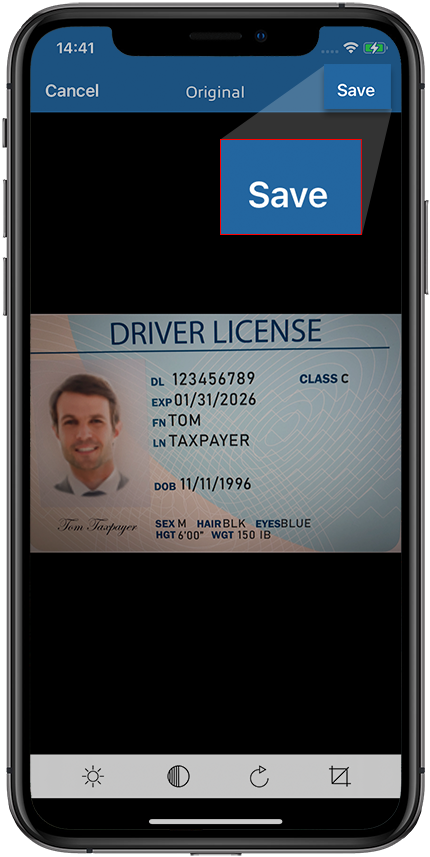
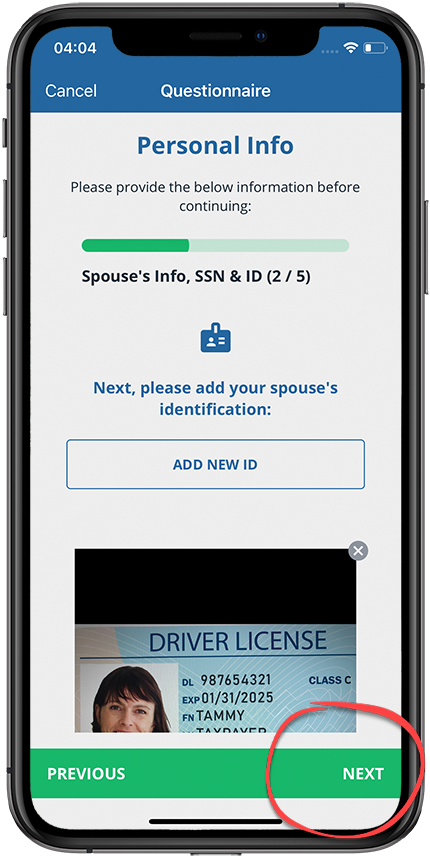
Select
NEXT
to continue to the next panel.Select the
X
icon to remove the newly provided ID.Select
ADD NEW ID
to replace the currently provided information for this panel.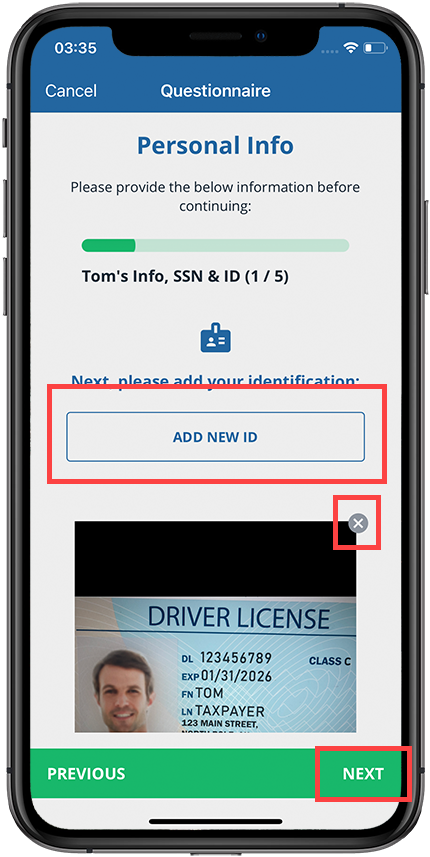
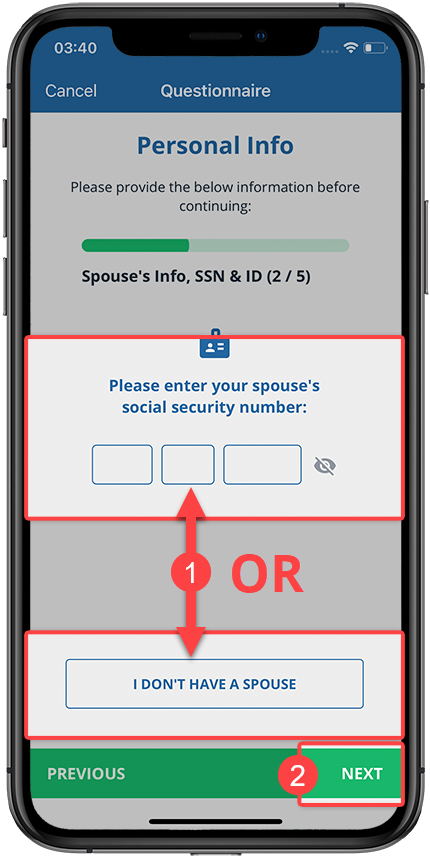
Enter spouse social security number
Enter your spouse's social security number, or select
I DON'T HAVE A SPOUSE
if you don’t have a spouse. Once you've made a selection, select NEXT
.
Spouse State ID
If you've indicated that you have a spouse and want to include their ID information, you have the option to:
- Add manually: to manually enter information from your Driver's License or State ID.
- Take a Photo: to take a photo of your Driver's License or State ID.
- Upload a Photo: to upload a picture of your Driver's License or State ID from your device.
note
You won’t see this step if you've indicated that you don’t have a spouse.
To enter your ID information manually, complete the required fields then select
NEXT
to proceed.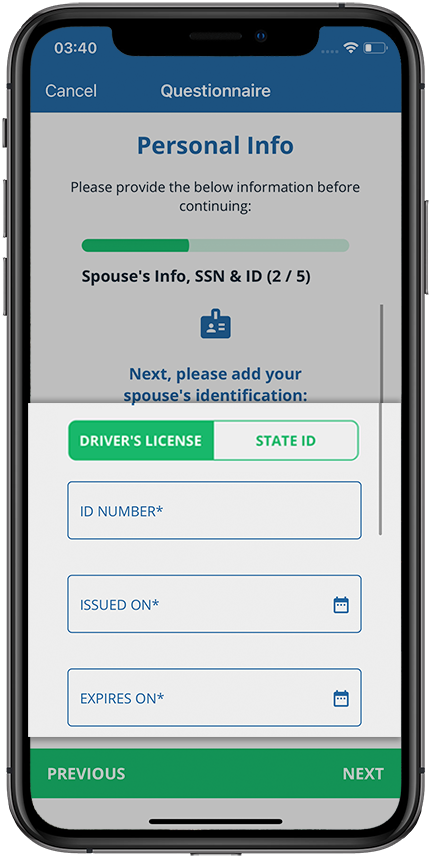
If you choose to upload a photo of your spouse's ID, scroll to the bottom of the screen, then select
UPLOAD PICTURE
.
After uploading/entering your spouse's personal information, select
NEXT
.
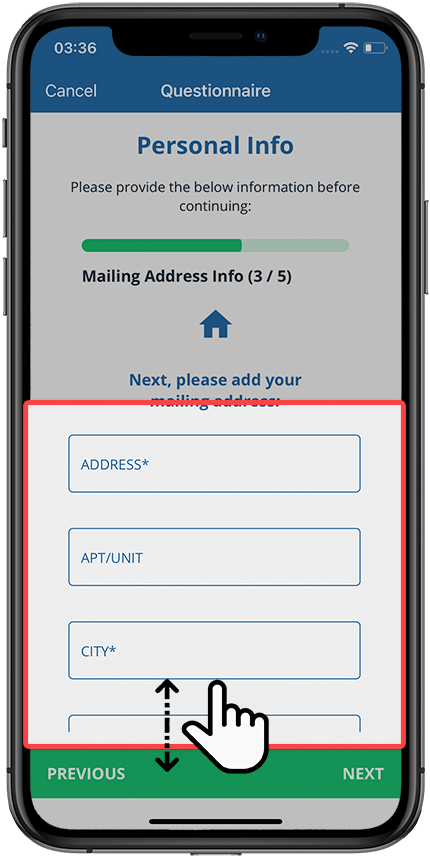
Mailing Address
On the
Mailing Address
panel, you can provide your mail/shipping address. You have the following options:- Add manually
- Use the same address from your ID
If you are adding the information manually, enter all of the requested information in the proper field and select
NEXT
.
If you are using the same address as your ID, select
USE SAME ADDRESS FROM MY ID
then select NEXT
to continue.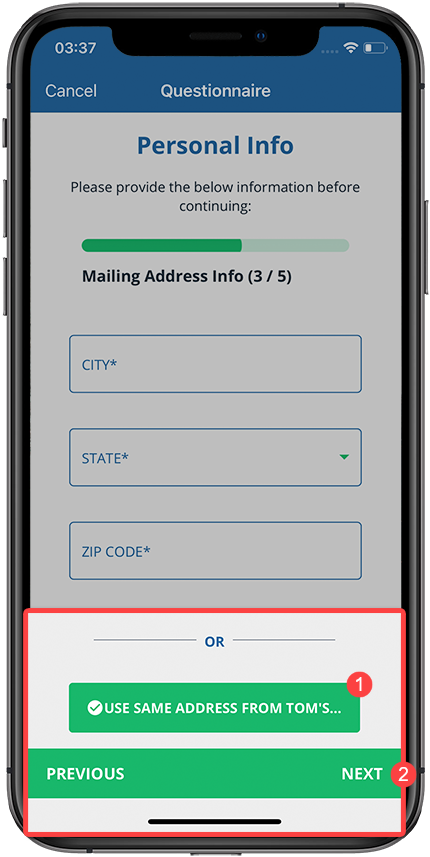
Dependent Information
Enter the first and last names of any dependents you have. You can select
ADD DEPENDENT
if you have more than one dependent.If you don’t have any dependents, select
I DON'T HAVE ANY DEPENDENTS
.Select
NEXT
once you've completed this step.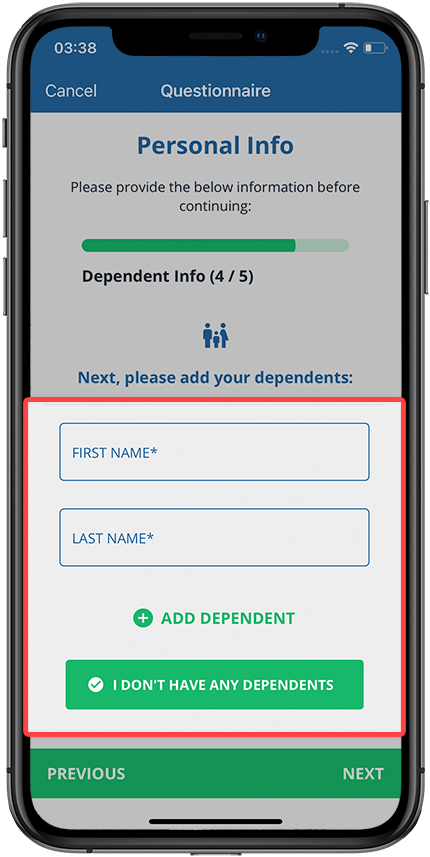
Banking Information
You have the option to provide your banking information. Providing this information speeds up processes like paying for tax payments and invoices that require payment information.
If you don’t want to include this information, select
NEXT
to proceed with this task.You can include your banking information. Indicate whether this is an
Individual
or Business
bank account and enter the requested information. Once you've completed each field, select NEXT
to continue to the last step.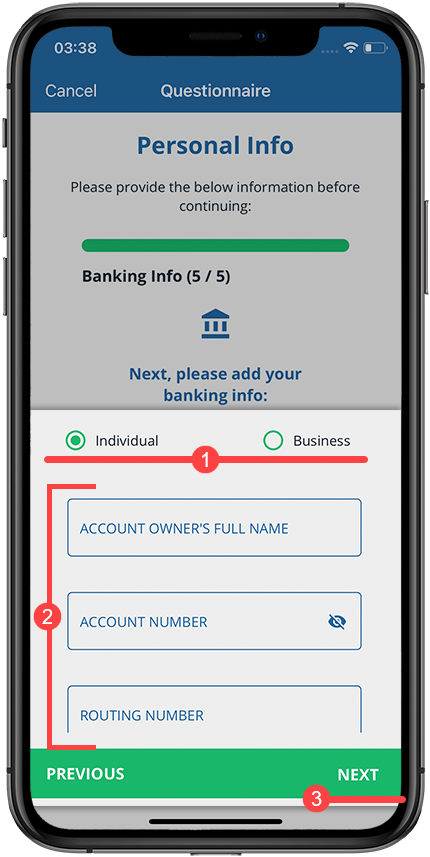
Summary
Once you've provided your personal information and selected
NEXT
, you will see a final screen summarizing the information you've provided. Swipe up/down to view all the information you've provided thus far. You can also select EDIT
to update the information.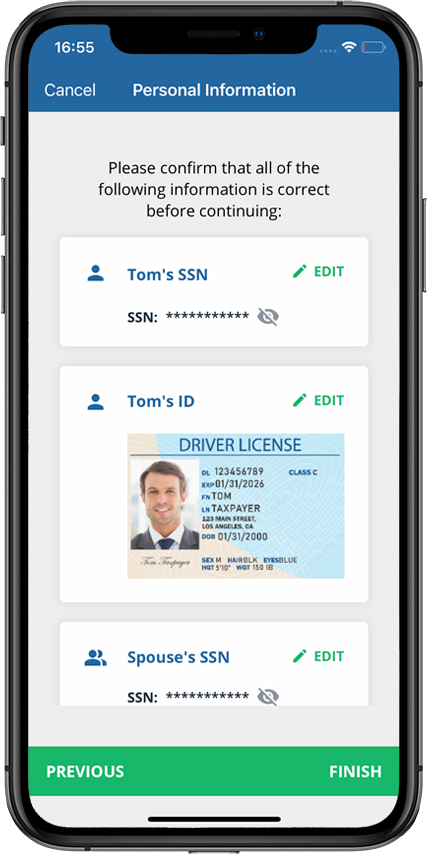
Once you are done reviewing the information, select
FINISH
. The Confirm Personal Information
window will appear asking you to confirm that you have completed providing your details. Select the checkbox to confirm that you are ready to submit the information to your tax professional.Select
Submit Now
to finish this task.Select
Submit Later
to add more information at a later time.note
You can't make any changes to your personal information once you select
Submit Now
. If you need to remove or update any information, select EDIT
or go to the previous panels.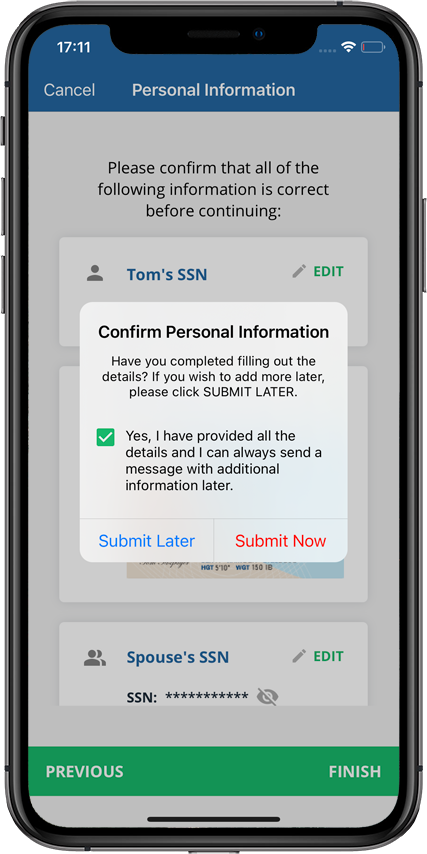
Android mobile app
Follow these steps on your Android mobile phone app.
Sign in to the TaxCaddy mobile app, then select
Confirm Personal Information
under Tax Pro Request
.
Enter Social Security Number
Enter your social security number, then select
CONTINUE
to proceed to the next step.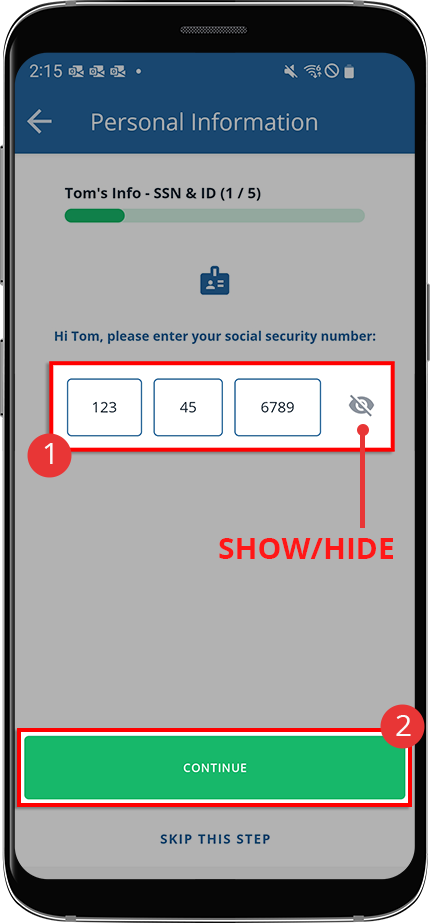
note
The characters you provide will be hidden (i.e., masked) by default, you can select the
Show/Hide
icon to show or hide the social security number.State ID
On the
State ID
panel, you have the option to enter information manually, upload a photo of your ID, or indicate that you do not have an ID.If you choose to add a state ID then you can:
- Add Manually: to manually enter information from your Driver's License or State ID.
- Take a Photo: to take a photo of your Driver's License or State ID.
- Upload a Photo: to upload a picture of your Driver's License or State ID from your device.
(Android) Add Manually
To enter your information manually, select
DRIVER'S LICENSE
or STATE ID
to indicate your type of ID, then enter all the details from your ID. You may need to swipe up to see all the fields. Once you're done, select CONTINUE
.
note
If you selected 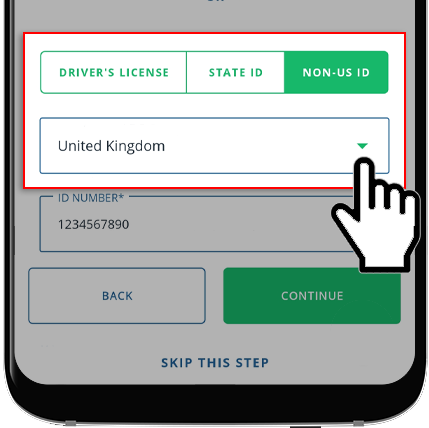
NON-US ID
, you will additionally be asked to provide the country from which this ID was issued.
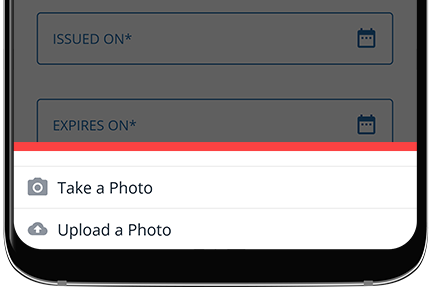
(Android) Take a Photo
To upload a picture of your ID, select
UPLOAD ID
.
If you don’t have a State ID to upload, select
I DON'T HAVE AN ID
to continue.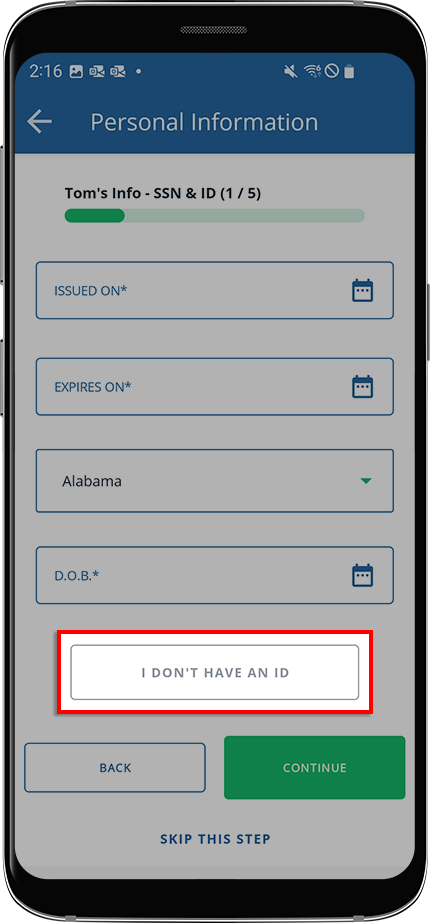
Indicate whether you want to take a new photo of your ID or upload one already saved to our device.
If you selected
Take a Photo
, select SET PERMISSION
to let TaxCaddy access your device's camera.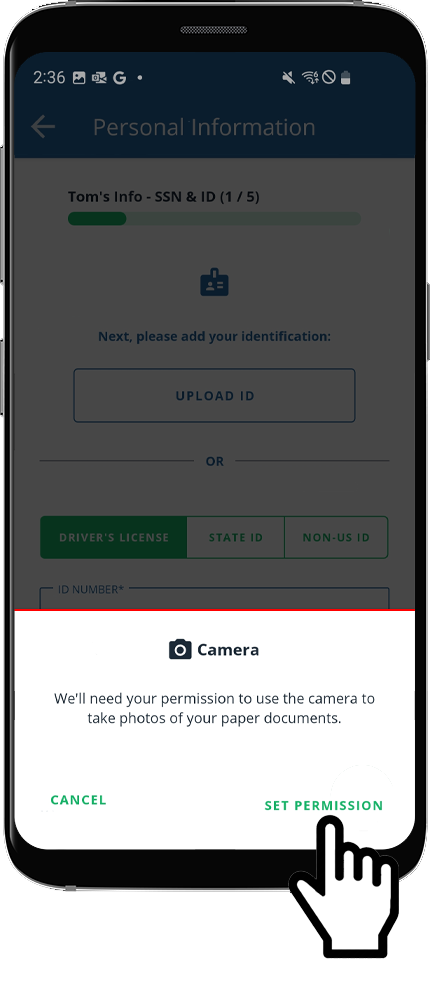
Select
While using the app
to let TaxCaddy use your camera.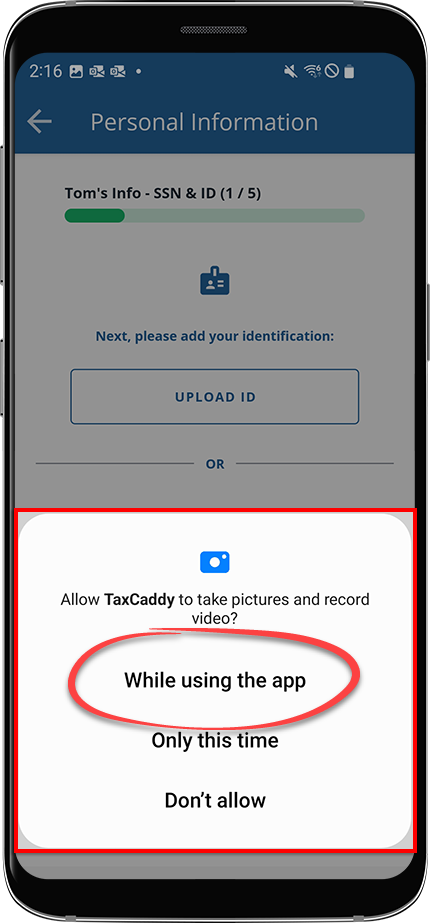
Select
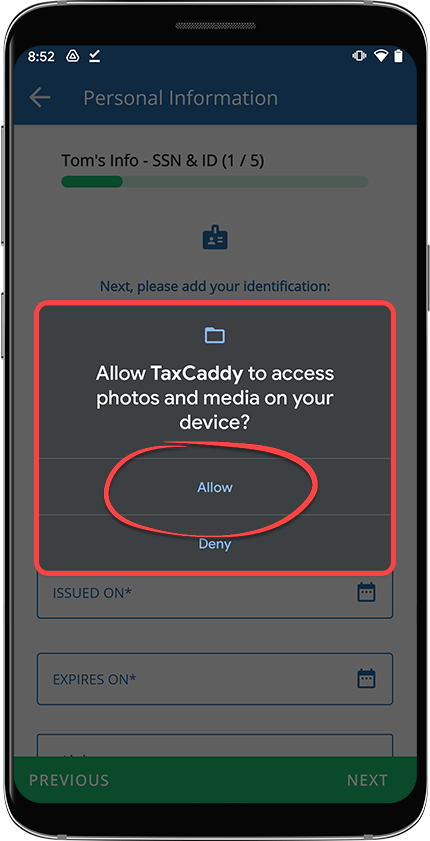
Allow
.
After uploading your ID, you can:
- SelectNEXTto continue to the next panel.
- Select theXicon to remove the provided ID.
- SelectREPLACE IDto remove the currently provided information for this panel.

Enter spouse social security number
Enter your spouse's social security number, or select
I DON'T HAVE A SPOUSE
if you don’t have a spouse. Once you've made a selection, select CONTINUE
.
Spouse State ID
If you've indicated that you have a spouse and want to include their ID information, you have the option to:
- Add Manually: to manually enter information from your Driver's License or State ID.
- Take a Photo: to take a photo of your Driver's License or State ID.
- Upload a Photo: to upload a picture of your Driver's License or State ID from your device.
note
You won’t see this step if you've indicated that you don’t have a spouse.
To enter your ID information manually, complete the required fields, then select
CONTINUE
to proceed.
If you choose to upload a photo of your spouse's ID, select
UPLOAD PICTURE
.
After uploading/entering your spouse's personal information, select
NEXT
.After uploading your ID, you can:
- SelectNEXTto continue to the next panel.
- Select theXicon to remove the provided ID.
- SelectREPLACE IDto remove the currently provided information for this panel.
Mailing Address
On the
Mailing Address
panel, you can provide your mail/shipping address. You have the following options:- Add manually
- Use the same address from your ID
If you are adding the information manually, enter all of the requested information in the proper field and select
CONTINUE
.
If you are using the same address as your ID, select
USE ADDRESS FROM ID
then select CONTINUE
to continue.Dependent Information
Enter the information of any dependents you have. You can select
ADD DEPENDENT
if you have more than one dependent.If you don’t have any dependents, select
I DON'T HAVE ANY DEPENDENTS
.Select
CONTINUE
once you've completed this step.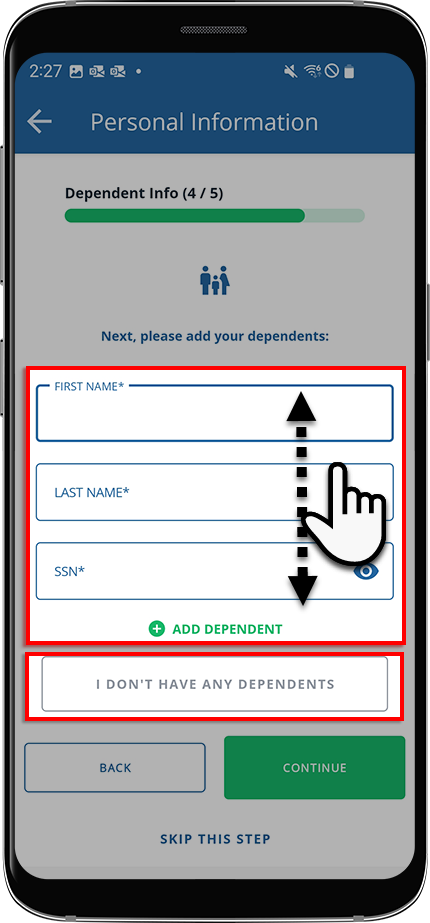
Banking Information
You have the option to provide your banking information. Providing this information speeds up processes like paying for tax payments and invoices that require payment information.
If you don’t want to include this information, select
SKIP THIS STEP
to proceed with this task.If you choose to provide your account details, indicate whether this is an
INDIVIDUAL
or BUSINESS
bank account and enter the requested information. Once you've completed each field, select CONTINUE
to complete this task.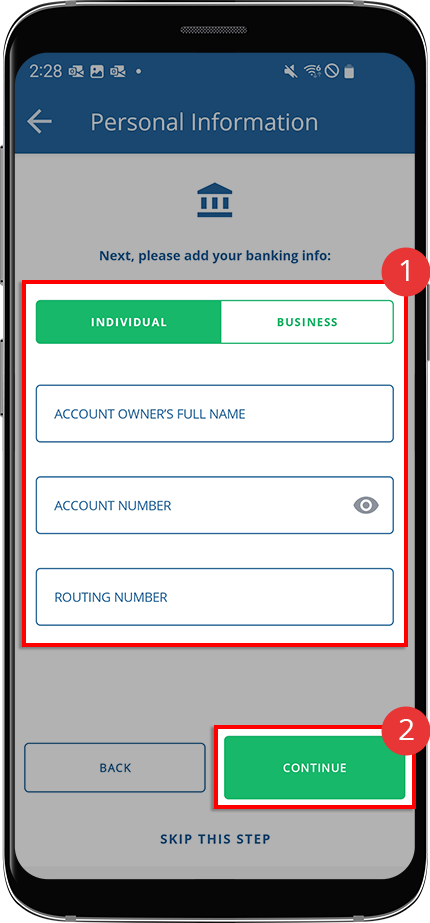
Summary
Once you have provided your personal information and selected
CONTINUE
, you will see a final screen summarizing the information you have provided. Swipe up/down to view all the information you've provided thus far. You can also select EDIT
to update the information.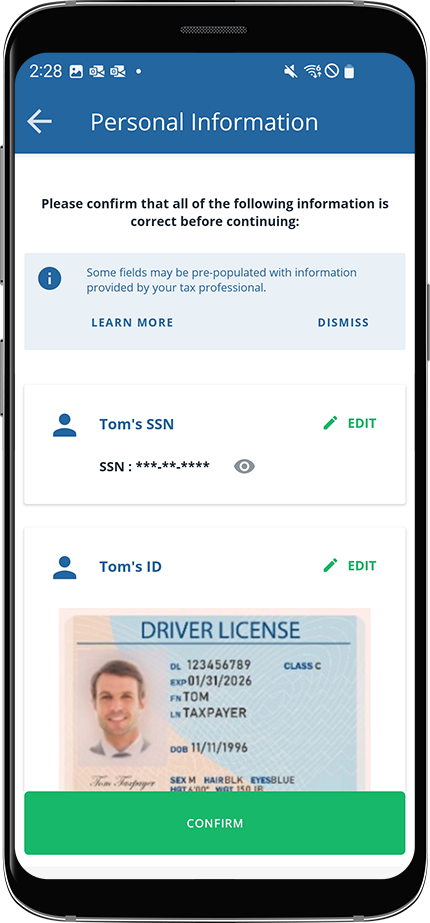
Once you are done reviewing the information, select
CONFIRM
. The Confirm Personal Info
window will appear asking you to confirm that you have completed providing your details. Select the checkbox to confirm that you are ready to submit the information to your tax professional.Select
Submit Now
to finish this task.Select
Submit Later
to add more information at a later time.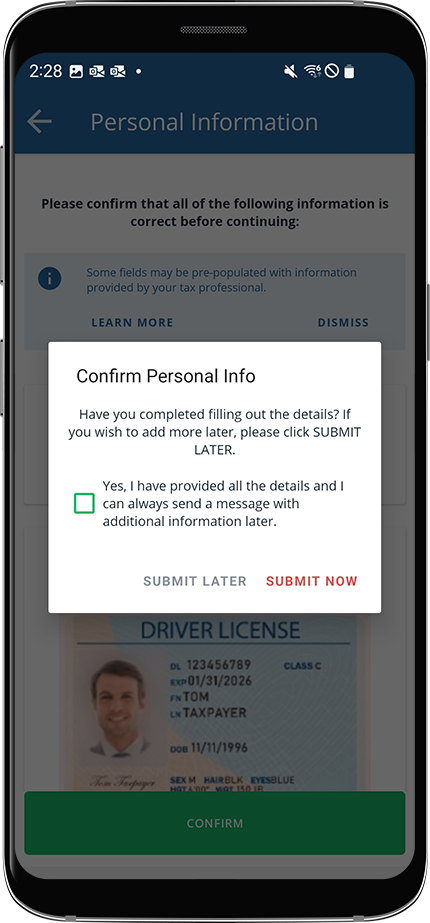
Autofill Personal Information
While completing the
Confirm Personal Information
task, some personal information that you or your tax professional have previously provided in TaxCaddy will automatically prepopulate (autofill) if it's available. If this happens, review the prepopulated fields (displayed in blue) for accuracy before your continue.- If the autofill information is correct, verify the details and then proceed to the next step.
- If the autofill information is incorrect, provide the correct information before you proceed.
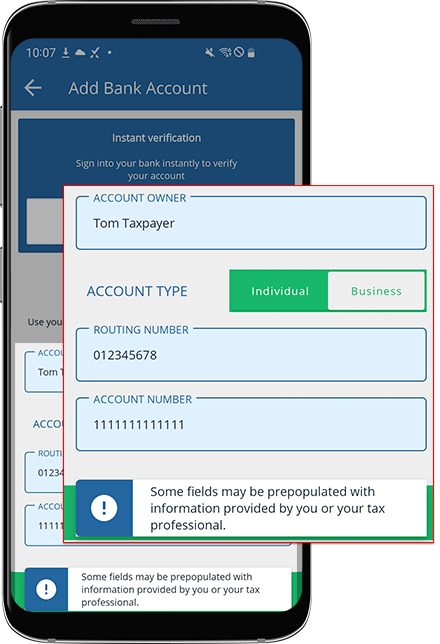
You will see a notification appear at the bottom of your screen indicating that some fields may have been prepopulated.
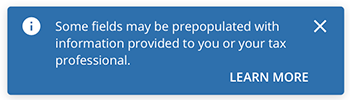
"Some fields may be prepopulated with information provided by you or your tax professional."
TaxCaddy prepopulates certain fields for the following scenarios, if the information is available:
- Confirming Personal Information
- Knowledge-Based Authentication
- Paying tax payments by check