
Enable and configure Adobe Acrobat Sign
Follow these instructions to enable and configure Adobe Acrobat Sign.
Enabling an eSign service
note
To complete these instructions, you must know the
Client ID
and Client secret
key for your eSign service account: Adobe Acrobat Sign instructions for retrieving the Client ID and Client secret key.System-level administration
System administrators can enable the integration with electronic signature providers via
System Admin
> System Settings
> Third Party Services
:
To enable one of the services, select
Add
. The Add Service
screen opens:
Select
Adobe Acrobat Sign
and then Add
.Click
More Actions
> Configure
:
The configuration screen for the selected service opens:

You must enter the
Client ID
and Client secret
key from your eSign service account: Adobe Acrobat Sign instructions for retrieving the Client ID and Client secret key.After entering these details, a permission screen opens.
Select
Accept
to accept the permission request, then the following message will display:Test successful and token generated. you can now save the configuration.
After the test is successful and the token is generated, select
Save
. The service is now configured and available in the list of third-party services.The system administrator can choose whether the services are enabled by default on every site or can disable them on the
Third-Party Services
screen:
note
If a service is disabled at the system level, it is
NOT
available at the site level.Authorising an eSign service
When HighQ support has configured the eSign service for your instance you must then authorise the service using your eSign account credentials.
note
If a service is authorised, you can send a document for signing on behalf of the system account. If a service is
NOT
authorised, a user can still send a document but must have their own eSigning service account.To authorise a service, click
More actions
> Authorise
:
Enter your Adobe credentials to authorise the service.
note
Use
More Actions
to Revoke authorisation
or Remove
third-party services:note
To ensure your instance supports the latest Adobe Acrobat Sign features (for example, multiple signature fields), configure webhooks for your Adobe Acrobat Sign account.
Site-level administration
Once enabled and configured, the services are set as default at the system level, and therefore as default at the site level. This can be overridden by changing the dropdown menu to either
ON
or OFF
in Admin
> Files
> Third Party Services
:
Enable features that require webhooks
To use features introduced since January 2024, you must add a
webhook
to your Adobe Acrobat Sign account.note
To support eSign features released in HighQ version 5.7.37 (January 2024) or later, please ensure you:
- Configure a new webhook in your Adobe Acrobat Sign account.
- Enable webhook-supported Adobe Acrobat Sign features in system admin for your HighQ instance.
- Ensure that Adobe Acrobat Sign is enabled for all required sites.
Configuring webhooks in Adobe Acrobat Sign
To ensure your instance supports the latest Adobe Acrobat Sign features (for example, multiple signature fields), you must configure webhooks for your Adobe Acrobat Sign account, then switch on webhook-enabled features in your HighQ system admin settings.
note
All Adobe eSignature features released up to and including the January 2024 customer release (version 5.7.37) continue to function (i.e. there is no requirement to make this change if you do not require additional features).
Add and configure a new webhook in Adobe Acrobat Sign
Open your Adobe Acrobat Sign account dashboard and log in as an account admin.
Open the
Account
tab and select Webhooks
from the left menu:
The
Webhooks
page opens: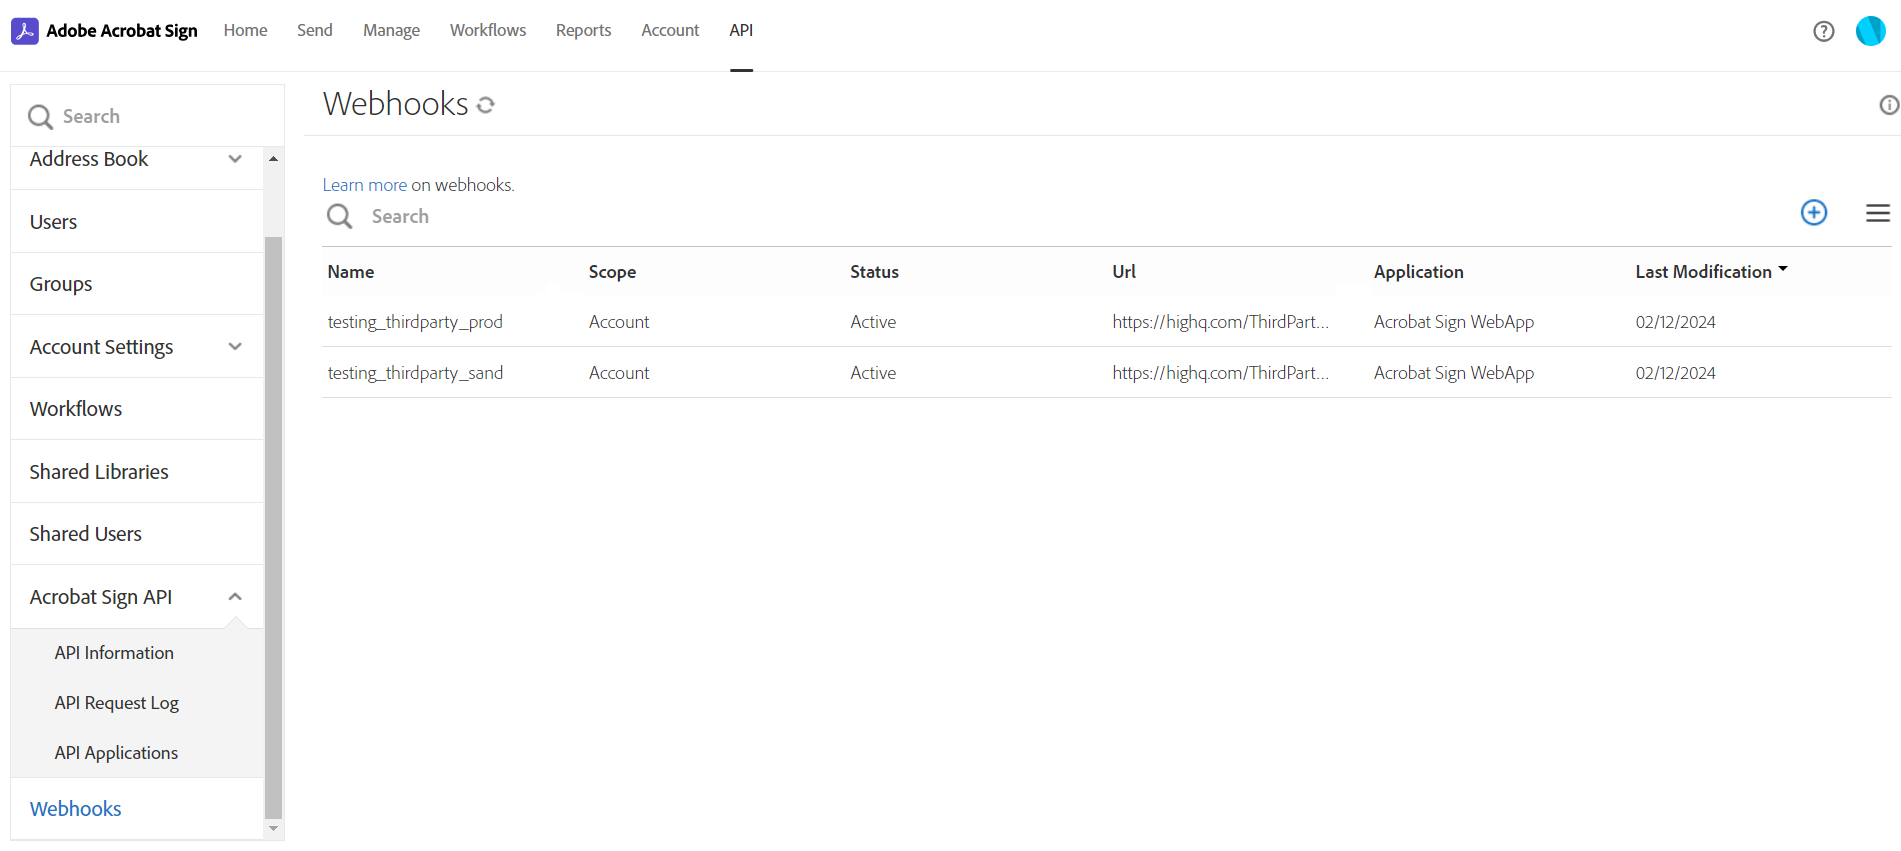
Select the
⨁
icon from the top-right of the list to create a new webhook.note
The list of webhooks for your account may be empty.
Enter the required entries for your configuration:
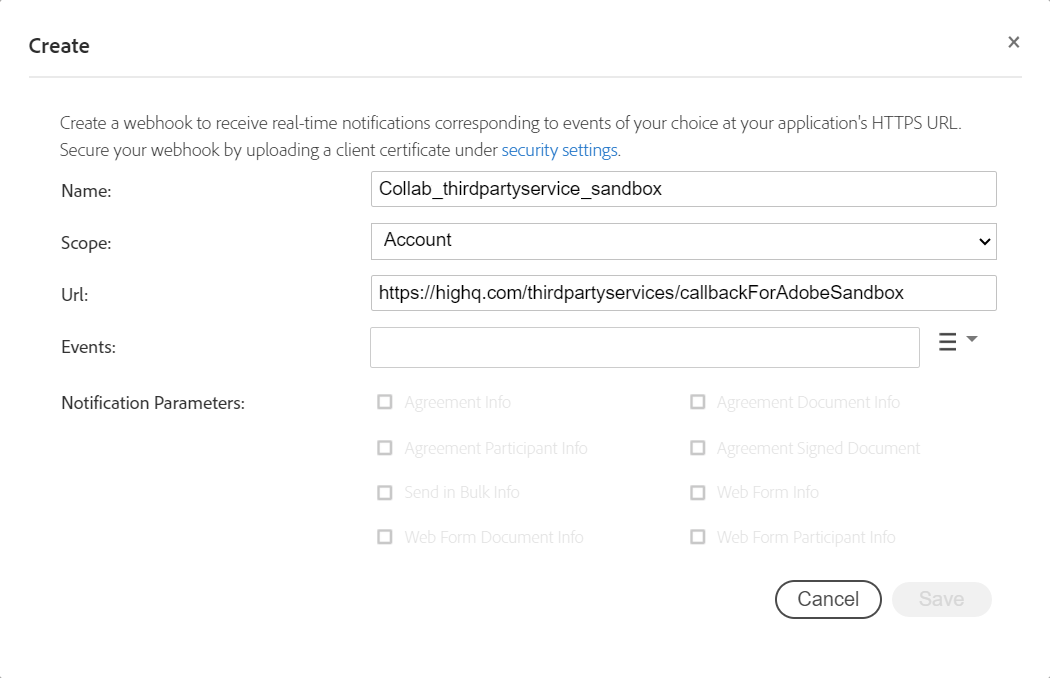
- Name- to help with troubleshooting, please use the following syntax:"CollaborateInstanceName_Adobe_Sandbox" or "CollaborateInstanceName_Adobe_Production"Replace 'CollaborateInstanceName' with the name of your HighQ instance; use either 'Sandbox' or 'Production' depending on the type of account you are configuring.
- Scope- select 'Account'
- URL- Find the third-party Microservice URL in the HighQ Hub, or you may need to contact our Support team to confirm the URL. Enter this, followed by "/callbackForAdobeSandbox" (if you are registering for a sandbox environment) or the URL followed by "/callbackForAdobe" (if you are registering for a production environment).
- Events- click the list button and select these events:
- Agreement sent
- Agreement rejected
- Agreement participant completed
- Agreement email viewed
- Agreement email bounced
Example:
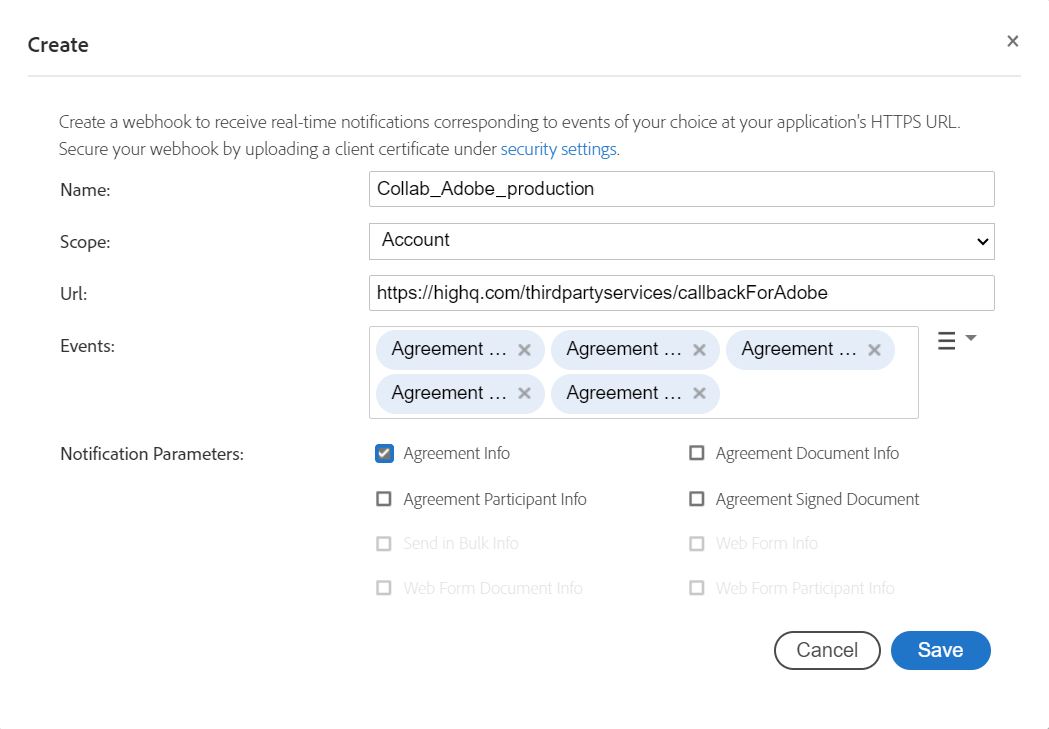
Click
Save
to add this webhook to the list of active webhooks.Check the Adobe Acrobat Sign service is configured and authorised in HighQ System settings.
Enable webhook features in System settings
Click your profile icon and select
System Admin
then System settings
from the list on the left.Scroll down to
Adobe Acrobat Sign
under Third party services
.Select
Enable webhook supported features
in System Settings
to enable advanced features for Adobe Acrobat Sign, such as multiple signature fields that can be placed in any location in a document.