
Review the converted invoices
Review the converted invoice by comparing the extracted on-screen data to the original invoice file, ensuring that totals, currency, timekeepers, fees, and expenses match before posting.
Access the review page
You can access the new invoice conversion review page the same way you accessed the legacy page:
- Firm users access the page from 1 of the following:
- .
- A matter'sInvoicestab.
- A direct invoice email link. Breadcrumbs at the top reflect the origin.
- Company users reach the same page from a matter'sInvoicestab.
Review a converted invoice
Make sure invoice data was extracted from the PDF (non-LEDES) file and converted into LEDES format, and make any needed corrections.
An instructional banner explains what to check before posting:
Review the extracted invoice data below. Confirm that the calculated totals match the totals shown on the uploaded invoice file. Resolve any discrepancies and add any missing required LEDES fields before posting.

The toolbar compares the invoice total extracted from the PDF with the total calculated from the extracted LEDES details.
Badges showing the total number of issues found in the extracted data are also shown.
The toolbar is sticky and remains at the top of the page when you scroll. A link to the original invoice file is included for easy access wherever you are on the page.
After making sure that the extracted LEDES data is correct and the invoice totals match the PDF file, select
POST
to deliver the invoice to the company.Step 1 - Review invoice headers
Status badges next to the section title summarize the issues found in the section.
- A red badge shows for issues that have to be fixed (for example, missing required fields).
- An orange badge appears for warnings that should be reviewed.noteThe red and orange badges can appear together or alone.
- A single green badge shows when there are no concerns.
Required fields are marked with an asterisk (*).
A
Documents
option shows the total file count and opens a screen listing the original invoice and all supporting documents, each downloadable individually or all at once.The
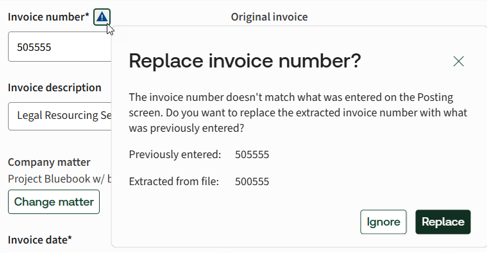
Invoice number
and Invoice currency
entered on the posting screen show in their respective fields, compared against the values extracted from the invoice file.A warning appears beside either field if the values differ.
- Hover over it to show a tooltip with the extracted value.
- Select it to replace the entered value with the extracted one.
Firm users:
The Company matter
and the Firm internal name & number
can be updated in the same manner as in the legacy page.Company users:
The Firm
and Law Firm Office
selection made on the initial posting screen can be updated here in the same manner as in the legacy page.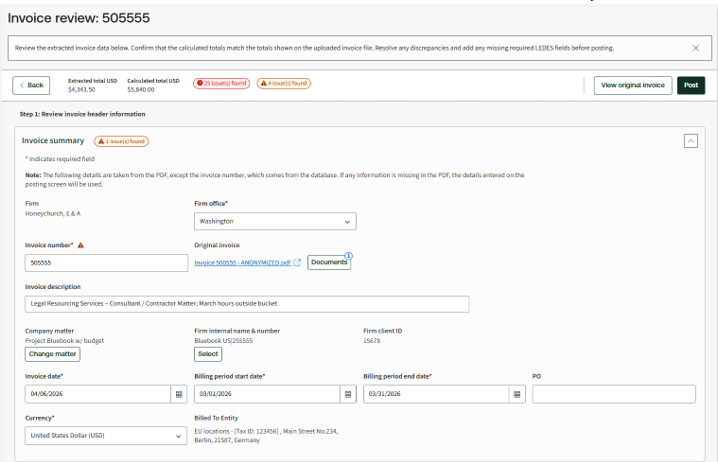
Step 2 - Review invoice total amounts
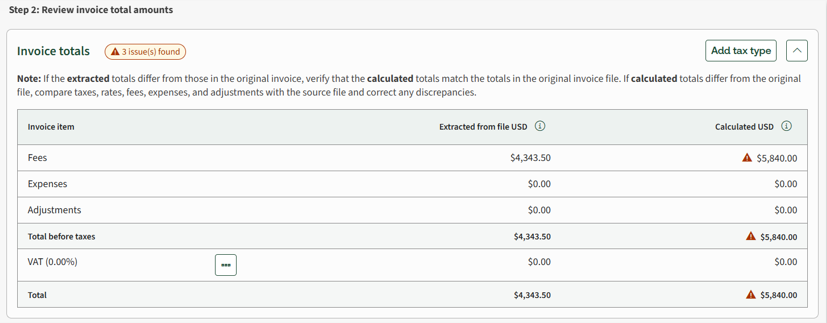
Extracted vs. Calculated
values are shown side by side for the following: - Fees
- Expenses
- Adjustments
- Total before taxes
- Each tax line
- The grandTotal
A warning shows on any calculated value that doesn't match the original file.
Both firm and company users can add, edit, or delete tax types directly from this grid (GST, HST, VAT, PST, or a custom tax with its own name and rate). Deleting a tax that's already in use prompts a confirmation before it's removed from every line item.
All totals recalculate in real time as fees, expenses, adjustments, or tax selections change.
Timekeepers section
The timekeepers extracted from the invoice file are listed in a dedicated, sortable grid with the following columns:
- ID
- First name
- Last name
- Classification
- Hourly rate
The grid feeds the
Timekeeper
dropdowns used in Fees and Expenses
.As in the legacy review page, timekeepers previously submitted are identified by ID or name, and the system autofills their ID and classification in this table.
New timekeepers will need to enter the missing information.
To update timekeeper information, select the relevant field and the entire row wills switch to edit mode.

Updating any timekeeper data in this table automatically updates the fee line items assigned to that timekeeper. A single update can correct multiple errors in the
Fees
section.Deleting a timekeeper still assigned to a line item triggers a confirmation prompt first.
important
- Many Legal Tracker customers automatically reject invoices with unapproved timekeepers. Review your clients' billing guidelines before submitting invoices with new timekeepers.
- Each timekeeper needs to be clearly identified on the invoice with:
- The 1st and last name — if provided, has to be consistent across all invoice submissions.
- ID (optional) — if provided, has to be consistent across all invoice submissions.
- Classification:
- If provided, it needs to match an approved company classification.
- If omitted, manually select the classification for each fee line item the 1st time the timekeeper appears, unless previously submitted via an invoice or rate sheet.
- Rate — if not provided, Legal Tracker infers the rate based on the total fee amount and time or hours associated with the fee.
- Some clients require aTask Codeand occasionally anActivity Codefor each fee line item. If these are missing from the invoice, you'll need to select them for each fee line item.
Fees
The fees table moved to a cleaner table layout with inline
Add
and Edit
. Missing required fields are highlighted in red with an inline error message and the missing information is flagged in the table.Example:
The company requires task codes, which were not found in the invoice file and therefore couldn’t be extracted. In this case, the user will need to select each row to edit it, then select a task code.Selecting a
Timekeeper
from the dropdown (showing name, ID, hourly rate, and classification) auto-populates the Rate
.Changing
Hours
, Adjustments
, or Tax selections
immediately recalculates Subtotal
, Tax
, and Total
.Apply multiple
Tax Types
per line with the checkboxes, each shown with its percentage.Select the ellipsis in the
Actions
column to delete a fee.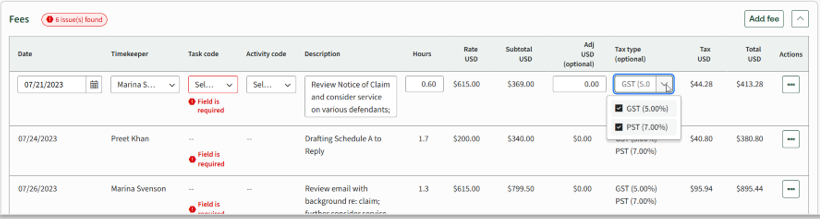
Expenses
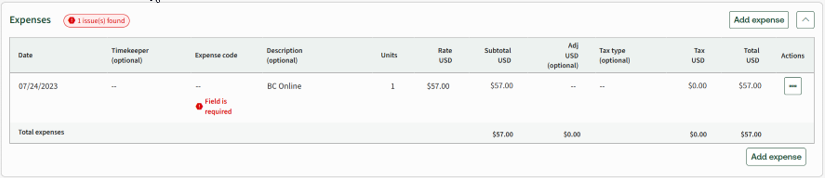
The extracted expenses are treated in a similar manner to the fees. The grid includes the following columns:
- Date
- Timekeeper (optional)
- Expense code
- Description (optional)
- Units
- Rate USD
- Subtotal USD
- Adjustment USD (optional)
- Tax type (optional)
- Tax USD
- Total USD
- Actions
Invoice-level adjustments
When there's a discrepancy between the extracted invoice totals and the calculated totals based on the invoice's LEDES details (fee and expense line items, or existing invoice-level adjustments), you can add a new invoice-level adjustment to reconcile the difference.
If the invoice file doesn't include enough detail to create fee line items (such as timekeepers, hourly rates, or hours), the fees can't be listed in the
Fees
section. Instead, they appear here as invoice-level adjustments with the type Fees
.Adjustments support multiple tax types and negative amounts.

Validation and posting
Every editable field transfers its own validation:
- A red highlight and inline message for errors.
- An orange warning icon for mismatches or unused taxes/timekeepers.
Error and warning counts roll up into a badge next to each section title and the overall
Invoice Summary
, so you can view what still needs attention.Posting is gated
: If you select Post
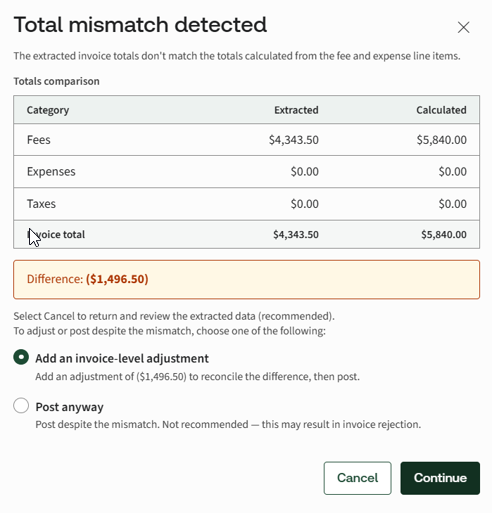
while errors remain on the page, you're taken directly to the 1st field that needs attention. Posting is blocked until every error is fixed.If, at the time of posting, the invoice totals from the PDF file still don't match the totals calculated from the extracted LEDES data, the system shows a screen highlighting the difference and offers 3 options:
- Cancel and go back to review the timekeepers, fees, and expense details.
- Add an invoice-level adjustment to address the discrepancy.
- Post anyway, at the risk of the invoice being rejected.
Related Content
-
About AI-powered PDF to LEDES converter
Format: Article
-
Invoice page after AI-powered PDF to LEDES conversion
Format:
Article
-
Post and convert a PDF invoice to LEDES as a company user
Format:
Article
-
Format your invoice files
Format:
Article