
DPS Gray List Management: Offline Editing and Audit Log
Entities on the
Gray List
can be updated offline by using a spreadsheet extractor upload. This spreadsheet is in Microsoft Excel format.If the extract will primarily be used offline as a reference for what the you are presently screening against in DPS, please confirm that all entities on the Gray List have a
Committed
or Submitted
status. If there are any pending entities on the
Gray List
:- ClickSubmittoContentorUndo Pending Changes.
Submit to Content
will commit the entity for screening. Undo Pending Changes
will undo changes and restore the list to what is presently in Content
. After there are no further pending entities on the
Gray List
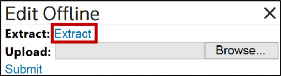
:- ClickEdit Offlineto open theEdit Offlinepop-up.
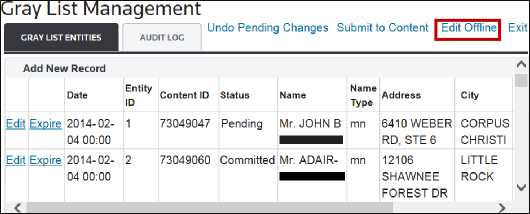
- ClickExtract.
Reading the Extracted Gray List
The
Gray List
spreadsheet looks different from other extracts within DPS because names and addresses are associated to the overall entity, not to each other.As a result, names and addresses extract to the same row. A name will have its own row to ensure that you are only trying to edit one name or address at a time.
In the example below,
ClientEntityID
123456 has three aliases, two addresses, and one reason. Since there are not multiple reasons associated with the entity ID, the reason repeats for each line.
Editing Entities in the Extracted Gray List
Use the extracted gray list as a template for uploading and editing new entities.
When creating a new line, create a new row and drag the row above to copy. Only change the name or address, leaving all other fields the same.
An updated name requires a
NameType
and Name
.An updated address requires an
Address
, City
, StateCode
, PostalCode
, and CountryCode
. Ensure that the state codes, postal codes, and country codes are correct.In the example below, the user added a new alias (“Test name 05”) and address (“125 Test AVENUE”) to Entity ID 123456.

The system will only allow for one entity type and one reason per entity. There are two ways you can edit the reason:
- The first method is to change the top field in the “Reason” column for the specified Entity ID. Drag down the updated reason to all rows belonging to the same Entity ID.
- The second method is to delete the contents of the “Reason” column.
Adding Entities to the Extracted Gray List
Adding a new entity follows the same process as adding a new name/address to an existing entity.
It is strongly recommended that the new entity be added at the bottom of the spreadsheet contents and the next sequential number be used.
In the extracted content, the
Entity ID
field is not automatically populated when you add a new row, but this field cannot be blank. Manually enter the next sequential Entity ID.It is important to confirm that the new entity does not share an Entity ID with an entity that already exists. If two entities share the same Entity ID, the new entity’s data will be added to the existing entity.
In the example below, the new Entity ID is 123457.

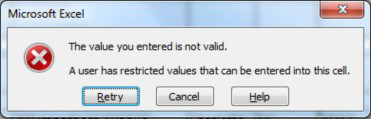
If you enter an invalid value for an Entity ID, you will receive an error message that the value you entered is not valid.
DPS Upload Process Notes
Omitting Fields
If
Name Type
is omitted in the system, the first name on the list will automatically be entered as a “mn” (main name) and all other names will automatically be entered as an AKA
(also known as).To ensure the correct name type is always assigned:
- Use theName Typefield in either theGray List Entitiestab or the exported spreadsheet.
Editing Records
Any changes to an entity, no matter how small, will return the entity status to
Pending
.When you submit the entity to
Content
, the entity will be treated like a new entity and not screened against until the changes have been committed to Content
and updated within the Content
database.Adding an Empty Sheet with Only New Records
The export spreadsheet can also be used as a template for adding new entities. However, it is very important that you confirm that none of the Entity IDs used by the new entities belong to an entity (or entities) already within the
Gray List
.If you accidentally upload an Entity ID that already exists in the DPS system, all of the existing entity’s data will be replaced with the new data from the spreadsheet.
As a result, you cannot add a second name or alias to an existing entity by uploading a new spreadsheet with only the changes. The full details for the entity must be uploaded.
Deleting Entities
Entities cannot be deleted. As stated above, the
Content
status will always be set to Active
when uploading spreadsheets.Expiring Entities
To expire one or more entities:
- Open the downloaded spreadsheet.
- In the "ContentStatus" column, enter "E" in the row of each entity you want to expire, then save the file.
- Navigate toGray List Managementand selectEdit Offline.
- In theEdit Offlinepop-up, clickChoose Fileand select your updated spreadsheet.
- Click onSubmitto upload the file. A success message will appear to confirm the upload.
- Confirm that all modified entities now display a "Pending" status.
- ClickSubmit to Contentto consolidate the changes.
Audit Log
The
Gray List Management Audit Log
displays all changes made to an entity, as well as when the entity was added to the gray list.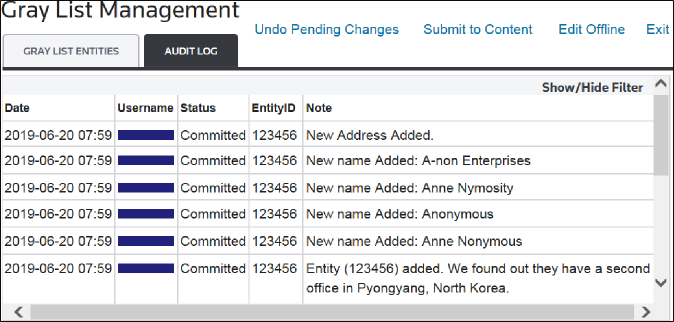
Related Content
-
DPS Gray List Management: Adding and Managing Gray List Entities
Format: Article