
DPS Gray List Management: Adding and Managing Gray List Entities
Gray lists are lists of entities that may not have been banned by a regulation or government authority, but a company might still decide to not do business with those entities. In these instances, the company has decided to screen for these entities the same way they would for actual denied entities.
If you have purchased the Gray List functionality for ONESOURCE Denied Party Screening, you can use the
Gray List Management
screen to manage a gray list of entities.You can access the following functionality on the
Gray List Management
screen:- Add/Edit Multiple Names and Aliases
- Add/Edit Multiple Addresses
- Add a Reason for Denial (only one reason is allowed)
- Activate and Deactivate Entities
- Extract List of All Gray List Entities
- Upload Spreadsheet for Offline Gray List Edits
- Keep track of changes
You can access this screen by selecting
Gray List Management
from the DPS
menu.
Adding and Entity to the Gray List
To add an entity to the gray list.
- ClickAdd New Record.

- ClickingAdd New Recordwill open a series of blank fields in which data can be entered.
- Enter a numeric Entity ID that will uniquely identify the entity. If this field is left blank, the system will automatically generate an EntityID. Entity type is considered unspecified by default. However, when specified as Firm or Individual, accuracy of search results is improved.

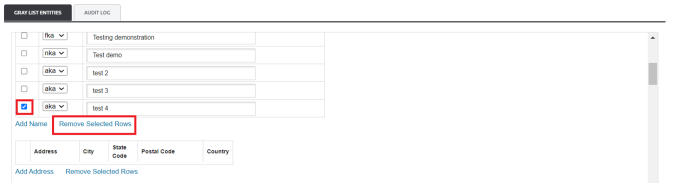
- ClickAdd Name. A small table will open where you can add an entity’s name information.

- Enter the main name (mn) information for the entity.

- To add additional alias rows, clickAdd Nameagain and enter more information. The system can hold up to eight (8) aliases for each entity. You can select a different Name Type according to your preference.List of Name TypesMeaningAKAAlso Known AsDBADoing Business AsFKAFormerly Known AsIMO(Acronym for Vessel Identification)MNMain NameNKANow Known AsIf you attempt to indicate more than eight records, the system will show the below notification message:

- To remove an alias, check the box on the alias’s left, and then clickRemove Selected Rows.
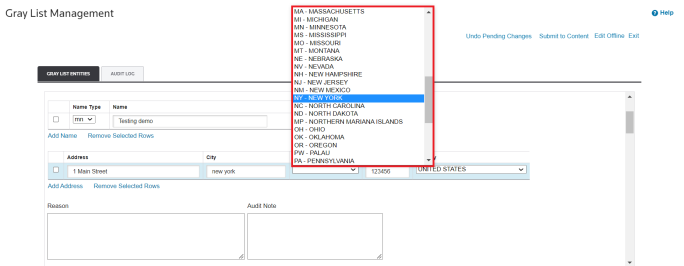
- ClickAdd Address. A small table will open where you can add an entity’s main name address information.

- Enter theAdress,CityandPostal Codeinformation.

- Select theCountrycorresponding to the address you want to include.

- TheState Codecombo box will become available and you can select the state accordingly.
- To add additional addresses, clickAdd Addressagain and enter more information.
- To remove an address, check the box on the address’s left, and then clickRemove Selected Rows.

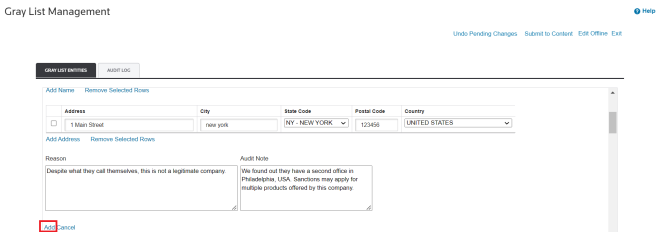
- Use theReasontextbox to enter a reason why this entity is being added to the gray list.
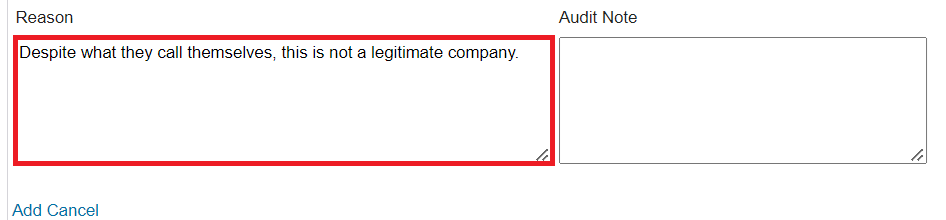
- If this entity already exists on the gray list, use theAudit Notetextbox to enter a reason for why a change is being made.

- After all information has been reviewed and is ready to submit, clickAdd. To drop and disregard all changes, clickCancel.
The new/updated entity will now appear on the gray list with a status of
Pending
.
Adding an Entity Sanction to Gray List
To add an entity sanction to the gray list:
- ClickAdd New Sanction Record.

- ClickingAdd New Sanction Recordwill open a series of blank fields in which data should be entered (entity id, name and address).

The process of entering data is the same as adding a new record, follow the procedure described in the
Adding an Entity to the Gray List
section described above, except the following:When including an address, first select a
Country
and then a State Code
. The Address, City and Postal Code are automatically filled with ANY_ADDRESS
and ANY_CITY
to indicate the sanction applies to all addresses and cities within the sanctioned country and state.
Submitting a Pending Entity to Content
A pending status means an entity has been added or updated, but has not yet been submitted to ONESOURCE Global Trade Content.
To forward a pending entity to
Content
:- ClickSubmit to Contentto open theSubmit to Contentconfirmation pop-up. This includes a notification stating that an entity change is about to be submitted and a previously overridden company may be re-blocked as a result of the change.

- ClicktConfirmto proceed orCancelto go back.

A notification message appears at the top of the
Gray List Management
screen and the entity now appears with a Submitted
status. It can take up to 24 hours for a submitted entry to be committed to Content
.
After an entry is committed to
Content
, the entry status changes from Submitted
to Committed
. A Committed
status means the entity is currently available for screening purposes. This may take up to 24 hours, but the status will automatically update.
If you attempt to reload the
Gray List Management
screen after submitting new or changed entities to Global Trade Content
, or if Global Trade Content
takes awhile to load, a notification message appears at the top of the screen showing the current status of the process. After the system finishes populating the data, a confirmation message appears at the top of the screen.Undo Pending Changes
To remove all pending entities and changes:
- ClickUndo Pending Changes. IfUndo Pending Changesis selected and the previously submitted changes are displayed on the screen, the change was committed toContentand will be screened against.ClickingUndo Pending Changesopens theUndo Pending Changesconfirmation pop-up.

- ClickConfirmto proceed orCancelto go back.

If submitted changes have already been updated in the
Content
database by the time Undo Pending Changes
is selected, those changes will be reflected on the Gray List Management
screen.You will then be able to make further changes and re-submit if necessary.
Related Content
-
DPS Quick Screening: Performing Manual Searches
Format: Article
-
DPS Gray List Management: Offline Editing and Audit Log
Format:
Article