
DPS Management: Batch Actions - Rescreening and Status Management
Rescreen (Single Entity)
The
DPS Management
screen can be used to re-screen a company from a previous search. To use this function:
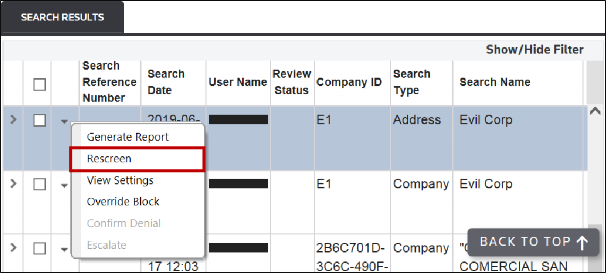
- Click an entity to re-screen from theSearch Resultstable.
- Hover your cursor over the drop-down menu arrow for the entity.
- ClickRescreento open a second browser tab withQuick Screeningopen. The screening information will already be populated intoQuick Screeningfields, including the Search Reference Number from the previous screening. This search identifier can be used to find related screening records.
 All options in the action bar will appear. If an option is shown in gray, that option cannot be selected.
 - Navigate back to theDPS Managementscreen on the original browser tab. The results of the most recent re-screening will populate the grid.
Rescreen (Multiple Entities)
Multiple entities can be re-screened at the same time. This functionality is useful when entities were screened a number of hours or days before your review.
If any entities or lists were updated after the prior screening, you cannot override the company without re-screening.
To re-screen multiple entities:
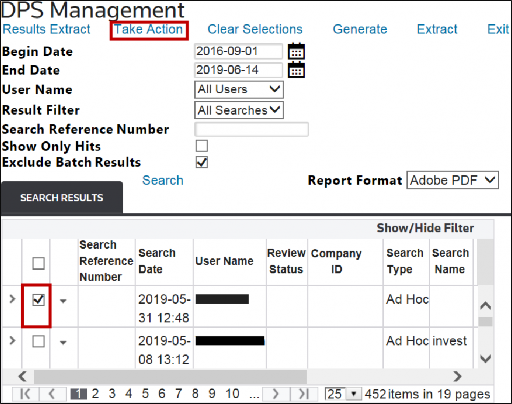
- Click which entities are to be re-screened by checking their boxes on the left.
- ClickTake Actionto open theTake Actionwindow.
 ClickingTake Actionwithout first selecting one or more searches from theSearch Resultsgrid causes the following message to appear on the screen:
- In theChoose Actiondrop-down menu, clickRescreen.

While the mass re-screening is in progress, the following message appears at the top of the screen, indicating how many of the current searches have been completed:

Until the mass re-screen is complete, limited screen use is available.
Override Block
The
DPS Management
screen can be used to override a blocked party (or multiple parties) from a previous search. To use this function:
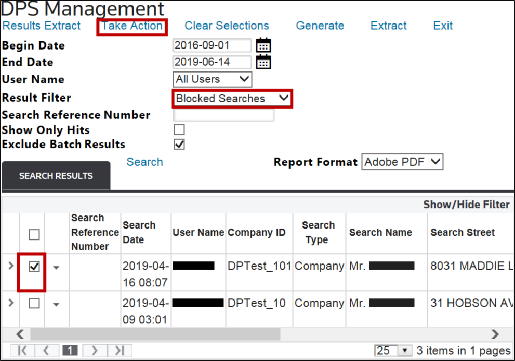
- Perform a search in theDPS Managementscreen.
- In theResult Filterdrop-down menu, clickBlocked Searches.
- In theSearch Resultstable, click which record(s) to override by checking the box to the left. To select all, check the box in the gray bar above.
- After the records are selected, clickTake Actionat the top of theDPS Managementscreen to open theTake Actionwindow.
 ClickingTake Actionwithout first selecting one or more searches from theSearch Resultsgrid causes the following message to appear on the screen:
- In theChoose Actiondrop-down menu, clickOverride Block.
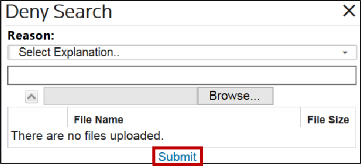
- After the action is selected, you can select an explanation from theExplanationdrop-down menu and/or write notes in the text box.
- To complete the override, clickSubmit.

note
You can be configured to Mass Override companies, even if one or more subscription lists have changed. If this option is enabled, a warning message appears at the top of the
Take Action
window, indicating the time and date the list(s) last changed. 
After the override is complete, a message appears at the top of the
DPS Management
screen. The override applies to all selected parties currently on the DPS Management
screen. If other parties need to be overridden, repeat the process steps lined out in this section.
Confirm Denial
You can change one or more Blocked Searches at a time to a
Denied
status. In the Search Results table:
- Click which records to change toDeniedstatus by checking the box to the left. To select all, check the box in the gray bar.
- After you select the records to be changed, clickTake Actionat the top of theDPS Managementscreen to open theTake Actionwindow.
 ClickingTake Actionwithout first selecting one or more searches from theSearch Resultsgrid causes the following message to appear on the screen:
- In theChoose Actiondrop-down menu, clickConfirm Denial.

- Write an explanation in the text box.
- To confirm and complete the denial, clickSubmitat the bottom of the window.
Related Content
-
DPS Quick Screening: Post-Screening Actions - Reports, Email, Entity Management, Denial Confirmation, and Escalation
Format: Article,
10 min read
Article,
10 min read
-
DPS Quick Screening: Taking Action - Manual Block for Companies
Format:
Article,
2 min read
-
DPS Quick Screening: Taking Action - Manual Block for Companies
Format:
Article,
2 min read