
Display Columns
Once the filters in the “ISF Search” header have been filled out,
move
to the “Display Fields” section of the screen.Display fields | Description |
|---|---|
Source Columns | Includes all column headers matching the source chosen in the “Source” header filter. Any or all of these columns can be added to a query. |
Display Columns | Includes all column headers selected to be part of the query. |

Moving Source Columns to Display Columns
To
move
a Source Column to the “Display Columns” section, perform one
of the following two methods:- Clickon the column name to be added, and thenclickthe right arrow button. The single arrow will move only the selected column. The double arrow will move all columns.
- Click and dragthe column name from “Source Columns” to “Display Columns”.

Rearranging Display Columns
Once all the columns for the query have been selected and moved to “Display Columns”,
review
the order of column headers to determine if they are in the right order.To
rearrange
the order of display columns, the user can click and drag
to the correct order or use the up and down arrows
on the far right.To
return
a display column to “Source Columns”, either click and drag
the Display Column or use the left arrows
in the middle of the section.
Once all fields are selected and ordered,
view
the data set created in the “Report Fields” section of the screen.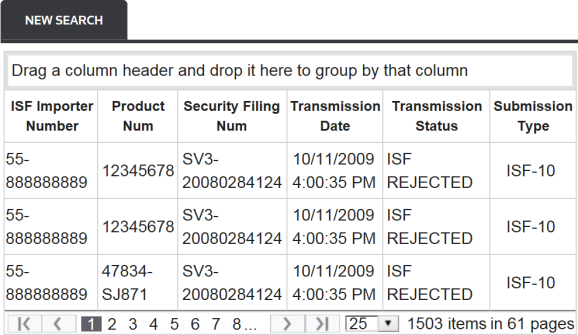
Search Fields
When a new search is created, its query results will appear under a “New Search” tab located at the bottom of the “ISF Search” screen. “New Search” indicates that this is a new search that has not yet been saved. For more information about saving searches,
refer
to the “Savings Searches” section of this User Guide.Once a data set is created, the user can search for key information contained within the data set by utilizing the searching capabilities in the “Search Fields” section.
Add New Parameter
To
add
a new parameter, click
“Add New Parameter”.
Clicking
“Add New Parameter” will enable the search criteria fields. The selections in the “Search Parameter” drop-down will be driven by the fields selected when the data set was created. The fields displayed in the drop-down will match the column names included in the data set in the “Report Fields” section. Choose
a Search Parameter from the drop-down.
After a Search Parameter is set,
click
on the “Comparison” drop-down and choose
a search parameter to use in the query. The Comparison will help define what the search will look for. 
Next,
enter
a value. This value is what the search will look for, based on the parameters set.
After all fields have been set,
click
“Insert” to add the parameter or “Cancel” to drop all changes.
Once “Insert” is clicked, the query will run. All items matching the query will be highlighted in the “New Search” grid located at the bottom of the screen.

More search parameters can be set following the steps listed above.
Modifying an Existing Parameter
To
modify
an existing search parameter, go
to the “Current Search Criteria” section, choose
a search parameter to modify, and then click
“Edit”.
Make any necessary changes
, and then click
“Update”.
Removing an Existing Search Parameter
To
remove
an existing search parameter, go
to the “Current Search Criteria” section, choose
a search parameter to remove, and then click
“Remove”.Saved Searches
Once search parameters are defined, a search can be saved for future use.
To
save
a search, return
to the “Display Fields” section of the “ISF Search” screen and then click
“Save Search”.
Clicking
“Save Search” will open the “Save Search” pop-up. Complete
all required fields, and then click
“Save Search”.
For information on how to locate a saved search,
refer
to the “Retrieving Saved Searches” section of this User Guide.Save New Search to Existing Category
To
save
the search under an existing category, click
the “Use Existing” button and then choose
a category from the corresponding drop-down. The tab name in the “Report Fields” section will change to the name of the newly saved search.
Save New Search to New Category
To
save
the search under a new category, click
the “Create New” button and name
the new category.
Sharing a Search
To
share
a search with other ONESOURCE ISF users, click
on the “Share this search?” drop-down and click
“Yes”.
Search Descriptions
Searchable descriptions can be included to make it easier to find a specific saved search. Once saved, key words in the description can be used to locate similar searches or to find a saved search.

Retrieving Saved Searches
To
open
a saved search, return
to the “Display Fields” section of the “ISF Search” screen and then click
“Select Search”.
Clicking
“Select Search” will open the “Saved Searches” pop-up. The available tabs are search categories created by the user plus the “Shared Searches” shared among other system users.To
open
a search, choose
a search from the list and click
its corresponding link on the left.
Saved searches can be reviewed, modified, or copied as a baseline for a new search.
Modify an Existing Search
To
modify
an existing search, open
the search as described in the “Retrieving Saved Searches” section of this User Guide.Once the search has loaded,
modify
the search parameters as listed in the “Search Fields” section of this User Guide.If the name, shared status, or description needs to change,
click
“Edit Search”.
Clicking
“Edit Search” will open the “Edit Search” pop-up. Make any necessary changes
, and then click
“Update Search” to save.
Copying a Saved Search
To
copy
a saved search, open
the search as described in the “Retrieving Saved Searches” section of this User Guide. Once the search has loaded, click
“Copy Search to New”.
Make any necessary changes and save
.Creating a New Search
To begin a new search,
click
on the “New Search” tab in the “Report Fields” section. Build
a new search and add
new search parameters as explained in the “Using ISF Search” section of this User Guide.
Extracting ISF Search Data
The “Export” link on the “ISF Search” screen allows the user to create an Excel spreadsheet that contains all of the query results. Selecting the “Export” option at the top of the screen extracts the result into an Excel spreadsheet that can be downloaded and saved locally.
important
You can extract up to 1 million results in a single operation. If you need to extract more than 1 million results, contact your system administrator for assistance.

Reset Search
The “Reset Search” option resets the “ISF Search” screen and clears all search parameters and/or selected saved searches from the screen. This feature allows the user to start a new search from scratch at any time.

Related Content
-
Importer Security Filing (ISF)
Format: Article