
UltraTax CS® print settings for organizers and engagement letters
Show all hidden content.
This article contains information about the required print settings to use for UltraTax CS® organizers and engagement letters. For information on how to prepare batch organizers, refer to Uploading Batch Organizers.
You can turn on the SafeSend integration in UltraTax CS® to have an option to generate the organizer with all of our requirements already in place without having to adjust your other settings. Alternatively, you can follow the legacy print settings options.
Print with the integration
This print option assembles and configures the organizer PDF with all the SafeSend requirements in place. This integration is available for UltraTax CS® 2025 and later.
note
- This generates a PDF copy of the organizer; it doesn’t upload the organizer to SafeSend Organizers.
- Refer to our Processing an Organizer article for more information about uploading organizers.
- The print collation can't be customized at this time.
- To customize the collation, refer to thePrint Without Enabling Integrationsection to follow the classic print workflow.
Turn on integration
- SelectSetup.
- SelectSystem Configuration.
- Select theSurePrep & SafeSend Integrationstab.
- Select theEnable SafeSend Integrationcheckbox.
- SelectOKto save any changes.
Print Organizer
- SelectFile.
- SelectPrint Organizers. . .
- SelectPrinter. . .
- Select a physical printer from the dropdown.
- SelectOKto save your selection.
- SelectClients.
- Select an available client.
- SelectSelectto move the client to theClients to printsection.
- SelectOKto save your selection.
- Select thePDF to fileoption.
- De-select thePassword protect filescheckbox.
- Select theSafeSendcheckbox.
- SelectAssemble.
Print without enabling integration
note
- Follow these guidelines to ensure a successful upload.
- Default settings should be used as a starting point to ensure the organizer is printed correctly.
- The collation can be customized to include classic pages, but the General Lite Info page is required for upload.
- Refer to our Unable to Process Organizer article for instructions to include the required page.
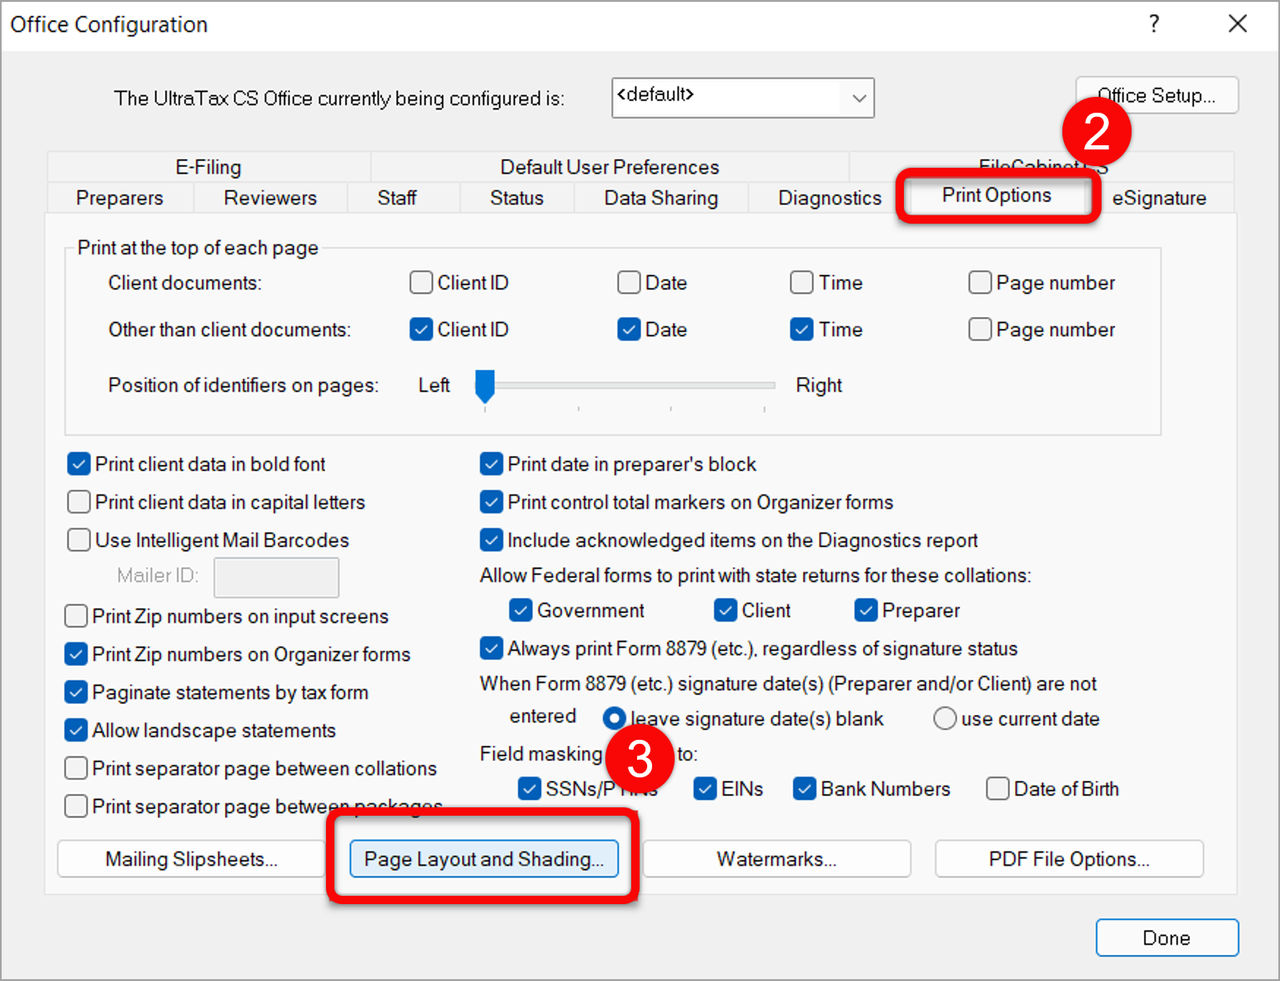
Office Configuration
- Go to .
- Select on thePrint Optionstab.
- Select onPage Layout and Shading.
- Select on theOrganizertab and make sure you use the default settings:
 .
. - SelectOK.
- SelectPDF File Options.
- Select theOptionstab and make sure the settings match what is shown.
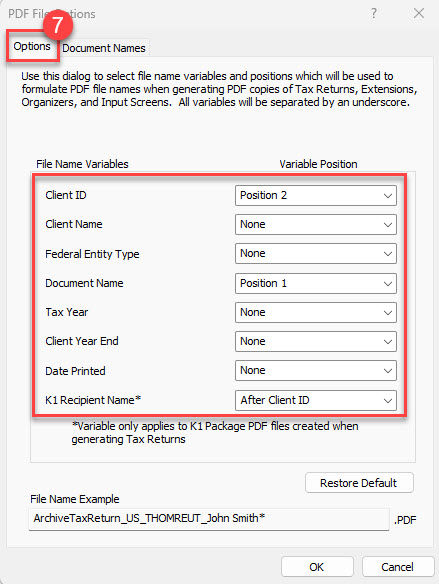
- Go to theDocument Namestab.
- Select the field next toOrganizer-ActionRequiredand change it toEngagement Letter.
- SelectOK.
1040 individual settings
- Go toSetup > 1040 Individual...
- Select theOrganizertab.
- Only select the following checkboxes:
- Mask SSNs, driver's license and state issued ID numbers with asterisks
- Print Individual Engagement Letter
- Proforma custom questionnaire and cover letter selections (Screen Letter)
- Print the Lite Client Organizer Itemized page even if no amounts exist
- SelectModify.
- SelectLite Client Organizer pages plus other pages in classic format.
- Select the checkbox next toForce Lite pages even when client does not meet Lite criteria.
- SelectOK.
Questionnaire settings
note
For UltraTax CS® organizer questionnaires, the following restrictions are in place:
- Don’t add or delete questions from the default set.
- Don’t change the text style from the default settings (Times New Roman 11 pt).
- SelectQuestionnaire.
- SelectOrganizer Questionnaire, thenOpen
- Go toDocument > Properties.
- Make sure the settings are set to default. SelectRestore Default, if necessary.
- SelectOK.
Return collation settings
note
The correct Client Information pages need to be included for the organizer to successfully upload.
- SelectOrganizer...
- Set the Print Condition toAlwaysfor:
- Lite-1 General Info page
- Personal Information.
- Client Contact Information
- Check:
- Include in Electronic Org
- Include in blank Organizer.
- SelectDeposit & Electronic Funds Withdrawal.
- Clear the checkbox next toAction Items PDF.
Engagement letters (optional)
Perform the following steps to ensure engagement letters are included in your UltraTax CS® organizers.
note
The engagement letter must be the only page included in the Action Items PDF.
- SelectEngagement Letter.
- SelectAlways.
- Select the checkbox next toAction Items PDF.
- Select the checkbox next toInclude in blank Organizer.
Printing a single UltraTax CS ® organizer
If you are printing multiple organizers, skip to the section named
Printing multiple UltraTax CS
®
organizers
.note
When printing, you need to select a physical printer.
Do not set the printer to Adobe
®
PDF
. This is specific to UltraTax CS® and ensures that margins are set properly.- Go toFile > Print Organizer.
- In the Print where section, selectPrinter...
- Under the Printer dropdown, select a physical printer.
- SelectOK.
- SelectPDF toFile in.
- (Optional) select...to change the destination location.
- Uncheck Password protect files.
- SelectAssemble.
Printing multiple UltraTax CS ® organizers
Assigning settings to clients
note
When printing organizers for multiple clients, UltraTax CS® limits your choices in the Print Organizers pop-up. These instructions will show you how to assign the proper settings to multiple client organizers when printing to PDF.
- Go toUtilities > Reassign Clients...
- Select clients whose organizers you will print from the list.
- SelectSelect->.
- The clients will move to the list on the right.
- Select the Category dropdown and selectOrganizer delivery.
- Select the Organizer dropdown and selectFile (PDF).
- SelectReassign.
Printing multiple client organizers
note
When printing, you need to select a physical printer.
Do not set the printer to
Adobe
®
PDF
. This is specific to UltraTax CS®
and ensures that margins are set properly.- Go toFile > Print Organizer.
- In the Print where section, selectPrinter...
- Under the Printer dropdown, select a physical printer.
- SelectOK.
- Select Clients.
- Select the clients you want to print in the list on the left and select Select->
- The clients will move to the list on the right.
- SelectOK.
- In the Print what section, selectPer client settings.
- SelectPrint.