
Upload batch organizers
Show all hidden content.
This article describes the process for uploading batch organizers from supported tax software systems into Organizers.
note
- All engagement letters included in a batch should be formatted the same way; any signature/date lines should be in the same position on the same page.
- For UltraTax CS, Lacerte, and GoSystem Tax RS, a client's engagement letter must be printed in 1 PDF file and their organizer must be printed in a separate PDF file. Print these files directly from the tax software.
- CCH Axcess and ProSystem fx must have a client's engagement letter and organizer printed in 1 PDF file. Print this file directly from the tax software.
Before you begin
- Make sure your organizers and (optional) engagement letters are named properly for the tax software you are using (refer to the file name format instructions in this article). An incorrect file name will result in an error status.
- Download a blank CSV template and fill out the CSV to include client information. The Client ID column in the CSV file must match a corresponding Client ID in the organizer and (optional) engagement letter file names.
- Have a ZIP archive that contains the batch's organizers and (optional) engagement letters.
- There is a size limit of 1 GB for the ZIP file.
note
- Make sure that the organizer data is placed in the proper column.
- Make sure that cells in the Client ID column are formatted as text before you enter data. This prevents Excel from inadvertently truncating numbers.
- To prevent Excel from truncating Client IDs, refer to our Leading Zeros in CSV Template article.
- Don’t add or delete any columns in the provided CSV template.
- Client ID, Taxpayer First Name, Taxpayer Last Name, and Taxpayer Email Address are required fields. Other columns can be left empty.
- Don’t have text in any cells other than the columns provided.
- Don’t change the names of any headers in the CSV template.
- Make sure the number of organizers in the CSV file matches the number of organizers in the ZIP archive.
- Make sure that the sort order of organizers in the CSV file matches the sort order of the organizers in the ZIP archive.
- If a spouse is included in an organizer, Spouse First Name, Spouse Last Name is required. Spouse Email Address is NOT required.
- A country code needs to be entered if a mobile number is present.
- After saving the CSV file, don’t reopen it prior to uploading it to Organizers.
File name requirements for supported tax software
CCH Axcess
A client's organizer and engagement letter must be printed in 1 PDF file directly from the tax software.
Organizer name format:
<YYYY><US><System Letter> <Client Name> Organizer <Client ID> <V#>Example: 2015USI Smith, John Organizer ABC123 V1
Refer to the CCH Axcess™ Best Practices for Printing Organizers article for additional guidance.
Engagement letter name format: The engagement letter bookmark must include
Engagement Letter
.CCH ProSystem fx
note
A client's organizer and engagement letter must be printed in 1 PDF file directly from the tax software.
Organizer name format:
YYI_<Last name>_<First Initial>_Organizer_V#_<ClientID>Example: 15I_Smith_J_Organizer_V1_ABC123
Refer to the CCH ProSystem fx® Best Practices for Printing Organizers article for additional guidance.
Engagement letter name format: The engagement letter bookmark must include
Engagement Letter
.UltraTax CS
A client's organizer and engagement letter must be printed into separate PDF files directly from the tax software.
note
UltraTax will recognize 9-digit client IDs as SSNs and only display 4 digits. The full client ID is required for batch uploads to function correctly.
Organizer name format:
<Document Name>_<Client ID>Example: Organizer_ABC123
Engagement letter name format:
<Engagement Letter>_<Client ID>Example: Engagement Letter_ABC123
Refer to the UltraTax CS® Best Practices for Printing Organizers article for additional guidance.
Lacerte
note
A client's organizer and engagement letter must be printed into separate PDF files directly from the tax software.
Organizer name format:
Organizer Forms–<Client ID>Example: Organizer Forms-ABC123
Engagement letter name format:
<Engagement Letter>_<Client ID>Example: Engagement Letter_ABC123
GoSystem Tax RS
note
A client's organizer and engagement letter must be printed into separate PDF files directly from the tax software.
Organizer name format:
<Taxpayer Last Name><Taxpayer First Name>&<Spouse Last Name>_<Spouse First Name>_<Client ID>_<Tax Year>Example: Smith_John&Smith_Jane_ABC123_2020
Engagement letter name format:
<Engagement Letter>_<Client ID>Example: Engagement Letter_ABC123
Submit your batch
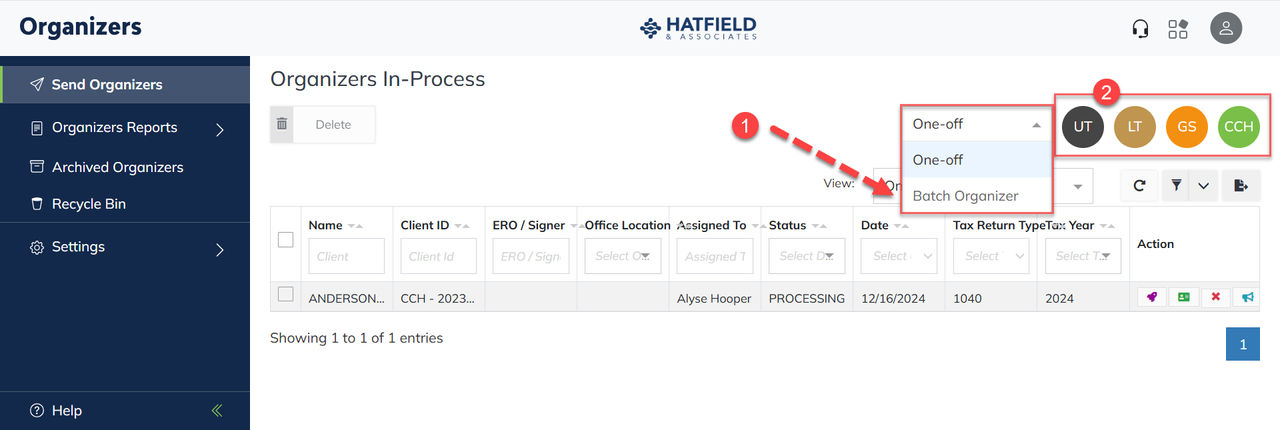
- Select theViewdropdown and selectBatch Organizer.
- Select theUpload buttonfor your tax software.
- In the batch upload screen, fill out the necessary information:
- The Batch Name can be anything you want to identify the batch in your firm's processing.
- Select the ERO from the dropdown.
- Select the Tax Year from the dropdown.
- Select theNo Engagement Lettercheckbox on or off to indicate whether your batch contains engagement letters.
- Drag and DropOrselect to Uploadin the Select ZIP file area.
- Drag and DropOrselect to Uploadyour batch CSV file to the Select CSV File area.
- SelectSubmit.
Checking your batch upload
When a batch upload is complete, Organizers will let you know via a notification or email. The batch will appear on the screen with a + button next to the Batch Name.
- Select theViewdropdown and selectBatch Organizers.
- Select the+button to refer to the contents of the batch.
- Eyeballwill let you view each organizer in review only.
- Client Informationwill let you view the client details that were pulled from the CSV.
- Deletewill let you delete the Organizer from the batch.
- Select theRocket iconto open and process the batch.
note
If you see an Errors tab while processing your batch, it means that Organizers encountered some problems during upload. You can try to correct each error by using the icon in the Action column. Some errors such as unrecognized file names (or that require corrections to the batch CSV file or ZIP file) will require you to upload the batch again.