
Process an organizer
Show all hidden content.
Before an organizer is delivered to the taxpayer, it must be uploaded and processed. These steps outline how to upload, process, edit, and deliver an organizer.
Uploading an Organizer
After selecting the software upload icon, the upload window will appear.
- Go toSend Organizers.
- Select a tax software button.
- Drag theClient CopytoDrag files hereorclick to uploadthe organizer PDF.
- VerifyClient IDandTax Year.
- Verify Taxpayer name.
- TheUpload Progressbar turns green when the upload is complete.
- Select or deselectNo Engagement Letter.
- If an engagement letter is not included, skip to step 10.
- Select theEngagement Lettertab to upload an engagement letter (step not required for CCH users).
- Drag the Client Copy toDrag files hereorclick to uploadthe engagement letter PDF.
- TheUpload Progressbar turns green when the upload is complete.
- SelectSubmitto finalize the upload.
Client Info Tab
The Client Info tab displays the personal information page of the organizer.
- Review organizer Information.
- Engagement Type and Tax Year can't be edited; this information is automatically recognized.
- Office Location is required. Refer to the Multiple Office Locations article for more information.
- Enter Taxpayer Information.
- Email is required.
- Mobile number and country code are not required. This is only applicable if your firm has MFA enabled. View Multi-Factor Authentication for Taxpayers for more information.
- Select theDeceasedcheckbox to mark the spouse or taxpayer as deceased.
- Refer to Deceased Taxpayer Option for more information.
note
If a Spouse is Included, the email is not required to send the organizer. The Taxpayer will have the option to add the spouse's email for signing or review.
Engagement Letter Tab
The Engagement Letter tab displays the full engagement letter uploaded with the organizer. Taxpayer and spouse signature blocks will need to be added to the page.
note
Any signature block option, like a Name or Initials field, will be required on the taxpayer side, even if the Signature is not required.
- Select anEngagement Letterbookmark OR select the Arrows to locate the page where you will place the signature blocks.
- Select theSignerdropdown to select the taxpayer or spouse (if applicable).
- Signature blocks associated with the selected signer are highlighted in yellow.
- Drag/drop any signature block onto the selected page.
note
By Default,
Signature Fields
will be marked as required. Once the field is placed on the page, a prompt will appear that will let you change this setting.- Select/ De-select theRequiredcheckbox to your preference.
- SelectSave.
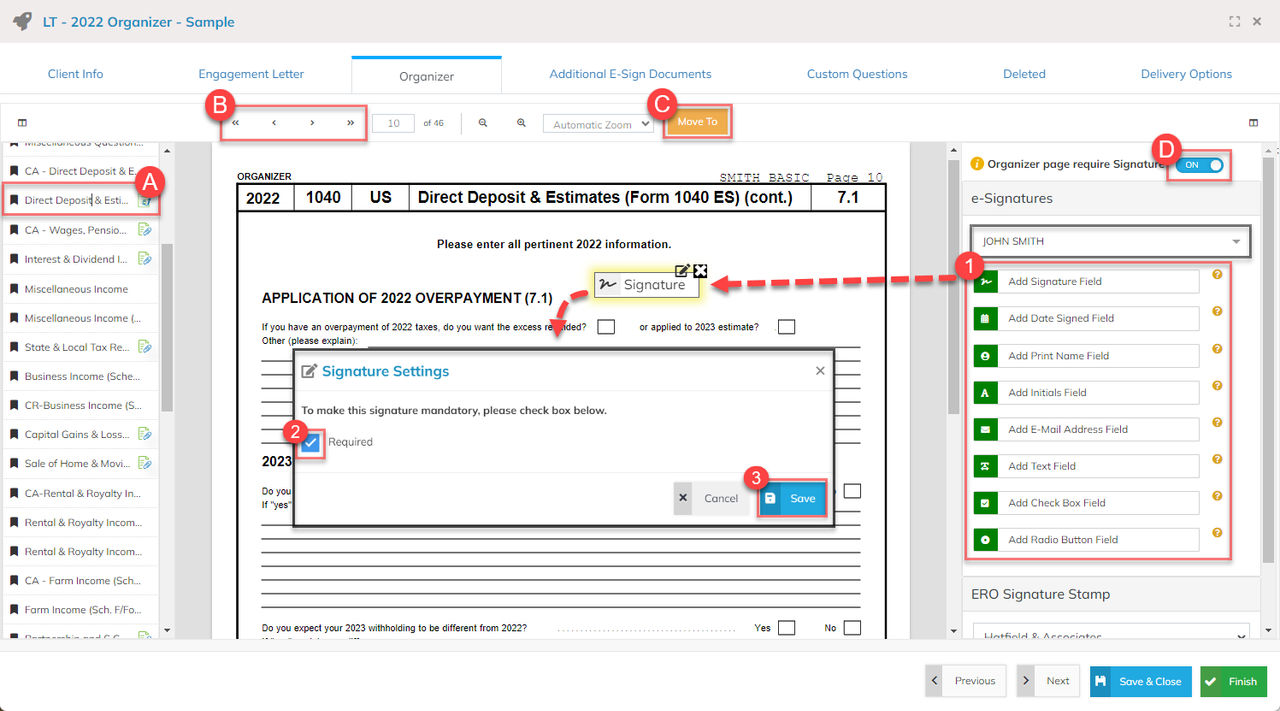
Organizer Tab
The organizer tab displays all pages in the organizer PDF.
- Select anyBookmarkto view that page.
- Use the arrows to go through each page.
- Select the orangeMove Tobutton to move or delete the selected page.
- Switch theOrganizer page require SignaturetoOnto add signature controls to the page (feature is not available for batch organizers).
- Drag/drop aSignature Blockonto the selected page.
- The block will be assigned to the selected taxpayer from the dropdown.
- Refer to the Placing Checkboxes and Radio Buttons guide for specific instructions related to those features.
- Select or de-select theRequiredcheckbox for added Signature Field blocks.
- SelectSave.
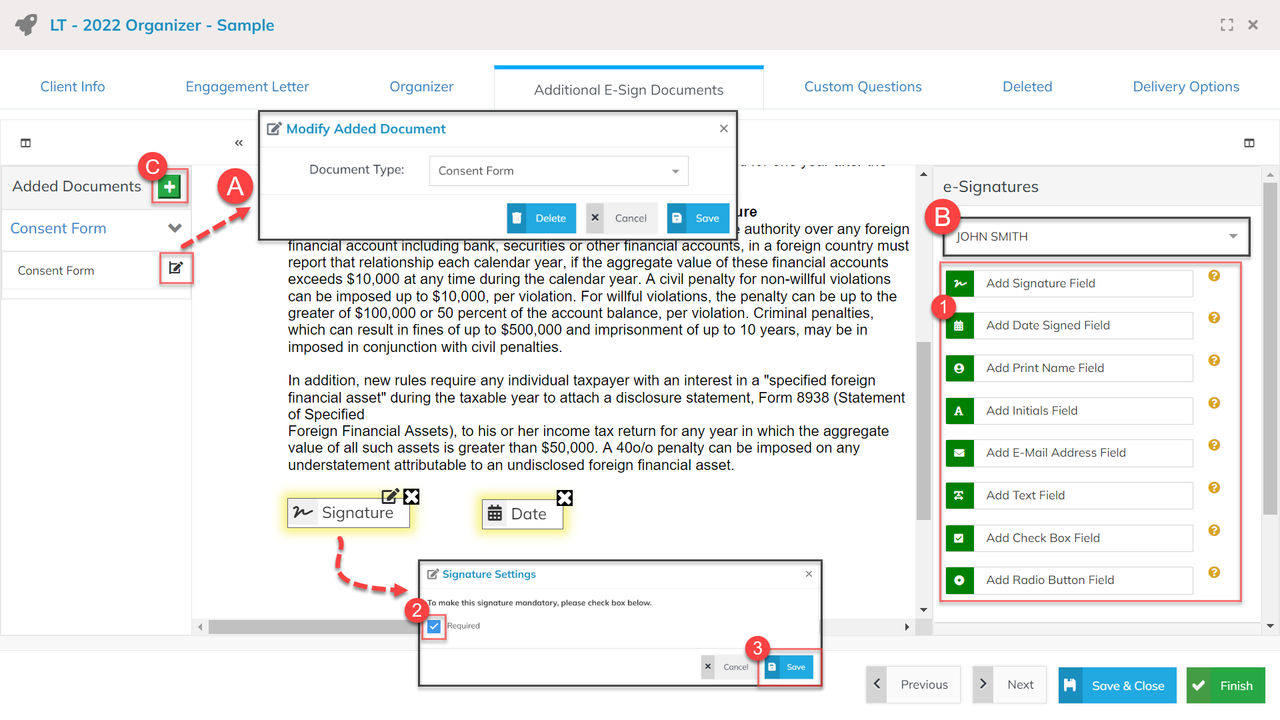
Additional E-Sign Documents Tab
The Additional E-Sign Documents tab is used to manually add forms that were not included in the original return PDF that require a signature. This tab functions the same way as the Engagement Letter tab after documents are uploaded.
note
Any signature block option, like a Name or Initials field, will be required on the taxpayer side, even if the Signature is not required.
- Select theAdd Document (+)button.
- Drag the document toDrag files hereorclick to upload.
- View theUpload Progressbar; turns green when the upload is complete.
- Select a document type from theDocument Typedrop-down menu.
- SelectSubmit.
After upload, additional editing options appear.
note
Signature blocks are not automatically added to additional e-sign documents. They must be added manually.
- Select theModify Added Documentbutton
 to edit or delete the document type.
 - Apply a signature field to the page.
- Drag/drop aSignature Blockonto the selected page.
- The block will be assigned to the selected taxpayer.
- Refer to the Placing Checkboxes and Radio Buttons guide for specific instructions related to those features.
- Select or de-select theRequiredcheckbox for added signature blocks.
- SelectSave.
- Add another Additional E-Sign Document.
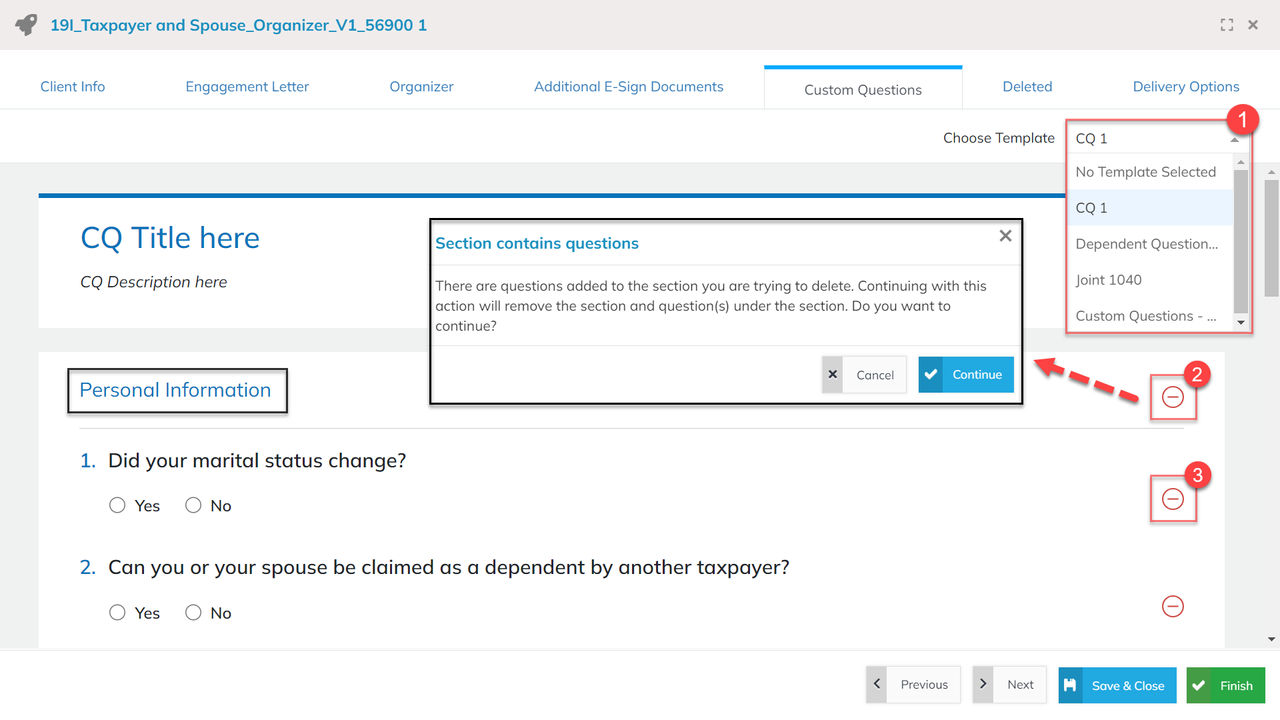
Custom Questions Tab
See the Custom Questions article for more information about setting up custom questions.
- Select theChoose Templatedropdown to apply the template type.
- Select theRemoveicon next to each section you need to delete.
- Removing a section will remove all questions within that section.
- Select theRemoveicon next to each question you need to delete.
Deleted Tab
The
Deleted
tab stores any deleted pages. These pages will not be delivered to the taxpayer. To restore pages: - Select theBookmarkto view that page.
- Select the orangeMove Tobutton.
- Select the appropriate section to move the document.
Delivery Options Tab
The Delivery Options tab is used to review and edit the default settings for the organizer.
Taxpayer Dashboard
- Select theTaxpayer Previewbutton to view the return as the taxpayer.
- A new tab opens; pop-ups must be enabled for this function.
- Select theContact Persondrop-down to select who will be listed as the firm contact for the taxpayer.
- Select theMessage from Preparerdrop-down to select a pre-made template to apply. See the Settings: Saved Messages article for more information.
- SelectNewto create a newMessage from Preparer.
- SelectEditto edit the existingMessage from Preparer(setting must be enabled by an administrator under Settings >Saved Messages).
Email Notifications
- Select theSender Namedrop-down to change the sender name that appears on emails sent to the taxpayer.
- Select theNotify About Completed Engagement Letterfield to select which user will be notified when the engagement letter is completed.
- Select theNotify About Completed Organizerfield to select which user will be notified when the organizer letter is completed.
- Select theNotify about Uploaded Filesfield to select which user will be notified when the taxpayer uploads documents.
Reminders
- Toggle theSigningreminder button to enable or disable signing reminders.
- Select theSend a reminder every. . .drop-down to select how often signing reminders are sent to the taxpayer.
- Toggle theOrganizersreminder button to enable or disable organizer reminders.
- Select theSend a reminder every. . .drop-down to select how often organizer reminders are sent to the taxpayer.
Finish Organizer Processing
- SelectFinish.
- Select to have theTaxpayerorSpousesign first.
- Please Note: If both Taxpayer and Spouse emails are entered in the Client Info section, the initial email will be delivered simultaneously.
- SelectSendto deliver the organizer.