
Automatically link new binders with client profiles in TaxCaddy
Your firm can use the SurePrep API to create binders in FileRoom and automatically link the new binders to client profiles in TaxCaddy. Creating a new binder (via API) and auto-linking it to a TaxCaddy client profile is the same as creating a new binder in TaxCaddy.
Based on your firm level settings, the API can also automatically upload TaxCaddy documents to the newly created/linked binder from the linked client. By using the API, your firm saves time by:
- Automating the process of creating a binder
- Automatically linking binders to client profiles
- Automatically uploading TaxCaddy documents to the binder
note
Without the API, a firm user can go to a client's profile in TaxCaddy and link the client's profile to a binder in TaxCaddy. However, this method requires a firm user to link each client to a binder manually, then select TaxCaddy documents to upload to the binder.
Before you begin
Contact SurePrep Support to enable the following features for your firm:
Firm-level Options | Description |
|---|---|
Auto-link (API) binder with TaxCaddy client profile | Automatically links the binder with a TaxCaddy client profile with a matching Tax Client ID (for example, Locator No.). |
Auto-upload TaxCaddy documents to (API) binder | Automatically uploads TaxCaddy documents to the binder if marked with the Include in binder document flag.note
You can only enable this option if you also enable the previous option. |
Create a binder with uploaded TaxCaddy documents
Follow these steps to create and link a binder with a client profile and automatically upload all TaxCaddy documents:
- (Optional) Go to the client's profile and flag the uploaded documents you want to include or exclude from the binder. By default, all documents uploaded to TaxCaddy are flagged for inclusion in the binder. Skip to the next step if you don't want to exclude any uploaded documents.Documents you flag toExclude from binder
 aren't included in the binder.Documents you flag asInclude in binder
 are automatically uploaded to the binder once the binder is submitted.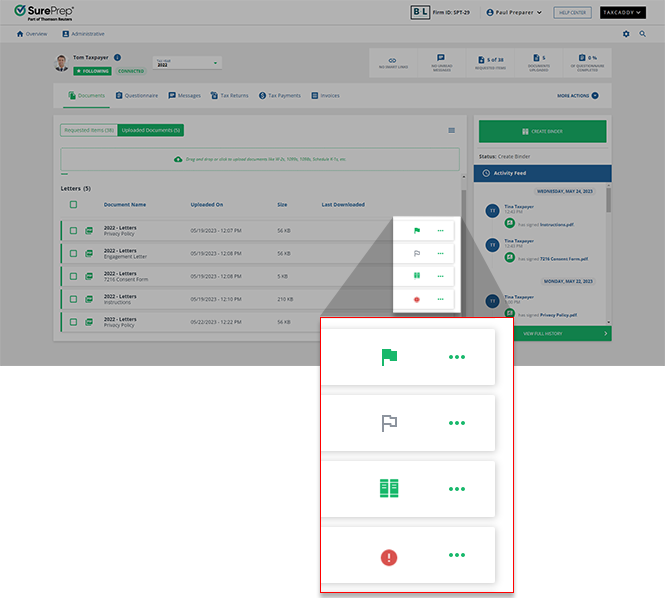
- Next, create a binder using the CreateBinder API method.If your firm enabled the option to auto-link binder at the firm level, then theLinkBinderinput parameter is set as1orTrue(for yes) by default, even if you don't add theLinkBinderinput parameter to theCreateBindercall.However, if you want to prevent a binder from being linked to a client profile manually, set theLinkBinderoption as0orFalse.noteCreateBinderinput parameters sample { "Email": "...", "Service_Type_Id": ..., "Template_Id": ...., "Office_Location_Id": ...., "LinkBinder":1, "Unique_Identifier": ".....", "Locator_No" : "....."}noteThe API binder creation workflow requires you to call: CreateBinder > UploadBinderDocuments (optional) > SubmitBinder. See the flowchart of all the methods needed to create a binder through API.noteMake sure there's only 1 matching client profile with the same Tax Client ID (that is,Locator_No). If there are multiple client profiles available in Taxcaddy with the sameTax Client ID, then the binders are created without linking to TaxCaddy.LinkBinderinput parameter (in the CreateBinder method) will only work after you enable the firm level option. On theCreateBindermethod, any change you make to the Owner, Member, Office Location, 7216 Consent, and Custom Field input parameter will override the existing attributes in the TaxCaddy client profile. To ensure the binder and TaxCaddy client profile is in sync, use theGetClientDetails(POST) method to get the current attributes saved for the client.
- (Optional) You can use theUploadBinderDocumentsAPI method to upload non-TaxCaddy documents. This step won't impact on TaxCaddy documents uploaded automatically.noteThe UploadBinderDocuments method becomes optional if:
- The firm enables auto-uploading of TaxCaddy documents.
- The client profile has at least 1 uploaded document marked to include in the binder.
- Call theSubmitBindermethod to submit the binder. If the SubmitBinder was successful, you will see the binder ID as a response (for example, 987654)You will see the following error if there are no uploaded documents available in the client's profile:{ErrorCode: 1060,ErrorDesc: "Please upload at least one source document to submit this binder"}Solution: Go to the client's profile and make sure there is at least one uploaded document marked to include in the binder. Alternatively, use theUploadBinderDocumentsmethod to upload a document to the document.
- In the client's profile, documents flagged to include in the binder will now show a newAdded to binder
 icon.
icon.
FAQ
Add additional documents to the binder
You can use the same workflow steps as previously described:
- CreateBinder > SubmitBinder
- Make sure to pass theLinkBinderinput parameter (for theCreateBindermethod).
- Make sure there's at least 1 uploaded document in the client profile, and it's flagged for inclusion in the binder.
Enable the option to auto-link the binder to (TaxCaddy) client profile without auto-uploading documents
When you contact SurePrep Support, specify that you only want to enable the option to auto-link new binders. However, since TaxCaddy documents are not auto-uploaded, the
UploadBinderDocuments
method is mandatory before submitting the binder.Requirements
To create a binder (and automatically link it to a client profile) with uploaded TaxCaddy documents, make sure to meet the following criteria:
Item | Details |
Firm Setting | Contact SurePrep Support to enable the following features for your firm:
|
TaxCaddy |
|
Services | 1040SCANverify (Offshore/Onshore) |
Leadsheet | None (Without Leadsheets) Classic Simplified Leadsheets binders |
Binder Type | 1040 binder type |
Tax Software | CCH Axcess Tax |
|
Related Content
-
SurePrep API - Binder use cases
Format: Article
-
SurePrep API - Binder use cases
Format:
Article

