
Activate UltraTax CS (Virtual Office CS or SaaS) 2024 and Prior
Tax File Activation Web lets your firm integrate SurePrep with your tax software, giving SurePrep the ability to communicate information with your tax software.
Tax Software | Description |
|---|---|
UltraTax CS (Virtual Office CS or SaaS) | Authenticating the tax software lets you integrate SurePrep services with your tax software. After the integration is complete, you will be able to create binders in FileRoom, Create Custom DRLs (Document Request List) in TaxCaddy, and fetch deliverables in Reviewer Dashboard (for example, tax returns, tax payments, and e-file authorizations). |
UltraTax CS (Local) | You'll need to set up SurePrep integration using a different method (that is, Tax File Activation window). After integrating UltraTax CS with SurePrep, set up a web authentication token to fetch deliverables like tax returns, tax payments, and e-file authorizations in the Reviewer Dashboard. Follow the instructions in this article to complete the setup. |
note
Starting from the 2022 tax year, the integration process in this article is
mandatory
for all firms using UltraTax CS (Virtual Office or SaaS). If you plan to Create Custom DRL or binders for the 2021 tax year, then don’t remove the previous UltraTax CS Virtual Office integration method with SurePrep. There is no change for firms that are only using the SurePrep Outsource service. Firms can continue using the existing integration method.Activate UltraTax CS
Follow these steps to complete a one-time setup of the UltraTax CS integration with SurePrep:
1. Get API credentials from UltraTax CS
2. Enter API credentials into SurePrep
note
For UltraTax CS (Virtual Office or SaaS), these steps are necessary to create binders, custom DRL, and fetch deliverables. However, for UltraTax CS local install, complete these steps if you need to fetch deliverables from the tax software.
Get API credentials from UltraTax CS (Virtual Office CS or SaaS)
- Log in to your UltraTax CS (Virtual Office CS).
- Go toSetup,System Configuration, thenCS Connecttab.

- Select theEnable CS Connect Background Servicescheckbox if it is not already enabled. Next, selectAny computer on this network.
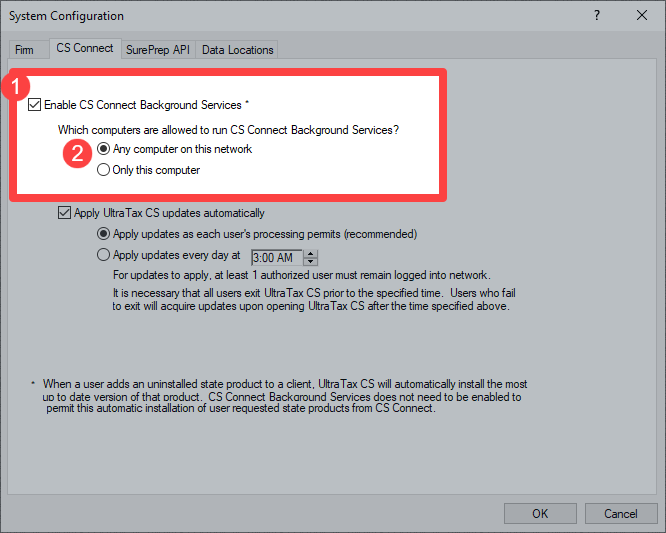
- Select theSurePrep APItab, select theEnable SurePrep Integrationcheckbox if it is not already enabled, then selectGenerate API Key.

- SelectAddto create a new API key for your firm. Once the API key is created, selectCopyto copy the API key to your clipboard. You will need to paste this API key into SurePrep'sAccount Admin.
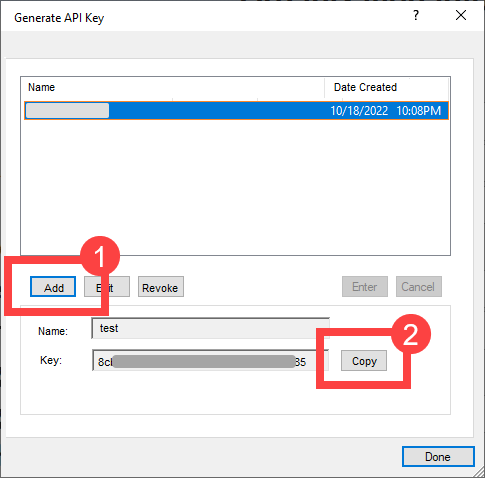
2. Enter API credentials into SurePrep
- Log into SurePrep FileRoom, then go toAdmin > ACCOUNT SETUP > Tax File Activation Web.
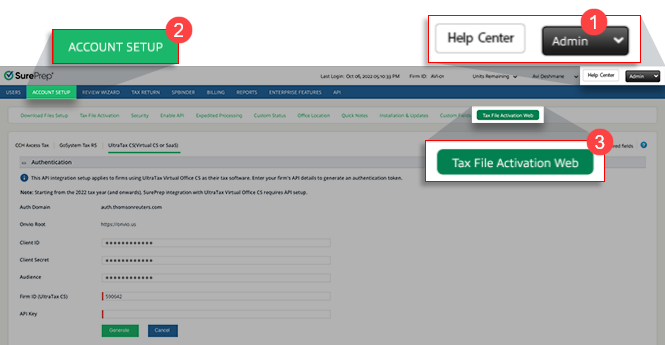
- SelectUltraTax CS, then selectAPI Authenticationto expand the section.
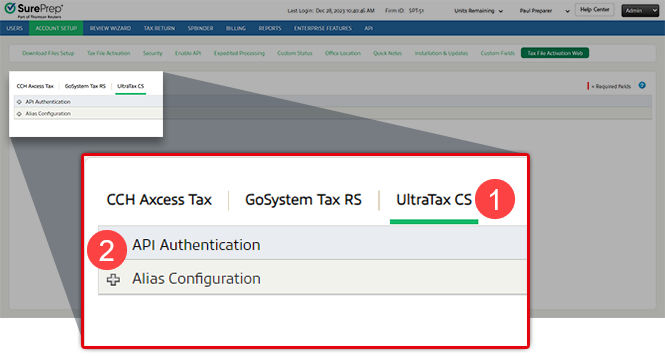
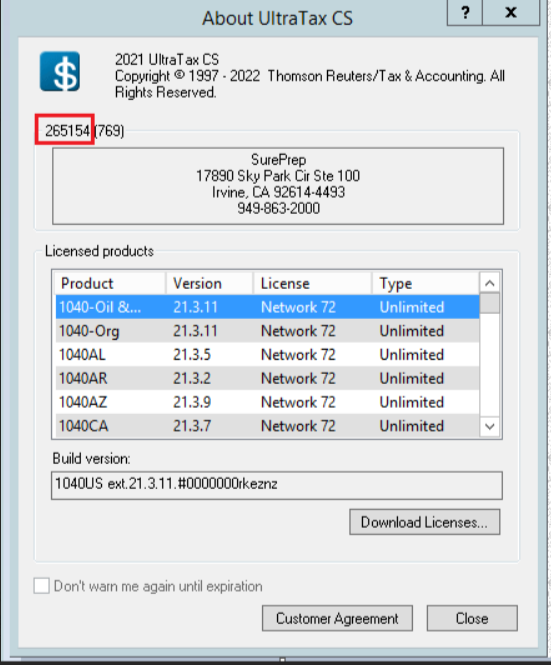
- Enter your UltraTax Firm ID in theUltraTax CS Firm IDfield.noteLocate your UltraTax CS Firm ID inHelp > About UltraTax CS. Your Firm ID is located on the upper left corner (without the parentheses).
- Enter theAPI Keyyou copied earlier from UltraTax CS (pressCtrl + V), then selectGenerate.

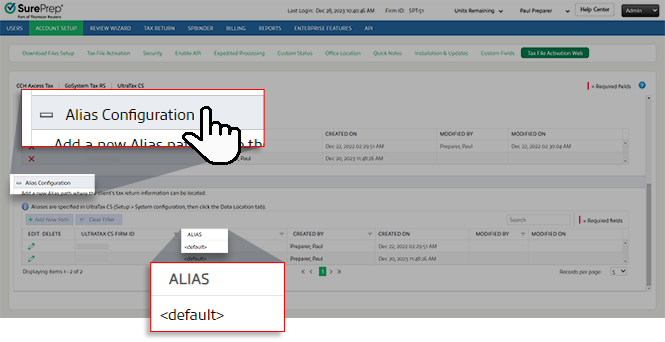
- Scroll down and selectAlias Configurationto expand the section if it is not already expanded. You will now see your <default>ALIASpath appear automatically.
- If your firm has multipleALIASpaths in UltraTax CS (Virtual Office or SaaS) then you can add additional paths if needed. In UltraTax CS, go toSetup > System Configurations > Data Locations(tab), and note down all the aliases for different office locations.
 SelectAdd New Path, then enter theALIASnames for eachData Locationpaths associated with the Firm ID.
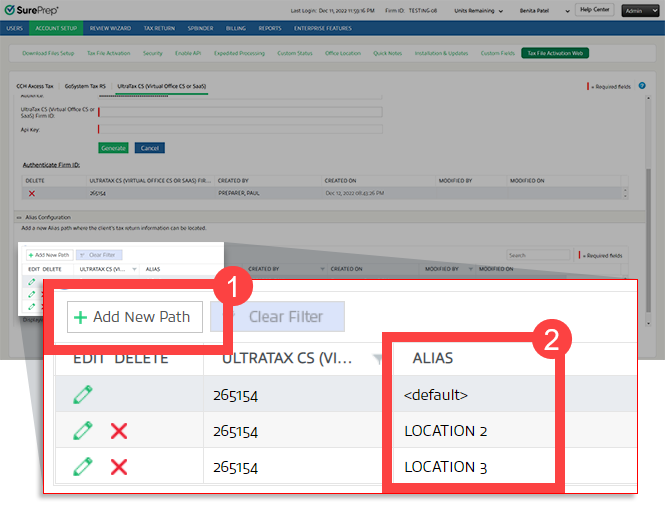 noteData Location aliases are in UltraTax Virtual Office CS (Setup,System Configuration, thenData Locationstab). Note that theAliasfor the paths that you want to use with SurePrep integration.noteTheALIAS(for paths) is case-sensitive, make sure to match the letters as you see them in UltraTax CS.
 - Your one-time setup is now complete. Use theSurePrep Integrationfeature in UltraTax CS (VO/SaaS) to select clients to create binders and add clients in TaxCaddy. UltraTax CS local and VO/SaaS users can fetch tax returns, tax payments, and e-file authorizations directly from the tax software.
note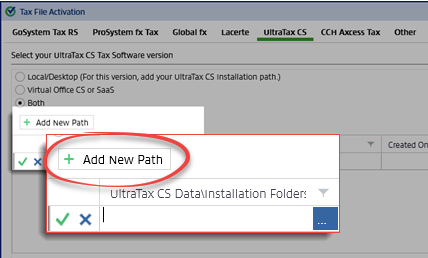
Some new firm (first year) or firms switching over to UltraTax CS (Virtual Office CS or SaaS) for the first time may not see UltraTax CS (VO/SaaS) appears as an option when selecting their tax software in TaxCaddy or the
Create New Binder
window. If the previous scenario happens, go to FileRoom
, Admin
, Account Setup
, Tax File Activation
, then UltraTax CS
(tab), then add a random placeholder path (for example, Z:/). After a placeholder path is saved, you will be able to see UltraTax (Virtual Office or SaaS)
as an option. Note that the placeholder path won’t be used to import any clients.Create clients' tax files in tax software- only UltraTax (Virtual Office or SaaS)
Before you create binders or Custom DRLs, you must first create
SurePrep Integration
tax files for all clients in UltraTax CS (VO or SaaS). Your clients'
SurePrep Integration
tax files in UltraTax (VO or SaaS) let SurePrep use the data to create binders and Custom DRLs. Client's information is shared with SurePrep without requiring you to upload any tax files.
You will need to repeat this (SurePrep Integration) action every time:
Add a new client to UltraTax CS (Virtual Office CS or SaaS).
note
You only need to create
SurePrep Integration
tax files for new clients. Before adding additional documents to binders created without
Leadsheets
.You only need to redo SurePrep integration for clients (in UltraTax Virtual Office CS) if you want to add additional documents to the client's (without
Leadsheet
) binder in FileRoom. Repeating SurePrep Integration
ensures that the most current information is used to process additional documents. note
For without
Leadsheet
binders, you only need to do SurePrep Integration
for clients whose binders you will be adding additional documents to. Follow these steps to create clients' SurePrep Integration tax files in UltraTax CS (Virtual Office CS or SaaS):
- Open UltraTax CS (Virtual Office CS or SaaS).
- Go toUtilities, thenSurePrep, thenIntegration.
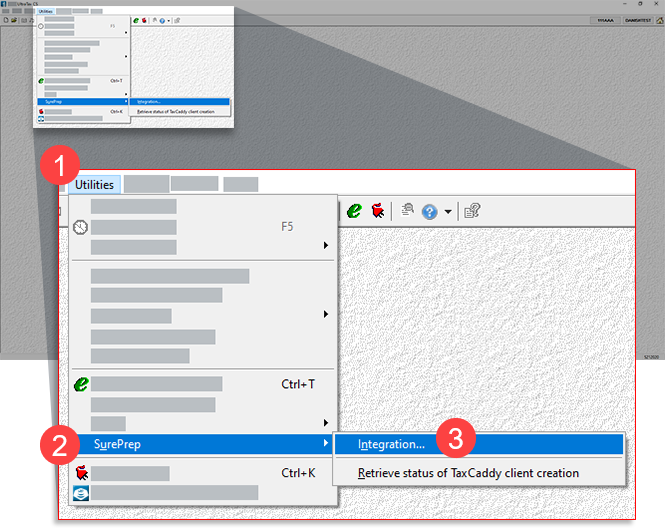
- Select the clients on the left panel, then selectSelectto select the highlighted clients. You can also selectSelect Allto bulk select all available clients. Select the checkbox forSend client data to SurePrep Binder and Document Request List. Next, selectContinueto begin creatingSurePrep Integrationtax files.
 noteYou can also useSurePrep Integrationto create TaxCaddy clients directly from UltraTax (Local and VO/SaaS).noteClients in Red: Clients that are missing the required information will be highlighted in red (for example, Name, SSN). To create tax files for these clients, open the client’s tax return and update any missing information.
- Clients not appearing: Clients that are currently locked in UltraTax CS Virtual Office won’t appear in theSurePrep Integrationwindow. To unlock your client go toLock > Repair > File Locks(tab).
Additional Notes
- For binders withoutLeadsheets,SurePrep Integrationhas to be repeated each time (in UltraTax VO/SaaS) before adding additional documents to SPbinder. On theSurePrep Integrationwindow, you only need to select clients whose binder you want to add additional documents to. RepeatingSurePrep Integrationensures that the most current information is used to process additional documents.
- On theSurePrep Integrationwindow, you only need to select new clients.
- The system generates a new token automatically before the current one expires.
What's next?
You can now:
- Create Binders (UltraTax CS Virtual Office or SaaS)
- Add a new client in TaxCaddy (UltraTax CS Virtual Office or SaaS)
- Create DRL in TaxCaddy (UltraTax CS Virtual Office or SaaS)
- Fetch deliverables in Reviewer Dashboard (UltraTax CS local and VO/SaaS)
Create Binders (UltraTax CS Virtual Office or SaaS)
After preparing your clients in UltraTax (via
SurePrep Integration
), you can create binders in FileRoom. On the Create New Binder
window, enter the tax Client ID
then select Search
to import the client's tax return information into a binder. UltraTax Virtual Office in FileRoom.

Add a new client in TaxCaddy (UltraTax CS Virtual Office or SaaS)
After activating UltraTax CS (VO/SaaS), you can add a new client in TaxCaddy and select UltraTax CS (VO/SaaS) as the tax software.
Create DRL in TaxCaddy (UltraTax CS Virtual Office or SaaS)
After preparing your clients in UltraTax (via
SurePrep Integration
), you can create custom DRL.Fetch deliverables in Reviewer Dashboard (UltraTax CS local and VO/SaaS)
After you've completed UltraTax CS integration with SurePrep, you can also follow the instructions in this article to set up web authentication token that will give you the ability to fetch deliverables in Reviewer Dashboard (for example, tax returns, tax payments, and e-file authorizations).
Video demo
Complete setting up UltraTax CS (Local and VO/SaaS) API with SurePrep before you can:
- Create binders, DRL - UltraTax CS (Virtual Office or SaaS)
- Fetch what you need from the tax software - UltraTax CS (Local and VO/SaaS)
Watch SurePrep and UltraTax CS integration setup
: https://youtu.be/kqH21LG2SlgUse the
SurePrep Integration
feature to integrate UltraTax (VO/SaaS) clients with SurePrep:Related Content
-
Activate UltraTax CS
Format: Article

