
Add Smart Links (document retrieval accounts)
Show all hidden content
Smart Links with document retrieval accounts create a link between TaxCaddy and your financial institution, letting TaxCaddy retrieve documents (for example, W-2, 1098, 1099) directly from your financial institution the moment they're added (and will periodically check for updates depending on the time of year) to save you from uploading your documents yourself.
note
Don’t worry, we’ll only use this information to transfer your tax documents from your institution to your TaxCaddy account. View our Smart Links Security page for information on the privacy and safety of your documents.
TaxCaddy.com on PC, Mac, or tablet
Follow these steps to add a Smart Link to a document retrieval account using TaxCaddy.com on your PC, Mac, or tablet.
- Sign in to TaxCaddy.com.
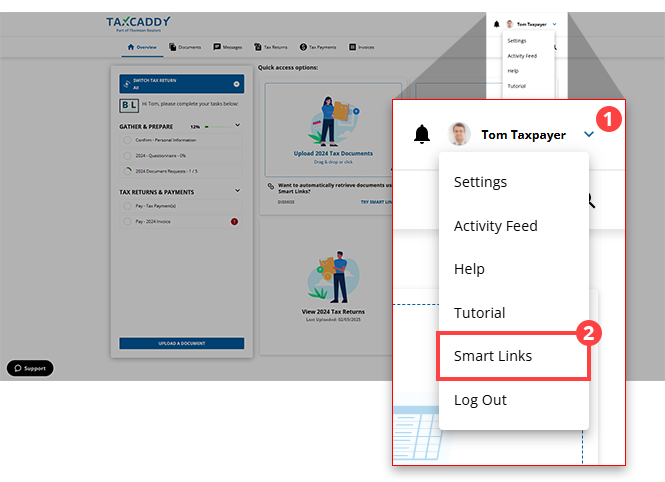
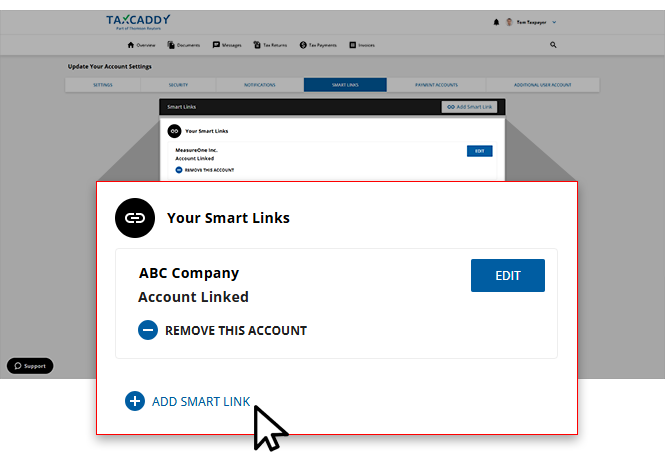
- Select theUser Menu, then selectSmart Links.
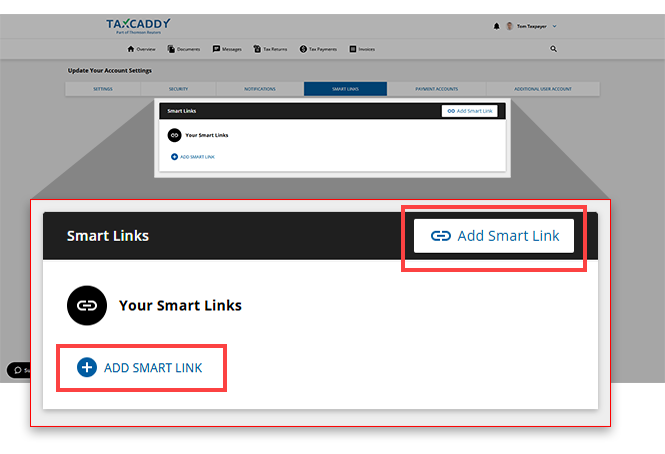
- SelectADD SMART LINK.
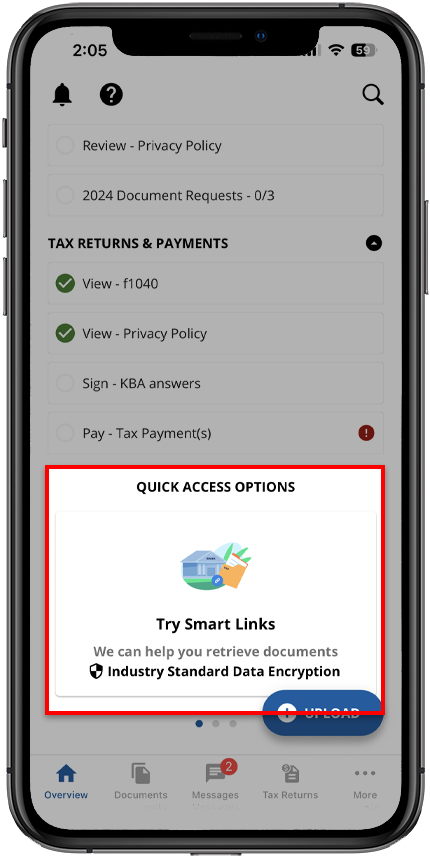
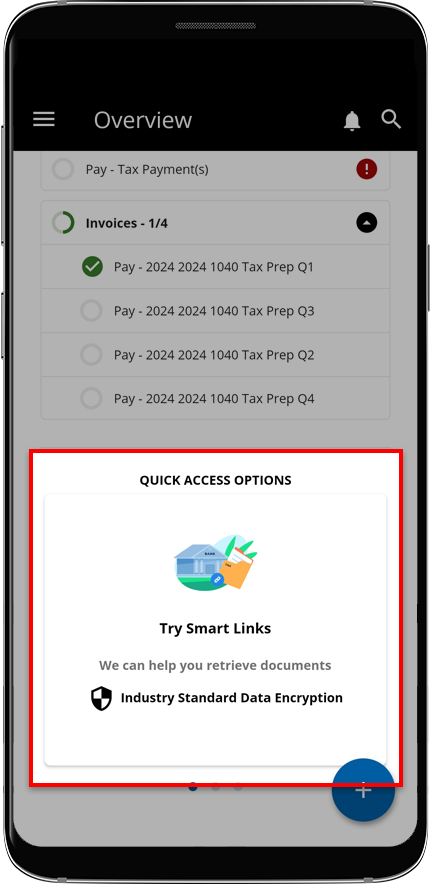
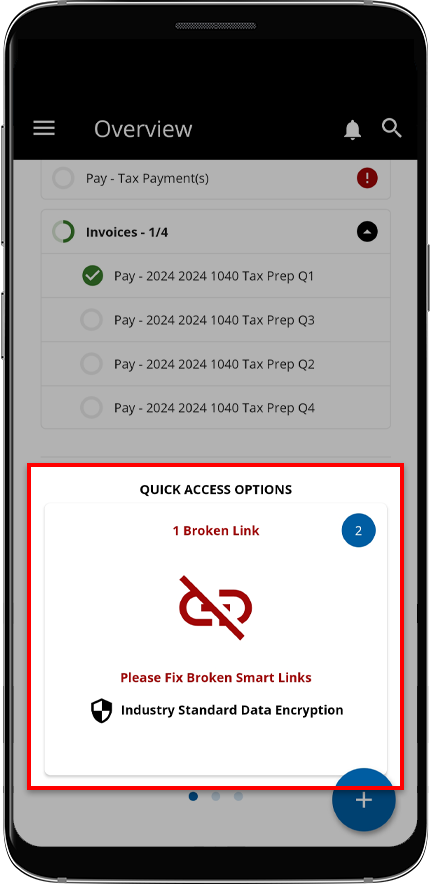
 If this is your first time adding a Smart Link, then theTRY SMART LINKSappear on the 1st panel underQuick access options
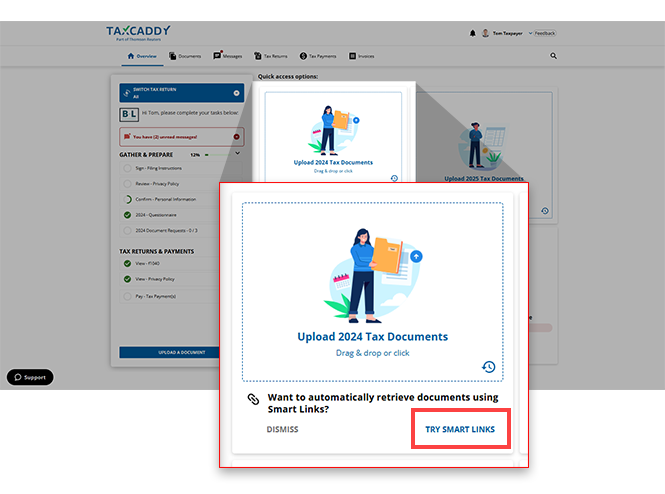
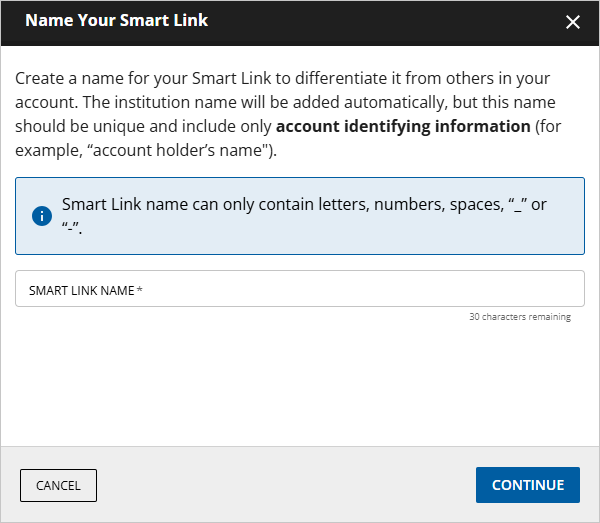
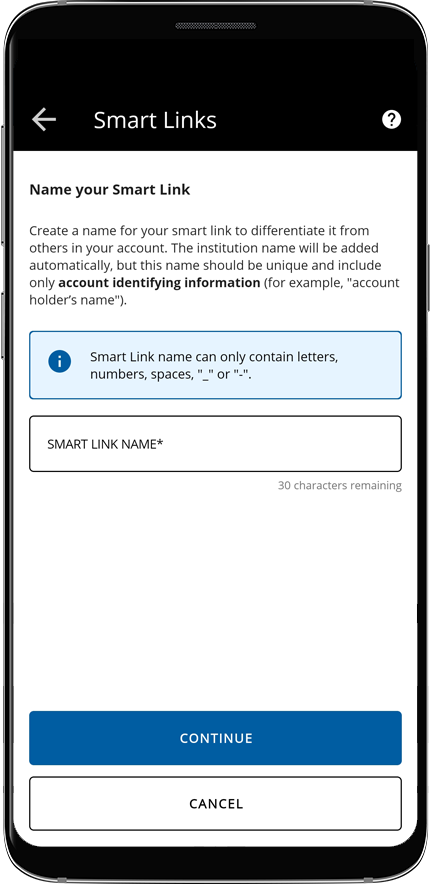
- In thewindow, enter a name to differentiate this Smart Link from the others in your account.Name Your Smart Link
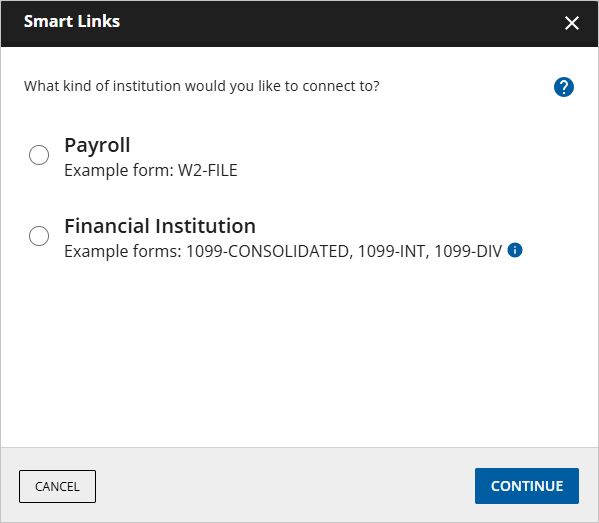
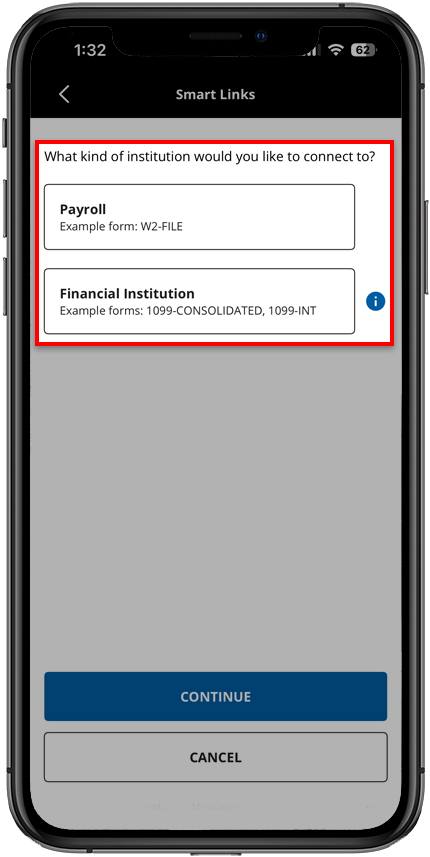
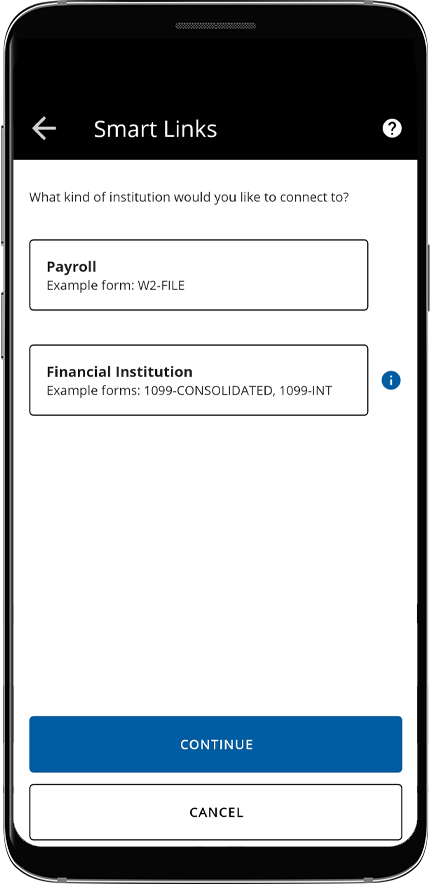
- Once the Smart Links window appears, select one of the following institution types:
- Payroll: W-2 form
- Financial Institution: 1099-CONSOLIDATED, 1099-INT, 1099-DIV, 1099-B, 1099-OID, 1098
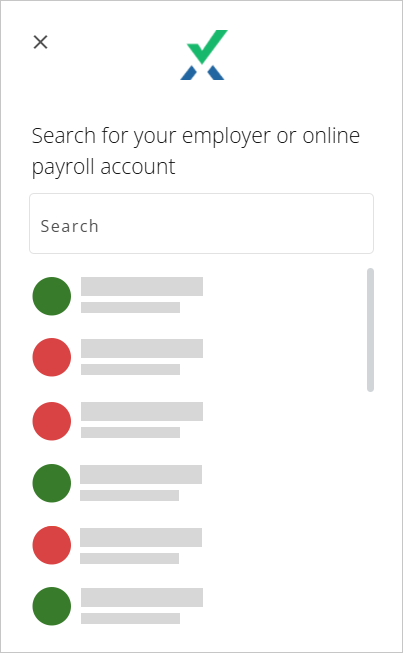
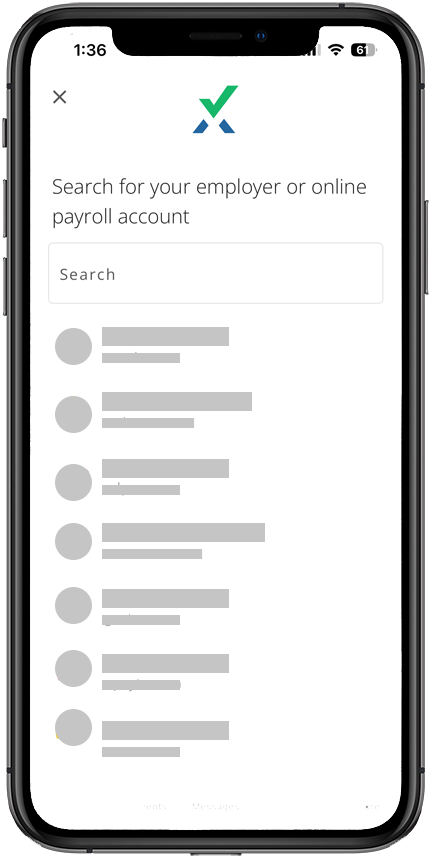
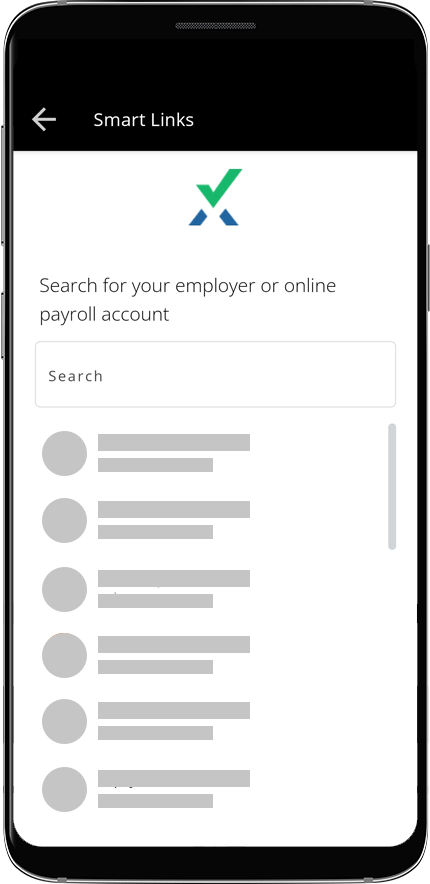
- Select your employer if you previously selected aPayrollaccount, or select your institution if you previously selectedFinancial Institution.If you don’t see your institution listed, you can scroll to the bottom of the window to find theSearch allfeature to find your specific institution.
 Some employers/institutions may require additional searching to find your specific account.
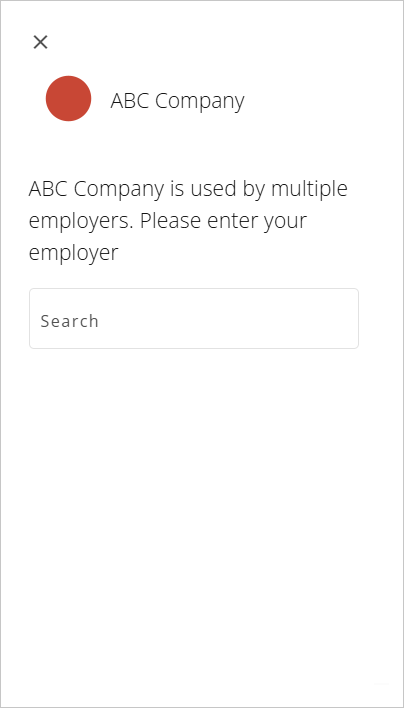
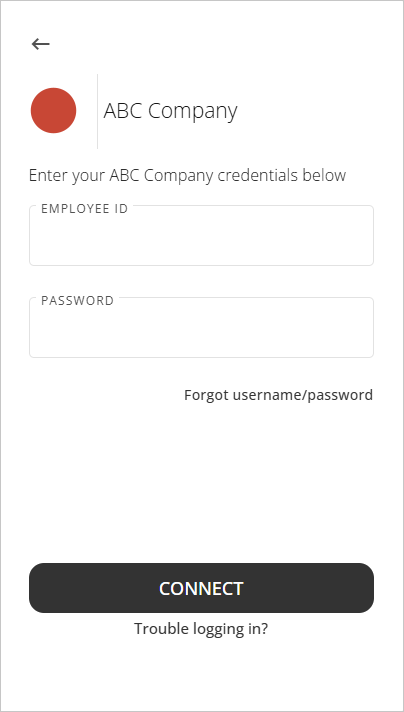
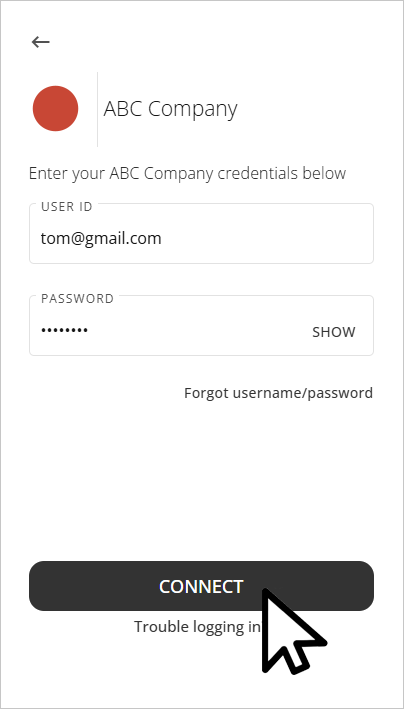
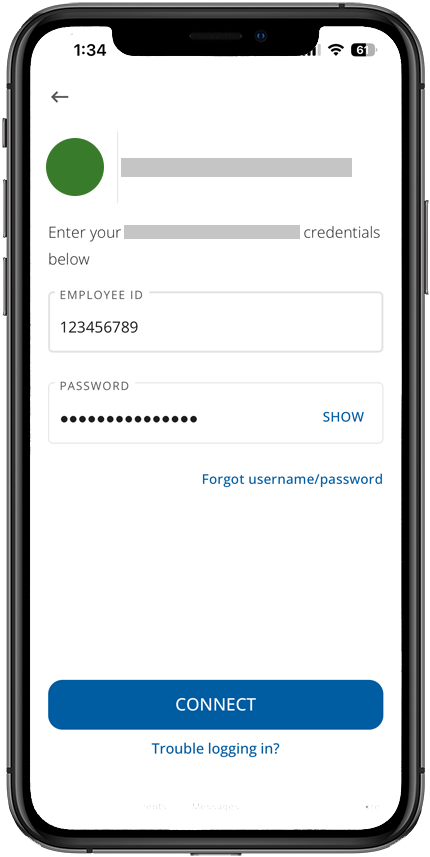
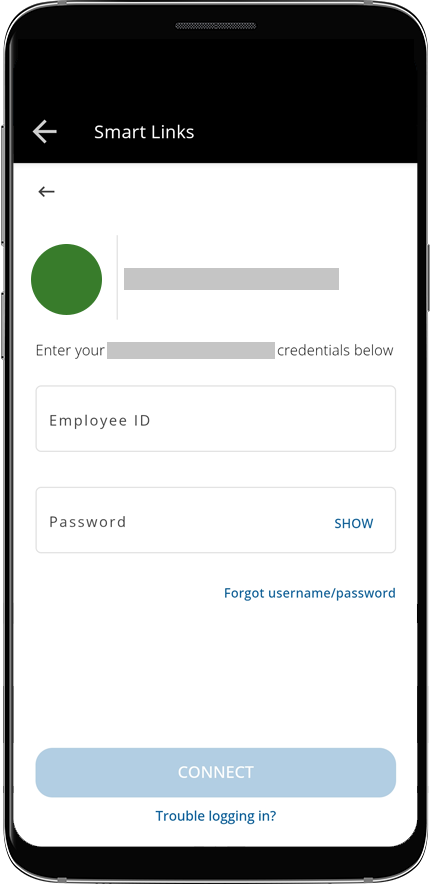
- Provide your sign-in credentials in theUSER IDandPASSWORDfields.noteYou can selectSHOWto make your password visible as you type.
 Some employers/institutions may require additional searching (that is,LocationorStore Number) to find your specific account.
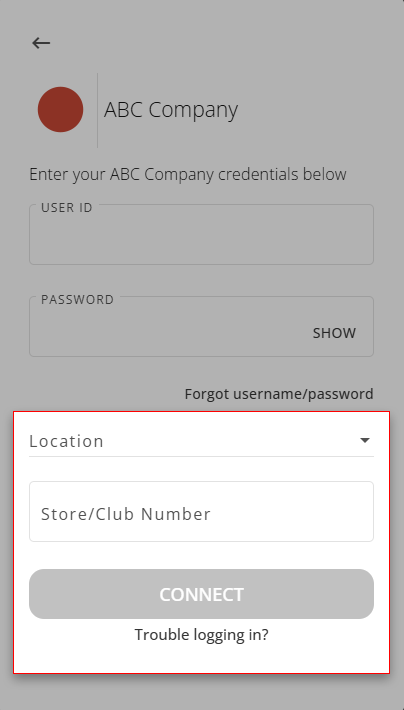
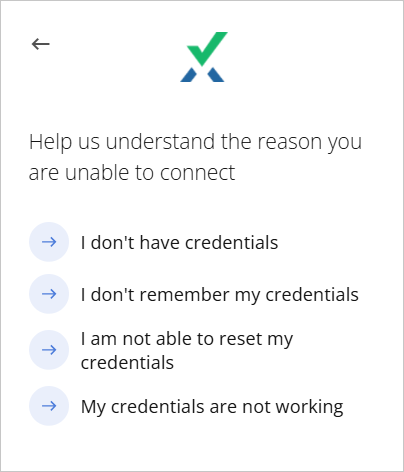
- If you are experiencing trouble logging into your account, you can selectTrouble Logging In?and select from one of the following options:
- I don't have credentials
- I don't remember my credentials
- I am not able to reset my credentials
- My credentials are not working
 If you've forgotten your password, selectForgot username/passwordto be redirected to your institution's login page.
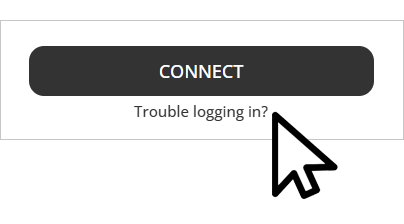
- After you've provided your login credentials, selectCONNECTto proceed.
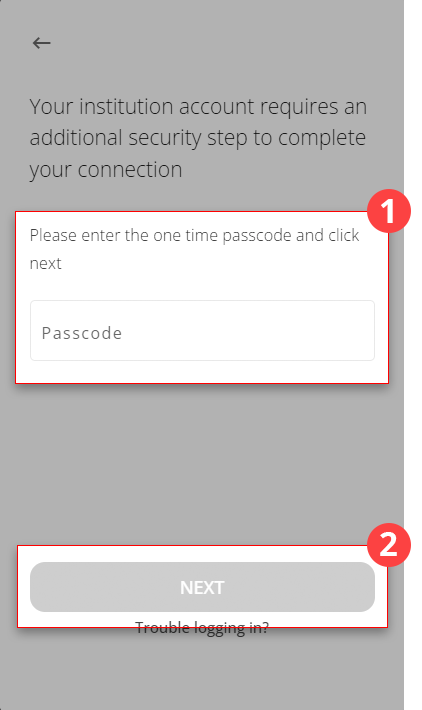
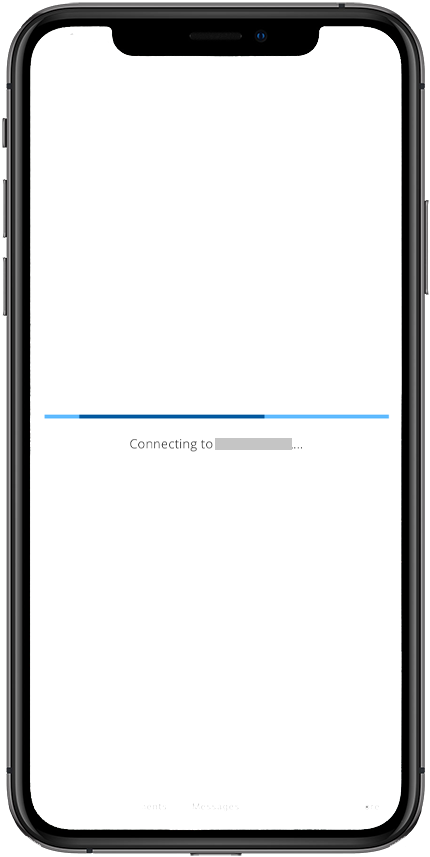
- Some institutions may require an additional multi-factor authentication code for further security. When prompted, provide the authentication code in thePasscodefield, then selectNEXT.
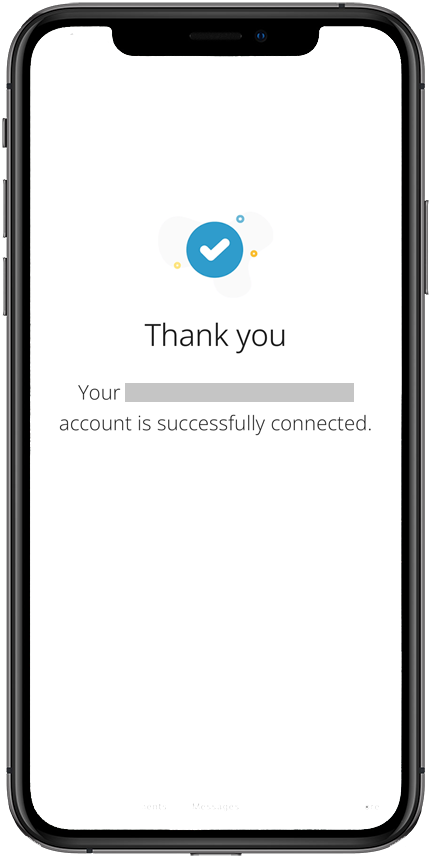
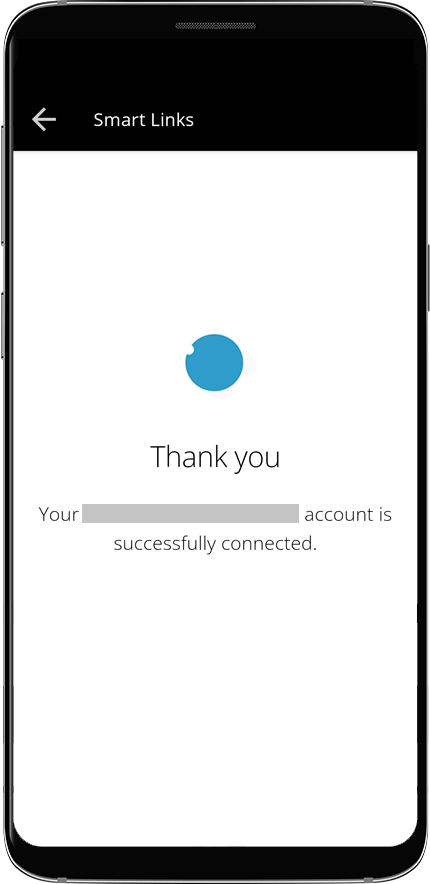
- Once the link has been established, the window will update to notify you of the successful link.noteConnecting Smart Links with your financial institution may take 24 hours to process.
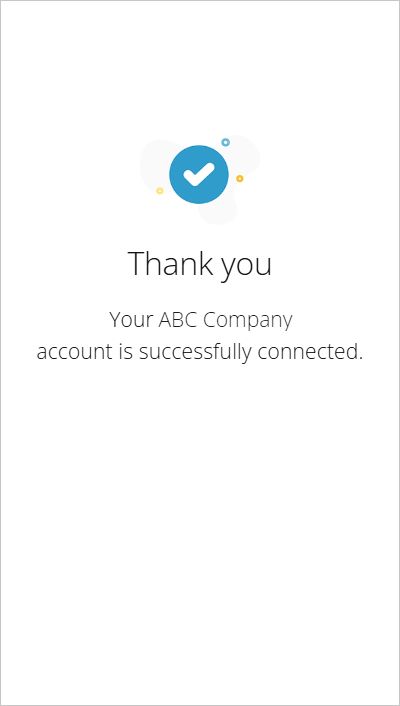 You will also see a toast notification appear on your screen notifying you of the successful link.
 If you weren't able to establish a link, you will be redirected back to the login screen and you will see an error message will appear stating:You provided invalid credentials. Please try again.
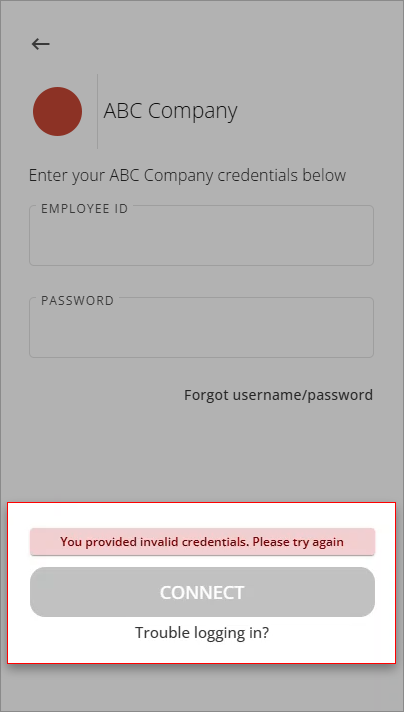
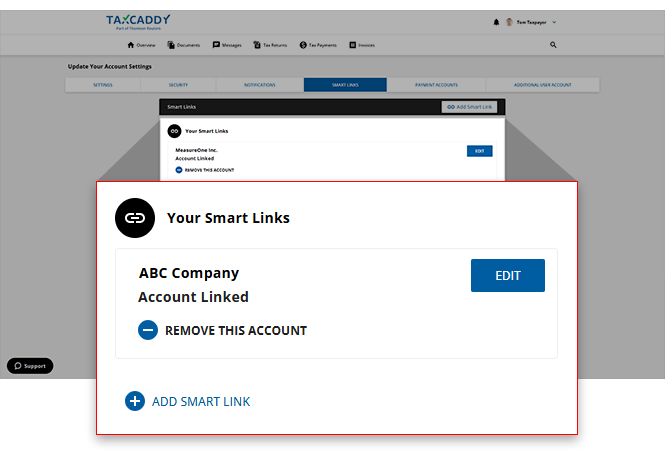
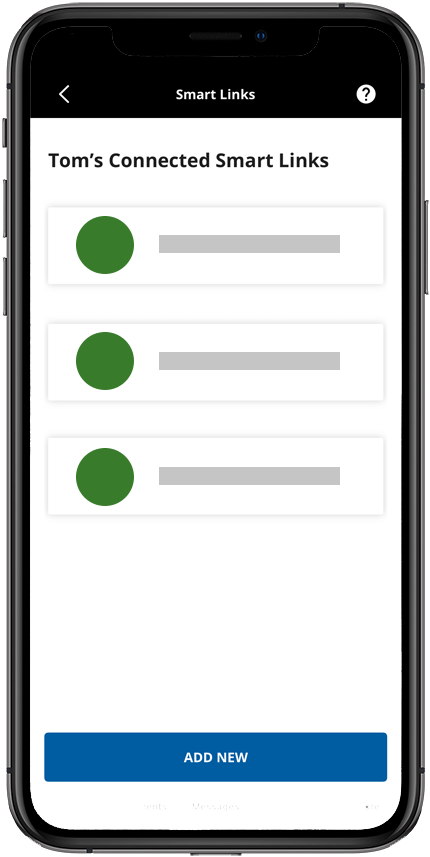
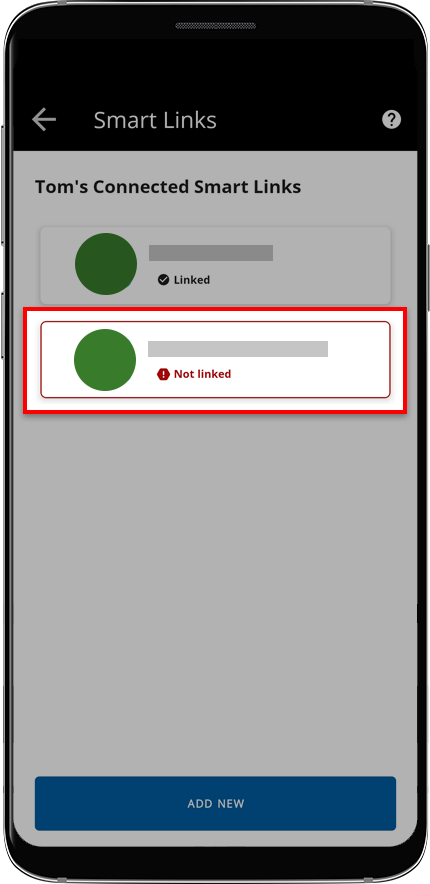
- The newly added Smart Link will be listed under theYour Smart Linkssection of theSmart Linkstab.noteUpon connection, newly established Smart Links may take up to 2 days to appear in theYour Smart Linkspanel and fetch your documents.
- You can selectADD SMART LINKto add another Smart Link for a new institution.
- The Smart Link will appear on the screen while the connection is in progress.
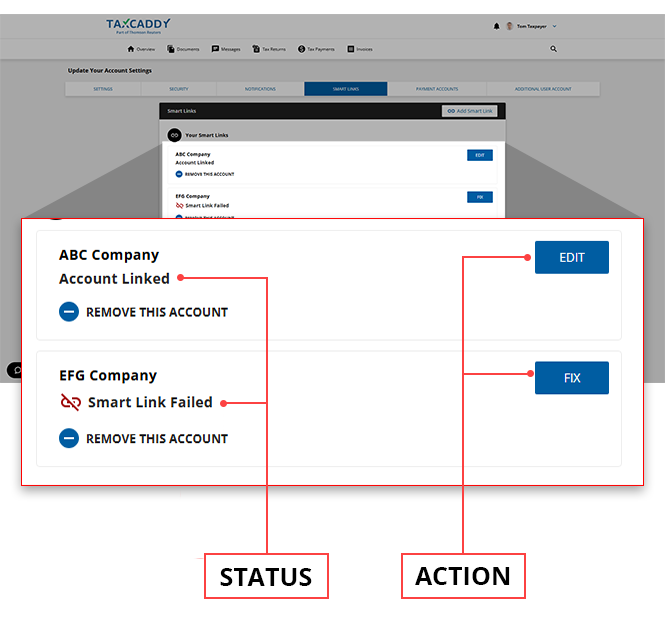
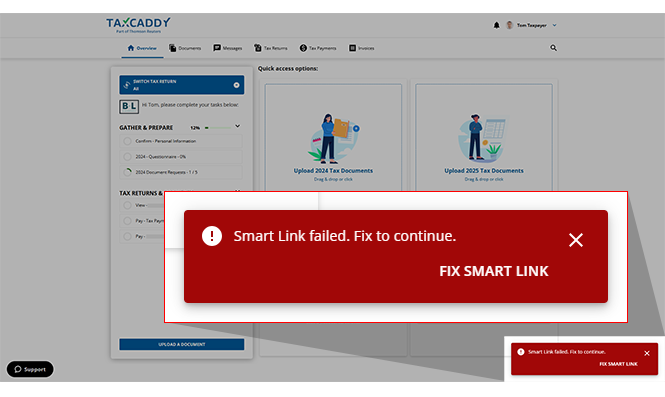
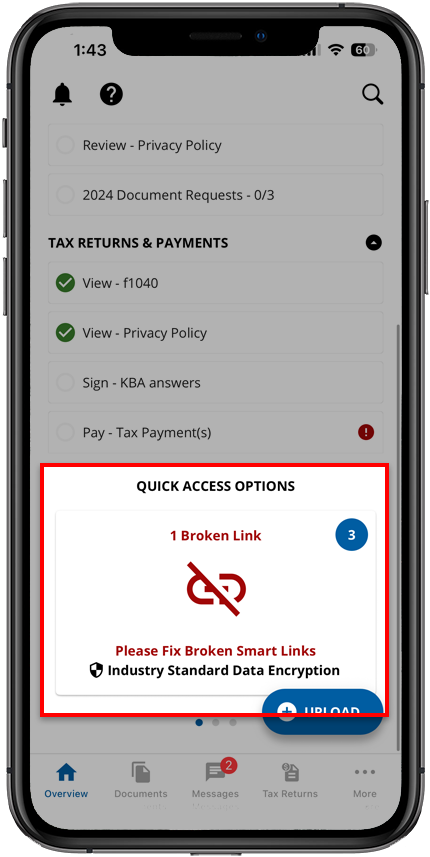
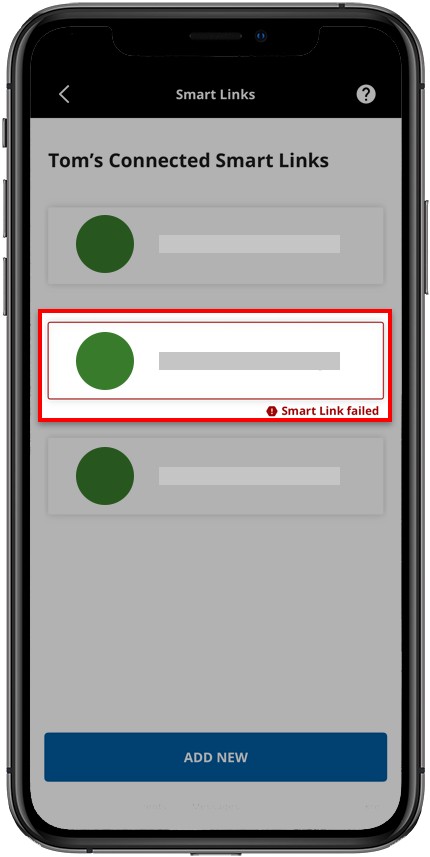
- You will see a toast notification appear on the bottom if a Smart Link is broken or needs additional information. SelectFIX SMART LINKto fix your Smart Links connection.
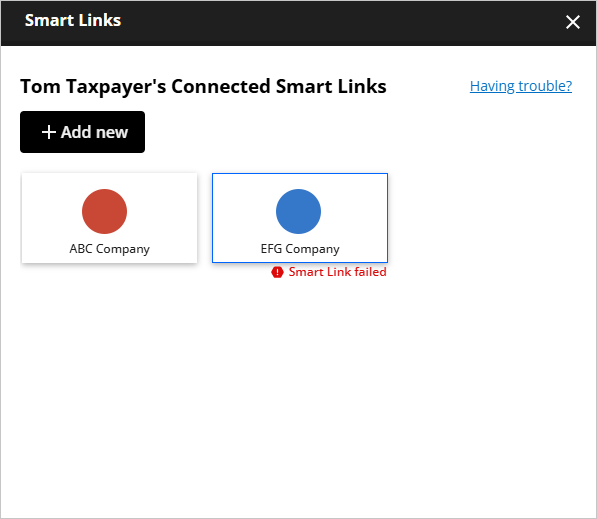
- Select the Smart Link that requires your attention.
- Enter the required information in their respective fields and selectCONNECT. If your financial institution requires two-factor authentication, you may be prompted to provide additional information in order to validate your identity.

- Once your account credentials and other required information have been validated, TaxCaddy will import any tax-related documents from the account.noteLinked accounts will stay linked each year, unless removed manually or disconnected due to an incorrect password.
 noteIf your financial institution requires you to receive and verify a security code each time you sign in, then the Smart Link won’t be able to automatically check and retrieve documents.
If your Smart Link hasn't connected after 24 hours, then remove the Smart Link and try again. You may also sign in to your financial institution's main site to check if your account is locked or if Third-Party Access is restricted.
iOS mobile app
Follow these steps to add a Smart Link on your iPhone mobile phone app.
- Sign in to the TaxCaddy mobile app.
- On theOverviewscreen, select theTry Smart Linkspanel. You may need to swipe left or right to view different panels.
- Select one of the following institution types:
- Payroll: W-2 form
- Financial Institution: 1099-CONSOLIDATED, 1099-INT, 1099-DIV, 1099-B, 1099-OID, 1098
- Use theSearchfield to find your financial institution, or make a selection from the list.
- Enter theEMPLOYEE IDandPASSWORDyou use to log into the financial institution, then selectCONNECT.
- The Smart Links processing screen will appear. Establishing a connection may vary in duration.noteConnecting Smart Links with your financial institution may take 24 hours to process.
 noteYou may receive an authentication code if your financial institution requires additional verification. The authentication code must be verified in 10 minutes before it expires.
 - Once your account credentials and other required information have been validated, the Smart Links processing screen will update.
 A financial institution can’t be added twice. If you share a bank account or have different accounts with the same financial institution, then you will only be able to add 1 account at a time.For example: If your Charles Schwab bank account is connected with Smart Link, then your spouse's Charles Schwab account can't be connected with Smart Links unless you remove your Smart Links connection with Charles Schwab.
 - ABroken Linkappears on the Smart Link panel to indicate that it needs your attention. Select theSmart Link.
- The status of the account updates toSmart Link failedif additional information is needed. Select theSmart Linkto address the issue.
- SelectFIX SMART LINKto fix the Smart Link.
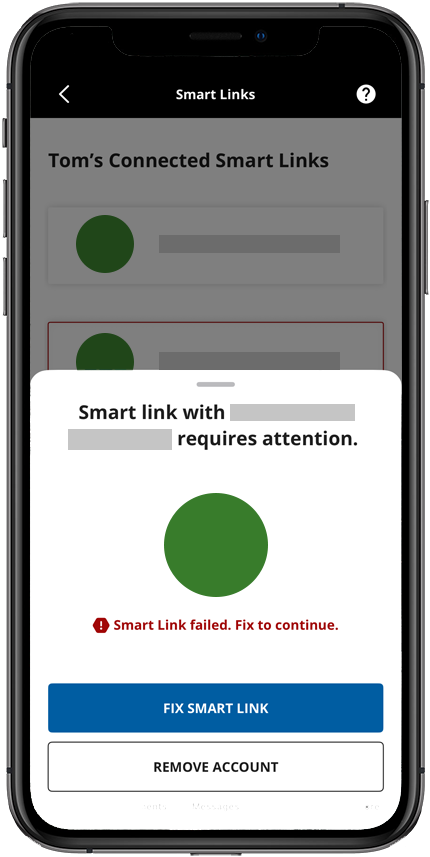
- You may be prompted to correct the information you provided or to provide additional information. Enter the required information, then selectSUBMIT.
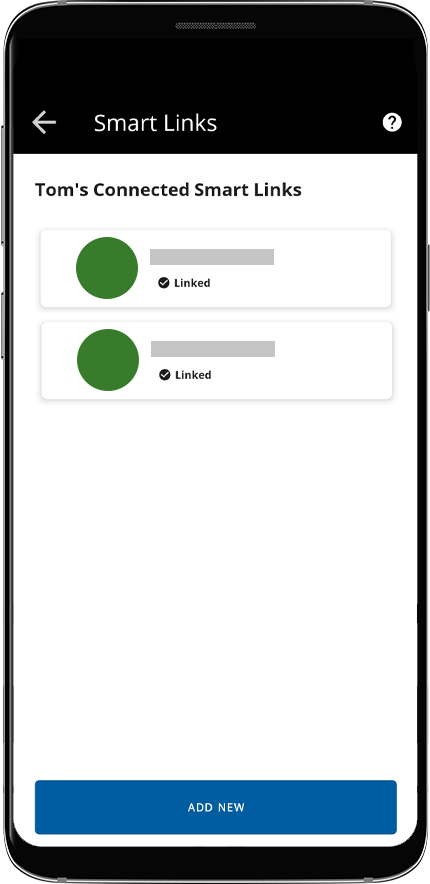
- Once your account credentials and other required information have been validated, the status of the connected account updates toAccount Linked. TaxCaddy will import any tax-related documents from the account once per day.noteLinked accounts will stay linked each year, unless removed manually or disconnected due to an incorrect password.
 noteIf your financial institution requires you to receive and verify a security code each time you sign in, then the Smart Link won’t be able to automatically check and retrieve documents every day.
Android mobile app
Follow these steps to add a Smart Link on your Android mobile phone app.
- Sign in to the TaxCaddy mobile app.
- On theOverviewscreen, select theTry Smart Linkspanel. You may need to swipe left or right to view different panels.
- Enter a name for your Smart Link.
- Select one of the following institution types:
- Payroll: W-2 form
- Financial Institution: 1099-CONSOLIDATED, 1099-INT, 1099-DIV, 1099-B, 1099-OID, 1098
- Use the search field to find your financial institution, or make a selection from the list.
- Enter the username and password you use to log into the financial institution, then selectCONNECT. You may receive an authentication code if your financial institution requires additional verification. The authentication code must be verified in 10 minutes before it expires.noteConnecting Smart Links with your financial institution may take 24 hours to process.
- Once your account credentials and other required information have been validated, the Smart Links processing screen will update if the Smart Link connected successfully.
 A financial institution can't be added twice. If you share a bank account or have different accounts with the same financial institution, then you will only be able to add 1 account at a time.For example: If your Charles Schwab bank account is connected with Smart Link, then your spouse's Charles Schwab account can't be connected with Smart Links unless you remove your Smart Links connection with Charles Schwab.
 - ABroken Linkappears on the Smart Link panel to indicate that it needs your attention. Select theSmart Link.
- Select theSmart Linkto address the issue.
- You may be prompted to correct the information you provided or to provide additional information. Enter the required information, then selectOK.
- Once your account credentials and other required information have been validated, the status of the connected account updates toAccount Linked.noteLinked accounts will stay linked each year, unless removed manually or disconnected due to an incorrect password.
 noteIf your financial institution requires you to receive and verify a security code each time you sign in, then the Smart Link won’t be able to automatically check and retrieve documents every day.
Related Content
-
Fix or Update Smart Links (document retrieval accounts)
Format: Article,
9 min read
Article,
9 min read
-
Remove Smart Links (document retrieval accounts)
Format:
Article,
4 min read
-
Smart Links institutions
Format:
Article,
1 min read
-
Troubleshoot: Smart Links Third-Party Access
Format:
Article,
1 min read
-
Smart Links security
Format:
Article,
1 min read