
CoCounsel for Microsoft Outlook
Microsoft Outlook Add-in for HighQ and Legal Tracker
CoCounsel for Microsoft Outlook
allows you to manage your emails, documents and matters directly to HighQ and Legal Tracker, from Microsoft Outlook for Office 365. If you are a CoCounsel user, you can enjoy CoCounsel Core features with this application. More details are available in
Microsoft 365 integration
on this page: https://www.thomsonreuters.com/en-us/help/cocounsel/integrations.htmlnote
This application was named
Thomson Reuters Legal Task Manager
until mid-October 2024. There are no changes to features or access for our customers using HighQ and Legal Tracker products.The add-in is linked to your Microsoft 365 account and is available on both Windows and Mac desktops, and your browser.
Install the add-in to add a
Thomson Reuters
button in your Outlook
integrations bar. The add-in provides options for saving and filing emails and documents in your 'My files' area of Collaborate, create matters, and share documents.Installation and security
Please see CoCounsel for Microsoft Outlook - Installation and Security for information on how to install or deploy the add-in.
note
The Installation and Security article includes answers to Security FAQs.
Log in for the first time
Please see here if you have not yet logged in and connected your HighQ or Legal Tracker accounts.
note
For convenience, you should pin the add-in panel to Outlook.
note
The contents of the add-in panel vary according to the accounts you have connected.
Matter management
CoCounsel for Microsoft Outlook
can efficiently extract information from emails to manage legal requests.note
See Matter management for more information.
Save an email and/or attachments to HighQ
Locate the Application Icon
- In Outlook, locate the application icon in the top-right corner of the interface.
- If the icon is not visible, expand the app menu. It may be hidden based on your zoom settings.
- Adjust the zoom level using Ctrl (Windows) or Cmd (Mac) and the scroll wheel until the icon is visible.
- To improve accessibility, pin the application as a shortcut in theOutlook ribbon.

- Click the icon to launch theHighQ application panel.
note
Pinning shortcuts provides faster access and supports a more efficient workflow.
Save Emails and Attachments
The Save Emails and Attachments feature enables you to
upload emails and their attachments to HighQ
. This process helps you manage files and metadata centrally within your workspace. - Open the required email in Outlook.
- Launch the CoCounsel for Microsoft Outlook application.
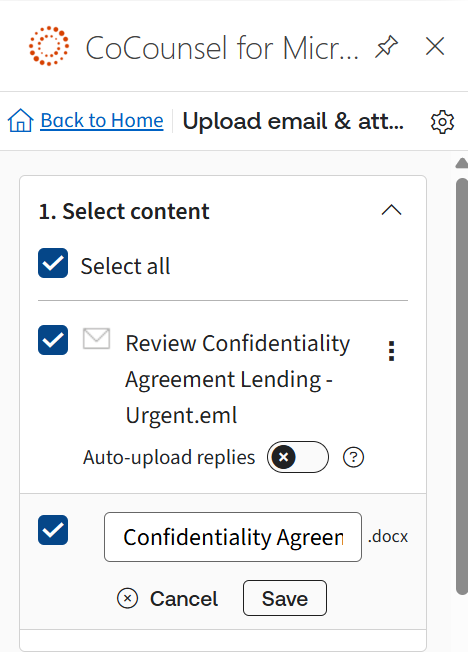
- Select Upload Email and Attachments. The system automatically extracts metadata and attachments from the selected email.
- Use the content selection list to:
- Choose which emails and attachments to upload.

- Rename content using thethree-dot menu. The new file name will be used in HighQ.
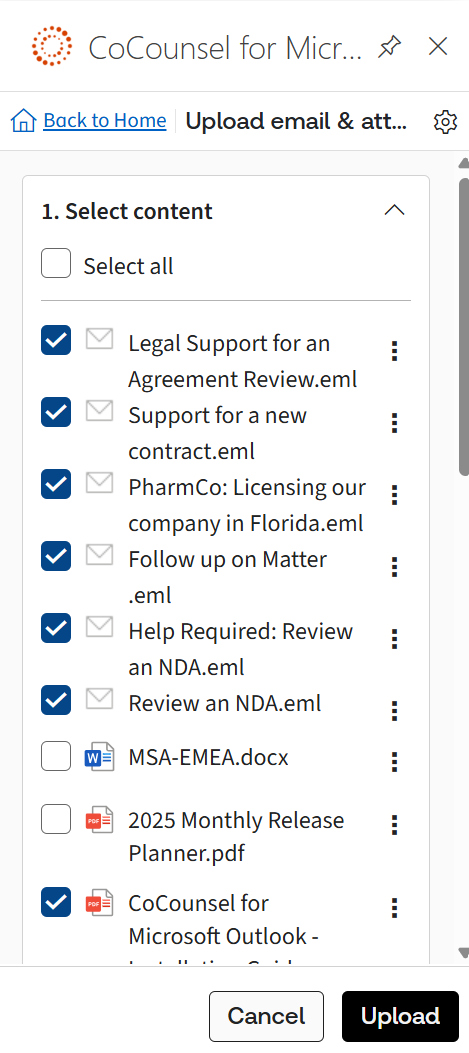
- To save multiple emails:
- Select multiple emails from your mailbox.
- Open theCocounsel for Microsoft Outlookand follow the same steps.
- Use the counter to verify how many items are selected.
- Adjust selections before proceeding.
note
Metadata, including sender and timestamp information, is automatically linked to each upload.
Automatic Thread Saving
When you save an email to HighQ, all subsequent replies to that email are automatically saved within the same HighQ location. This eliminates the need to manually upload every related message. If
Outlook
detects a side conversation that starts a new thread, automatic capture stops for that branch of the discussion. This follows Outlook’s built-in thread management rules. For example, such as change in Email Subject line 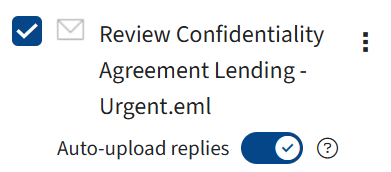
A new version is added to HighQ when the conversation is synced with at least one new email added to the discussion thread.
note
This functionality doesn’t work when multiple email threads were selected.
note
Discussions can sometimes take a few minutes to reflect in HighQ.
Choose a Save Location
After selecting emails or attachments, choose where in HighQ to save them.
Location Options
- Suggested Locations: Displays your most frequently accessed folders or recent save locations.
- Favorites: Lists your HighQ favorites. Favorites synchronize automatically between Outlook and HighQ.
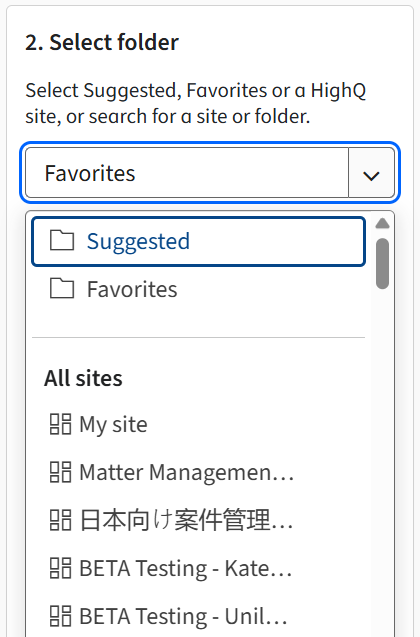
Navigation Options
- Type a site name in the dropdown field. As you type, matching results display automatically.
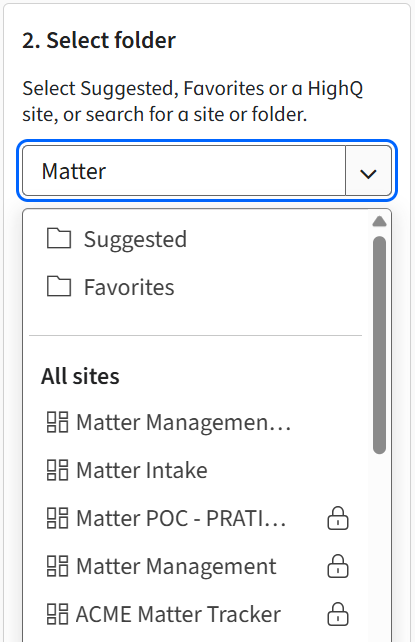
- Browse folders and subfolders by single-clicking on the chevron on the side or double-clicking on them directly. You can also navigate using breadcrumbs.

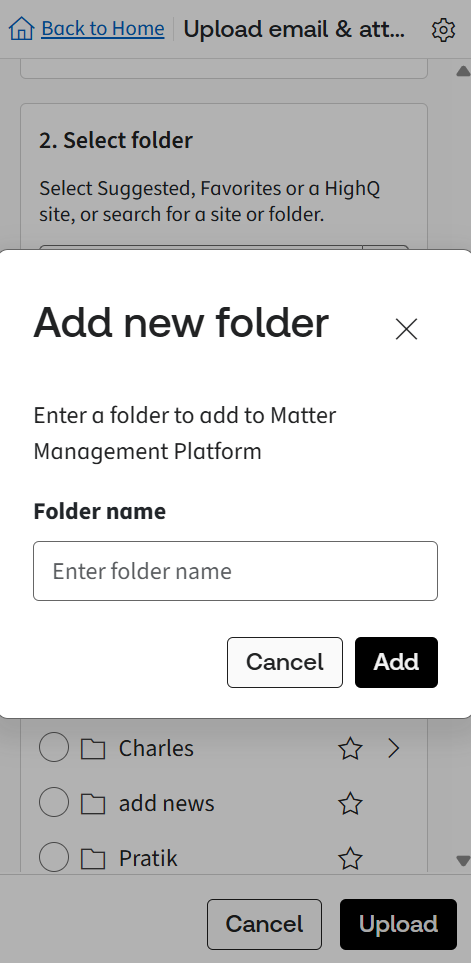
- Create a new folder using the New Folder option and select it before saving.
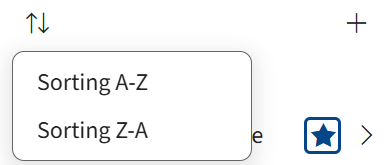
- Sort lists alphabetically or in reverse order.
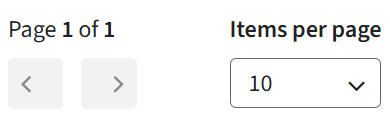
- Adjust pagination to view additional items if necessary.
- Use thesearch barto locate specific sites or folders.
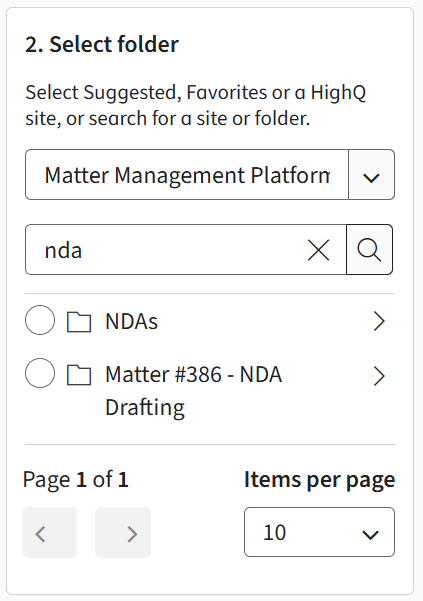 noteTo execute a search, press Enter or click the magnifying glass icon.Access Permissions and SecurityYour HighQ access permissions are synchronized within Outlook, ensuring secure and consistent authorization. If a lock icon appears next to a site, additional action may be required—such as accepting site terms or permissions
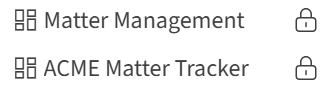
- Only users with valid access can save content to restricted sites.Restrictions may include:
- Accepting terms and conditions
- Completing workflow approvals
- Two-factor authentication (2FA)
- Password protection
- IP address limitations
- Check-in/check-out status requirements
These controls help ensure only authorized users can interact with protected content. Important: Accept all site conditions in advance to avoid upload errors.
Upload and View Metadata
- After confirming your save location, select Upload
- The application uploads the selected emails and attachments to HighQ.
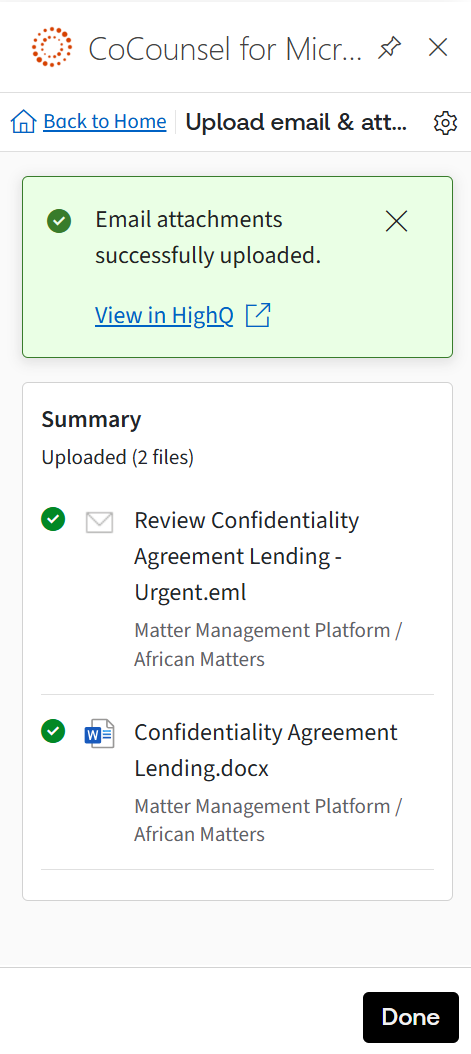
Once completed, the following information is available on the HighQ platform:
- Uploaded emails and attachments
- Metadata, including sender, recipient, subject, and timestamp
To ensure complete
metadata visibility
, enable metadata display in the Admin Panel, under Settings. note
Enabling metadata visibility ensures that all key attributes are displayed for tracking and compliance review.
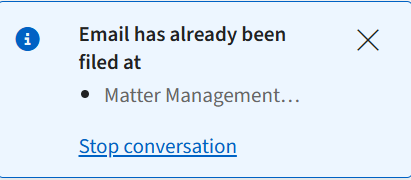
Email Tagging and Tracking
After saving, Outlook automatically tags the uploaded emails. Tags show which emails and conversations are archived to HighQ.

You can easily identify saved emails in your inbox and stop conversation tracking at any time through the
HighQ app panel
. 
note
Tags help avoid duplicate uploads and maintain a clear record of stored content.
One-click upload
As you upload more emails, the add-in predicts where you often save emails and attachments.
The
One-click upload
panel suggests a location, taken from your previous interactions with similar emails:
Click
Quick upload
to file the email immediately, or select Manual upload
to choose another location.Labels
Labels are added to emails in the Outlook window to show their status with the add-in.
Emails that have been saved are shown with an
Email filed
label.
Email discussions that have been saved are shown with a
Conversation Enabled
label:
note
It does not affect the email or discussion filling if you remove the label.
Automatically save your sent emails to HighQ
When you compose a new email,
before you click
, select Send
Upload
to automatically save the email to HighQ when you send the email. note
The new UI of Outlook ('New Outlook') is the preferred platform for the add-in, as it supports all features seamlessly. While the application can operate with the legacy Outlook UI, there are some limitations: 'Auto-filing discussion' and 'Save Email on Send' are not fully compatible, which may lead to issues that Thomson Reuters cannot address. However, 'Save Email' functions as intended when you file an email after reception.
When the
Compose email
window is open, Don't upload
or Upload
are available in the Sent emails
section of the add-in: 
If you want to save the email to HighQ, select
Upload
. Select Auto-upload replies
to save this email and
also automatically save all replies in the email thread.
By default, the email is saved to your default folder location, select
Change folder
to change the destination folder.note
This selection only applies to the current email and email thread. You can change the default folder in the add-in settings, below.

Default settings
You can change default values and preferences in
File email preferences
. Select the
Settings
button:
Open
Preferences
, select the HighQ
tab and then File email preferences
. Adjust the default folder and email saving preferences as required.
Click
Save
to keep your changes.Save an email and/or attachments to Legal Tracker
You can save any email to Legal Tracker; any attachments in that email can also be saved in the same location.
Select one or more emails to save, then click the add-in icon on the right-hand toolbar.
Select
Upload Email and Attachments
: 
The contents of the add-in panel vary according to the accounts you have connected.
Check you have selected the correct email.

If the subject of the email is not clear, is a duplicate, or needs more information, click
Rename
to adjust the text. Select
Continue
. Find a matter for the selected items.
Select a tab to help find a matter;
Open matters
, Recent matters
and Favorite matters
.note
The list of Favourites and Recent folders and sites are synced with Legal Tracker. For example, if you favourite an item in Legal Tracker, then it is shown as a favourite in the add-in.

To help find a matter, select
Search
to enter a search term and use a filter to filter the list. 
note
User permissions from Legal Tracker are applied to the list of matters and folders in the add-in. You must have access to matters and folders in Legal Tracker to also access them in the add-in.
Select a matter. if there are folders for that matter, you can select individual folders.
note
If required, you can select more than one matter or folder; a separate copy of the selected emails and attachments is saved in each location.
Select the appropriate matters or folders and then set security for the uploaded items in
Access security
:
Click
Upload
to save the email and selected attachments. 
After they are uploaded, the documents are saved and available in the Legal Tracker service.
Save complete email discussions to HighQ
You can save entire email discussions to HighQ with the
Auto-upload replies
toggle. note
The new UI of Outlook ('New Outlook') is the preferred platform for the add-in, as it supports all features seamlessly. While the application can operate with the legacy Outlook UI, there are some limitations: 'Auto-filing discussion' and 'Save Email on Send' are not fully compatible, which may lead to issues that Thomson Reuters cannot address. However, 'Save Email' functions as intended when you file an email after reception.
After you click on the “Upload Email and Attachments” Card, select the
Auto-upload replies
toggle in the bottom right corner of the window:
When the switch toggle is turned “ON”, the add-in not only saves the selected emails but also future replies to the same email thread. This allows you to make sure that the latest emails in the discussion are always saved to HighQ without manually uploading them.

note
Discussions are not synced instantly, replies are checked at a regular interval (every 30 to 60 minutes) even if your device is off and Outlook is inactive. The sync process only stops if you log out of the Outlook Add-in or if you stop the email filling for the email discussion.
A new version is added to HighQ when the conversation is synced with at least one new email added to the discussion thread.

Upload and share folders and documents
You can create dynamic sharing links to HighQ files and folders so that the recipients of your email can simply click on the sharing link to get access to your content.
When you compose an email, click the
Apps
icon to find the add-in. 
If your content has already been uploaded to HighQ:
Select
Share HighQ Collaborate links via Email
. 
Browse your HighQ sites and folders to select the HighQ content you want to share. You can select and share multiple documents and folders.

Select the content, then click
Continue
. The Define Security Options
window opens:
Select appropriate security options, then click
Share link(s) in email
.A sharable link is generated and added to the email body.
note
Repeat the process to add multiple links to the same email.
Continue to create your email and then send it with the dynamic links when ready.

If your content hasn’t already been uploaded to HighQ:
Select
Upload to HighQ Collaborate and share
. 
Drag files to the window or click
Browse
to find and upload the documents of your choice. 
Then click
Continue
to select the HighQ location to save these documents. 
Select the location or locations and click
Upload to HighQ
.
A summary window opens:

note
Click
Close
if you only want to upload the documents to HighQ.You can create a sharing link later.After you upload your documents to HighQ click
Share link(s) in email
.Site file sharing
options appear so that you can adjust user access permissions for your content. Select appropriate security options, then click
Share link(s) in email
.
A sharable link is generated and added to the email body.
note
Repeat the process to add multiple links to the same email.
Continue to create your email and then send it with the dynamic links when ready.
Settings
Click the settings icon to open settings:
General
Matter management settings

- Activate Intelligent Intake features: - Enable or disable the AI Extract Information intake feature. If the box is checked, then you’ll be able to use this functionality. If the box is unchecked, then theExtract Informationbutton is hidden and the feature is disabled.
- Always ask for confirmation before scanning emails- If this is selected, confirmation is needed before you extract the information from an email request. A pop-up appears to confirm if you need to extract information from the email. This provides an extra layer of security if emails can contain sensitive information.
- Suggest relevant actions- Enable or disable suggested actions. The application can dynamically suggest actions based on your previous use of the add-in.
- Where do you want to create your matter by default- Select a default location for created matters when information is extracted with the AI feature. This does not change the options in the add-in, which allows you to create matters manually.
- Ask me every time my preferred location to create a matter- If this is selected then you are always prompted to selectHighQorLegal Trackerwhen you create a matter with the AI feature. If it is not selected, you can only create a matter on the platform that is selected by default (HighQ or Legal Tracker).
HighQ
iSheet associations
Please see iSheet Associations.
Sharing options
You can adjust the default sharing options for your content in the
Sharing options
menu. There are two sections, one for your own files and sites and another for any other files and sites (i.e. not created or owned by you). When you share files from your site or My Files the add-in follows your
My File sharing
settings. When you share a file from any other site, the add-in follows site file-sharing
settings 
- Show dialog when sharing- If this is selected, current share settings are displayed before the link is generated. This allows you to verify and change settings if HighQ settings are not appropriate. If not selected, you are not asked to verify the share settings and the add-in follows the default settings for sharing files to generate links.
Legal Tracker
Save email preferences
In the
Legal Tracker
section under Preferences
, the Save Email and Attachments
allows you to define default values for two key fields: Folder
and Access Security
. 
- Folder- Choose a default folder for uploading emails and attachments to a matter.
note
You can modify the folder selection during the
Upload Emails and Attachments
process; click the matter hyperlink to change the folder before you upload the email.- Access Security- Specify a default access security setting for uploaded emails and attachments.
note
You can modify access security during the
Upload Emails and Attachments
process; choose an option from the Access security menu in the Choose Matter
window.Create matter preferences
Preferences for Matter creation are managed in Legal Tracker. To set values in the Outlook add-in select
Open Settings in Legal Tracker
, then open the User Profile
section in Outlook Add-in Defaults
.
Ensure all settings are configured correctly in Legal Tracker then return to the Outlook add-in and click
Sync with Legal Tracker
to synchronize all changes.Click
Save
to keep the synced values.note
This ensures seamless integration and consistency between the two platforms.
Related Content
-
Installation and Security
Format: Article,
14 min read
Article,
14 min read
-
Matter management
Format:
Article,
22 min read
-
Using HighQ with CoCounsel for Microsoft Outlook
Format:
Article,
14 min read
-
Using Legal Tracker with CoCounsel for Microsoft Outlook
Format:
Article,
6 min read
-
Release notes
Format:
Article,
3 min read