
DPS Management: Search History and Result Analysis
The
DPS Management
screen is used to review and take action on multiple companies and/or searches. This screen provides a full search history. You can access this screen by selecting DPS Management
from the DPS menu. 
Querying Search History in DPS Management
You can perform searches based on date ranges, user name, result type, only parties that received a hit (
Show Only Hits
), and by the Search Reference Number
. You can also limit the results to show only manual searches by selecting Exclude Batch Results
.With the
Result Filter
, you can select the type of records to review.Type of records |
Description |
|---|---|
All Searches |
Provides a list of all records with no data filtered out. This is the best filter to look for an exact screening run on a specific date. |
Blocked Searches |
Provides a list of only blocked records. This is the best filter for acting on past searches that have been blocked. The system does not show duplicate searches with the same data, but only shows the most recent screening. Overriding or confirming a denial on a search on this grid will remove the search, allowing it to operate as a “work queue”. |
Escalated Searches |
Provides a list of only escalated records. Much like Blocked Searches , Escalated Searches will filter all of the searches that have been escalated at least once. |

If
All Searches
is selected in the Result Filter, the Review Status
column shows the status for the entities.
If
Blocked Searches
or Escalated Searches
is selected in the result filter, the Highest Score
column appears on the screen and the Review Status
column will no longer be visible. You can be reminded of the review status of all searches displayed in the grid by reviewing which filtering option was selected.For the Advanced engine,
Highest Score
reflects the highest score (as set up on the DPS Settings
screen) received by any of the hits on the search.Hiding Ad Hoc Results from a Search
To hide ad hoc results from a search, select
Show/Hide Filter
.
Next, select the filter field above
CompanyID
. From the filter options, select NotIsEmpty
.
Configuring Search Results Grid
You can configure the search results grid to show columns according to your preferences. Once you set this configuration, the system saves your preferences, so the grid shows only the columns you select the next time you log in.
To apply this configuration:
- SelectConfigure Columns.
- Go toColumns.

- Choose the checkboxes for the columns you want to view and deselect the checkboxes for the columns you want to omit.
For example, if you choose to view the Current Screening Status column, you can view the latest screening statuses of companies. This column provides the same status value for all entries in the screening history that have the current status.
To know more about screening statuses, refer to the Conducting a Search section of this user guide.
Filtering Search History by Company Name and ID
To query search history of a specific Company Partner:
- Click the required Company name fromLoad Companydropdown. Each option in the dropdown shows Company Partner name followed by its id.
- Once the required company is selected, clickSearch. Previous searches of the required company are shows in the grid.

Related Search Results
To view related search results for a previous search:
- Click a search to open.
- Click its corresponding expansion arrow on the left side of the screen to show the information returned at the time of the original search.

From here, you have access to all information as previously described in the
Search Results
section of the help. Scores are sorted from highest to lowest by default.
Hits on the
DPS Management
screen can be sorted by any column in the grid. Sorting can be useful in prioritizing hits ranked by Score or grouped by Website. 
Search Results Details
After a
DPS Management
search has been completed and a search result has been expanded by selecting the expansion arrow on the far left, further details can be viewed by clicking Details
.
Clicking
Details
opens the Denied Party Entity Detail
window. A green dot next to a record provides the date and time a record was added or changed.
Filtering Search Results
To use the advanced filter options:
- ClickShow/Hide Filter. A field appears in the bar below each column header.
- Click a column to filter and enter a value.
- Click the filter icon.

- Click a filter option. Filter options may vary slightly depending on column type. A more detailed search can be performed by filtering multiple columns at the same time.

Filtering the
CompanyID
column can be used to quickly reference past screenings for specific companies, making it easier to differentiate between companies with similar names and addresses.
View Settings
The
View Settings
option allows you to see which settings were in place when the selected screening took place.To view the previous settings:
- Click a record to review.
- Hover your cursor over the left of the record’sSearch Reference Numberuntil an options list appears.
- ClickView Settingto open a second browser tab containing an uneditable version of theDPS Settingsscreen. This screen displays all the options that were selected at the time the search was performed on the company.

For more information about the
DPS Settings
screen, refer to the DPS Settings
section of the help.
Using the engine:

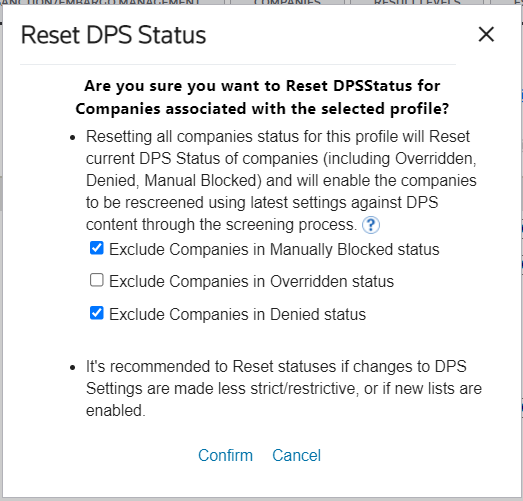
If a proactive screening process is being executed when Confirm is clicked, the system will request your confirmation to cancel that process, which is ongoing, in order to proceed with reset status. If you don’t approve, reset status cannot be performed at that moment. Once batch is finished, you may reset status again later.
Activate Advanced Engine
This allows customers to enable the new Advanced screening engine as default for the selected screening profile. If customers have more than one, then they will have to enable it for each screening profile.
After the new engine is activated as default, this button switches to allow “Deactivation” of the advanced engine should the customer need to switch back to the old engine. However, it is encouraged that feedback be provided to Thomson Reuters via Account Manager or Customer Success as to the rationale for deactivating. This is because eventually the new Advanced engine will replace the old screening engine, and the old screening engine will be retired.
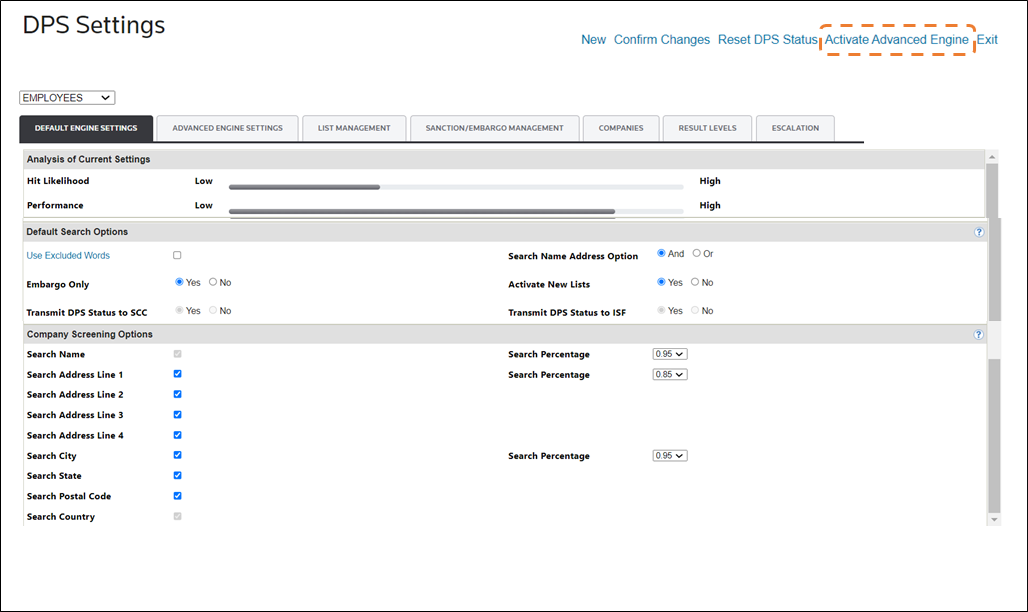
Reset DPS Status
This is an option for customers to reset the DPS Status for companies associated with the selected screening profile, in mass. This could be used to allow previously screened companies to be reset to “Not Screened” to be rescreened using new or changed DPS Settings. It provides some options to excluded certain companies, specifically where user research has been done on the party.
It’s not recommended to exclude “Overridden” parties because there could be different results after a rescreening that require review, that may or may not have existed on the prior screening using different settings.
View Notes and Documents
The
View Notes & Documents
column on the far right of the screen allows you to view associated notes and documents for a given search result.To open a note or document:
- Click a record to review.
- Click the hyperlink in theView Notes & Documentscolumn to open theSearch Noteswindow, which contains separate tabs for notes and documents.


Settings
The
Settings
column displays the settings description ( Ad hoc
or Default
).To see the detailed settings used at the time of the screening:
- Click a record.
- Hover your cursor over theSettingscolumn.

Using the engine:

Related Content
-
DPS Lookup: Comprehensive Company and Screening Record Overview
Format: Article,
1 min read
Article,
1 min read
-
DPS Webservices: Reviewing Results on DPS Management
Format:
Article,
3 min read