
Configuring Contract Express features
Contract Express allows Administrator to configure availability of application functionality for users. Administrator can enable or disable Contract Express features, or fine-tune the set of actions, available on the Document details page depending on Document’s status.
Configuring availability of Contract Express features
- Go toAdmin>Features. Features available for enabling/ disabling are listed in theAreacolumn. You can enable/ disable the following:
- Advanced AI Features– if enabled, allows Authors to use Advanced AI features which involve document analysis.
- Alerts– if enabled, allows for automatic sending of email notifications when certain events are triggered.
- Analytics- if enabled, allows Admins to run usage reports and create custom dashboards.
- Approvals- if enabled, Approvals configuration is available for templates and if configured, Approvals are applied to documents.
- Contacts- if enabled, allows users to save contacts for use within questionnaires.
- Datasheets- if enabled, allows users to create different views of My Documents and My Matters pages, with selected column headings.
- eSignature- if enabled, allows to send documents for signature to the selected eSignature provider (DocuSign or Adobe Sign).
- Expertise Apps- if enabled, allows Admins and Authors to create Flowchart templates.
- Matters- if enabled, allows for questionnaire answers to be passed into the questionnaires for subsequent templates within that matter.
- Negotiation- if enabled, Negotiation configuration is available for templates and applied to documents.
- Search Documents- if enabled, allows searching in documents’ content with the Documents tab.
- Search Templates- if enabled, allows searching in templates’ content within the Templates tab.
- Snapshots- if enabled, allows running snapshot tests with theAdmin>Snapshotssection.
- Two-factor authentication- if enabled, provides secondary level of authentication security.
Some of the features are required for Contract Express to function, so they cannot be turned off (Documents, Templates and Configuration defaults). - Check the features you want to make available for your users and clickSave.
Enabling approvals and configuring their status names
- Go toAdmin>Features.
- CheckApprovalsto enable approvals for your license space.
- To allow bulk approvals based on answer review in the Datasheet, checkBulk Approvals.This action adds a new tab in the Documents section labelled ‘Awaiting approval’. This tab displays all contracts awaiting approval which the user is authorized to approve. To bulk approve, apply a datasheet to review the answers, select the documents which meet your requirements and click ‘Approve’.

- ClickManage Statusesto define custom names for approval statuses, if it is required.StatusDescriptionApprovedThe approval has been grantedWaitingThe Document has been sent for approval, and is awaiting this approvalCompliantAn approval is applicable but not relevant because it does not meet the criteria outlined in the approval stepExemptCurrently not used in this version of Contract ExpressIrrelevantCurrently not used in this version of Contract ExpressRejectedThe approval has been rejectedRequiredThe Document requires approvalRevokedThe approval has been revokedQueuedWhere there are multiple sequential approvals and the preceding approvals are pending, the approvals that are not first are marked as such
- ClickSave.
Enabling negotiation and configuring its status names
- Go toAdmin>Features.
- CheckNegotiationto enable negotiation for your license space.

- ClickManage statusesto define custom names for negotiation statuses, if it is required.StatusDescriptionWaitingNegotiation has been requested for the DocumentInternal ReviewA Negotiator has taken the responsibility of the Negotiation for the DocumentExternal ReviewA Negotiator has pointed out the fact of the Document is sitting with an external party for an external reviewCompletedNegotiation is complete
- ClickSave.
Voiding active Negotiation tasks when disabling negotiation
If you are trying to disable Negotiation while there are active negotiation tasks, Contract Express will ask whether you want to:
- Allow all active negotiations to be completed or;
- Void all active negotiation tasks.
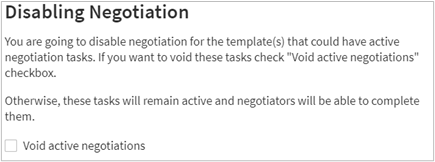
Check
Void active negotiations
checkbox to void negotiation tasks. As a result, Contract Express will remove all active negotiation tasks and return corresponding Documents to their previous statuses from which negotiation had been requested. If you leave
Void active negotiation
unchecked, users will no longer be able to request negotiations for any Documents, but all pending negotiations will continue until they are either completed or revoked.Changes to Contract Express when negotiation is disabled
After turning off Negotiation, you will see the following changes in Contract Express:
- Negotiation KPI is not calculated and not displayed in the KPI widget of the Admin Dashboard (see KPIs widget for more details).
- Negotiation tab in Overdue Items widget is not displayed (see Overdue items widget for more details).
- Negotiation tab in Template details is not displayed (see Enabling negotiation for a template for details about the negotiation settings for a template).
- Negotiation tab of the Tasks tab is not displayed, if there are no active negotiation tasks or they have been voided.
- Negotiation Turnaround Time metric is not available on the Template details tab for a Template (see Configuring export settings for a template for details about metrics).
- Reports for Negotiations are not available (Total Negotiations by Status - see Point in time reports, Average Negotiation Cycle Time - see Distribution reports).
Contract Express will reinstate all data and settings listed above, if you enable Negotiation again.
Enabling alerts
Alerts allow to set up email notifications about certain event and actions for documents. To enable alerts:
- Go toAdmin > Features.
- CheckAlertscheckbox.
- ClickSave.

More details on configuring alerts, see Configuring alerts.
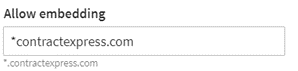
Enabling questionnaire embedding
You can allow embedding of Contract Express questionnaires in other websites, if your license has Guest Access enabled.
To enable embedding:
- Go toAdmin>Features.
- Enter the domain name preceded by an asterisk (*) in theAllow embeddingfield inConfiguration defaultsarea and clickSave.
To allow embedding on any website, enter an asterisk only.
Enabling single sign-on
To enable single sign-on you must first obtain an updated Contract Express license. To do this, and for a list of steps, please contact Contract Express Support.
Enabling two-factor authentication
Two-factor authentication provides an additional level of security by requiring your users to enter a second piece of information when they sign in; in this case a code from an associated authenticator application. It follows the “having something and knowing something” model where users know their password and have their authenticator application, increasing the security as it is unlikely both will be illicitly acquired by same individual.
To use two-factor authentication your users must first register Contract Express with a supported authenticator application. Contract Express supports the time-based, one-time password algorithm for two-factor authentication; authenticators that use this include Google Authenticator, Microsoft Authenticator, Authy, and Symantec VIP. To register, please follow the links to download the authenticator and follow the steps within to set it up.
To enable two-factor authentication:
- Go toAdmin>Features.
- CheckTwo-Factor Authentication.
- Select the two-factor authentication level you want to use. Currently, Contract Express supports three levels:
- user choice, where the choice to configure lies with the individual users (our recommended setting when first enabling to provide users time to set up their authenticator);
- enforce when a new browser is used, where users must use two-factor authentication whenever they use a new browser; and
- enforce every time a user logs in, where users must use two-factor authentication every time they sign in.
- ClickSave.

If you select user choice your users must enable two-factor authentication as follows:
- Go toMy Account.
- SelectEnable two-factor authentication.
Enabling datasheets for Documents tab
Datasheets are used to create customised views of data captured across all documents and to customise information displayed on the document details pages. To enable datasheets:
- Go toAdmin > Features.
- CheckDatasheets.
- ClickSave.
Enabling eSignature
To enable eSignature for the license space:
- Go toAdmin>Features.
- CheckeSignature.
- Select the eSignature provider you wish to use. Currently Contract Express supports DocuSign and Adobe Sign.
- ClickSave.
When you enable eSignature at the license space level, its configuration becomes available at the template level (for details, see Configuring eSignature for a template).
For more details on eSignature usage as part of a Document workflow, see eSigning documents.
Enabling search in documents
Contract Express allows searching documents’ content. This functionality is available on the
Documents
tab.To enable document search for the license space:
- Go toAdmin>Features.
- CheckSearch Documents.
- ClickSave.
For more details about searching in Documents, see Document search.
Enabling search in templates
Contract Express allows searching templates’ content. This functionality is available on the
Templates
tab.To enable document search for the license space:
- Go toAdmin>Features.
- CheckSearch Templates.
- ClickSave.
Template search is based on the same principles as document search. For more information on document search, see Document search.
Enabling analytics
Contract Express captures some metrics, including KPIs, template popularity, and document distribution by status. Contract Express 8.5 introduces the ability to create custom dashboards, with datasheets as the underlying data source. This functionality is for administrators only and is available on the
Analytics
page.To enable analytics for the license space:
- Go toAdmin>Features.
- CheckAnalytics.
- ClickSave.
Disabling analytics will disable the
Analytics
page. If you re-enable analytics, all existing analytics become visible. See Analytics and reporting for more details on Analytics.Enabling matters
To enable Matters for the license space:
- Go toAdmin>Features.
- CheckMatters.
- ClickSave.
Disabling the Matter feature will disable the
Matters
page. If you re-enable Matters, all existing matters become visible. See Working with matters for more details on Matters.Enabling contacts
To enable Contacts for the license space:
- Go toAdmin>Features.
- CheckContacts.
- ClickSave.
Disabling Contacts will disable the
Contacts
page and will not allow users to use contacts from the questionnaire. If you re-enable Contact, all existing contacts become available. See Managing contacts for more details on Contacts.Enabling snapshot testing
Snapshots can be used to troubleshoot issues with questionnaires or to test the behavior of a specific template in a newer version of Contract Express.
To enable snapshots for the license space:
- Go toAdmin>Features.
- CheckSnapshots.
- ClickSave.
For more details about testing snapshots, see Checking a template's health in Contract Express.
Enabling categories for templates
To enable template categories:
- Go toAdmin>Features.
- CheckCategoriesinTemplatesarea and clickSave.

Managing actions availability based on documents’ statuses
Contract Express allows you to manage actions available for users depending on documents’ status.
To configure actions per statuses:
- Go toAdmin>Features.
- ClickManage statuses and actionsbutton inDocumentsarea.
- Review the action list available for the statuses.
- Add or remove actions, if required. To add an action, click + and select the required action.
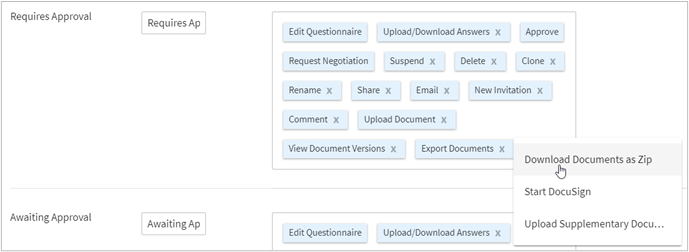
- ClickApplyto save changes.
note
Most of the actions that are responsible for moving documents from status to status are not configurable to avoid issues with the workflow (for example, dead-ends and loops). Note that Contract Express may override custom settings for actions if it is required by the template’s profile or sharing settings of a document.
Setting up Document deletion mode
Contract Express provides two document deletion modes, managed by
Document deletion
setting in Documents
area:- : In this case, Contract Express deletes documents only when a user deletes them explicitly from the Documents tab.On demand
- : Contract Express deletes Documents after a certain period of inactivity (by default 5 hours, configurable for on-premise deployments with the web.config file, see the Enterprise Installation Manual for details).Automatic
To set up document deletion mode:
- Go toAdmin>Features.
- Select the required mode inDocument deletiondropdown inDocumentsarea.If you select Automatic mode, Contract Express displays a warning. ClickOKto confirm your selection.
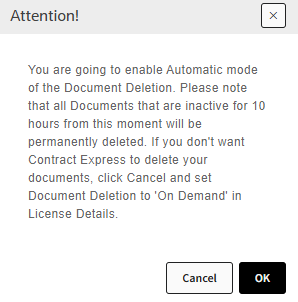
- ClickSaveto save the changes.
If Automatic document deletion mode is enabled, Contract Express displays the following warning on the Documents page.
