
Managing sites
Contract Express allows setting up multiple sites, apart from the main site. All these sites can have different look and feel, and their users can access only their allocated site and corresponding templates and documents.
Creating sites
To create a new site:
- Go toAdmin>Sites.
- ClickAdd sitebutton.
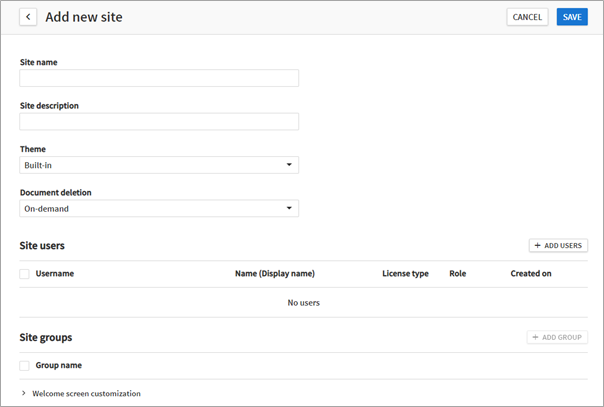
- Fill out the details for the new site:
- Site name- name for the new site, mandatory field. Note that the Site name should be unique and cannot be the same as the name of any existing Groups. It is not possible to change the Site name after you save the site.
- Site description- optional description of the site, visible only for Administrators.
- Select aThemefor the site, for details see Managing Contract Express look and feel with themes.
- SelectDocument deletionmode for the site, for details see Managing actions availability based on documents’ statuses.
- Define site users and groups, see Adding users to sites manually and Adding groups to sites.
- Configure welcome screen for the site, see Customising site welcome screens.
- ClickSave.
Adding users to sites manually
Contract Express allows adding users manually or in bulk.
To add users to a site manually:
- Go toAdmin>Sitesand select the required site.
- ClickAdd usersbutton.
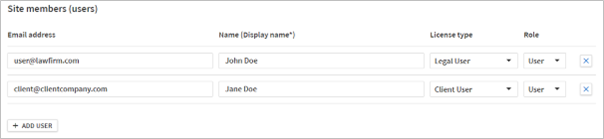
- Enter parameters of a new user:
- Email address(this will be their username) - mandatory parameter.noteFor Windows Authenticated instances, typing the first three letters of the username or Active Directory group will initiate a search.
- Name(Display name) - optional parameter.
- License type- select the user license type to be allocated (see User license table for more information about user license types).
- Role- you can add only Users to a site.
- ClickAdd userbutton to add another user.
- CheckSend email invitation to a new usercheckbox, if you want Contract Express to send an invitation to the new users. UseAdditional informationfield, if you want Contract Express to add some information to the standard invitation email.
- ClickApplyto save the list of users.
- Save the site settings, clickingSave.
If you have selected to send invitations to users, they will receive an invitation email with a link to join, with 28 days to follow through on the invitation before the link expires.
Adding users to sites in bulk
Contract Express allows importing multiple users from a file.
To add users to a site from a file:
- Go toAdmin>Sites.
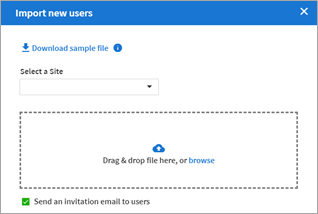
- ClickImport usersbutton.
- In opened panel clickDownload sample fileand save the sample .xlsx file on your disk.
- Enter the list of users into the sample file. For every user you should define:
- Email- mandatory parameter.
- Full name- optional parameter, Contract Express will use this name in the invitation email.
- Role- optional parameter.
- User license type- select from dropdown.
noteDo not deleteFull Namecolumn from the file, even if you leave it empty, as Contract Express requires this column to create users correctly. - Go toAdmin>Sitesagain and clickImport usersbutton.
- Select the site to which you want to add users.
- CheckSend email invitation to a new usercheckbox, if you want Contract Express to send invitation to the new users. UseAdditional informationfield, if you want Contract Express to add some information to the standard invitation email.
- Drag and drop the file with users to the dedicated area or browse for it.
If you have selected to send invitations to users, they will receive an invitation email with a link to join, with 28 days to follow through on the invitation before the link expires.
Adding groups to sites
Contract Express allows creating groups for sites. Site’s groups are specific to and available only within that site.
To add a group to a site:
- Go toAdmin>Sitesand select the site.
- ClickAdd groupbutton.noteAdd groupbutton is available only if you have allocated users to the site.
- DefineGroup name.
- AddGroup members. You can add users or other groups from this site to the group.
- ClickSave.
Customising site welcome screens
Contract Express allows configuring customised welcome screen for every site.
To customise the welcome screen for the site:
- Go toAdmin>Sitesand select the site.
- Change the welcome screen settings in Welcome screen customisation section.
- ClickSave.
Editing sites
To edit a site:
- Go toAdmin>Sitesand select the site.
- Make the required changes. Note that site name is not editable.
- ClickSave.
Deleting sites
- Go toAdmin>Sitesand check the required site.
- ClickDeletebutton and confirm the deletion.
note
When deleting a site, note that this will also delete all users and groups within the site. All Documents generated by users in that site will be retained until deleted by an admin or via automatic deletion, if enabled. For more information about Document deletion mode, see Managing actions availability based on documents’ statuses.
Using Contract Express from a subsite
Users should be added to subsites by the Administrator in
Admin
> Sites
section, see creating sites
section for more details on creating subsites.Upon logging in, members of a subsite will automatically be directed to the specified subsite.
Users may only be members of one subsite at any given time. Users may be moved from one subsite to another by the Administrator in
Admin
> Sites
section by removing the applicable user from the old site and adding them to the new site.