
Create new binder
Creating a binder is a starting point from where you can submit your client's tax documents and have them processed through OCR, get verified, and go into SPbinder for preparation. You can create a binder for your client by providing basic information about the type of binder you want to create. At this stage, you can set which firm user should be the Owner, the office location, binder access permissions, and binder tax year.
When you create a binder in FileRoom, SurePrep gets your client's information from the tax application and creates a binder specifically catered for that taxpayer client. The information fetched from your client's tax application file is used to create placeholders called “proforma” (for example, W-2 proforma placeholder for “ABCD, Inc.”). In SPBinder, you can organize documents to their respective (proforma) categories and export the data to the correct entities in the tax application.
You will need to upload the client's most recent tax application file details. Before creating a binder, make sure the client is created or proforma (roll forwarded) to the current tax year.
Follow these steps to create a new binder for processing 1040, 1041, 1065, 1120, 1120s, or custom binder:
- If the menu doesn't sayFileRoom, point to the menu then selectFileRoom.IfFileRoomis already visible, you can skip to the next step.

- Point to theCreate New Binderdropdown icon, point to your binder type, and then select on your service.
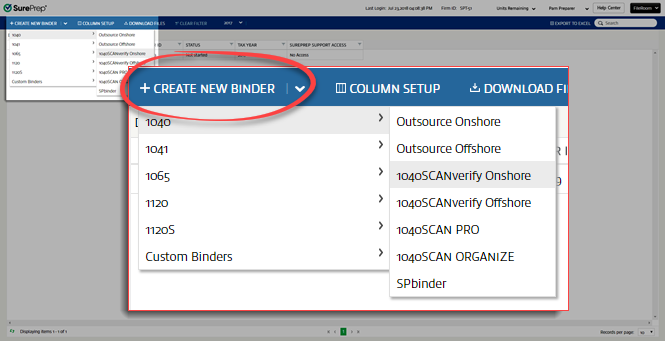
- Your browser downloads a PBFx file. This could be displayed differently depending on your specific browser. Select the file to open the SurePrep submission screen.
 Alternatively, you may see a window prompting you to download the file. This will also look different depending on your browser. Download the file then open the file.
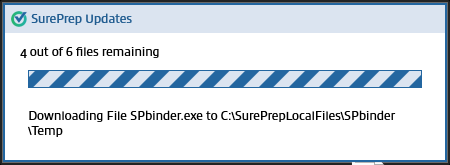
 - You may have to wait a few minutes for SurePrep to update. TheSurePrep Updateswindow will tell you the progress of the update process. Once this step is complete, theCreate New Binderwindow will open automatically.noteThe initial download may take some time when you create a binder for the 1st time on your computer.
- UnderSelect Binder Options, you may see the7216 Consent Received?option if your firm enabled this feature. 7216 requires that tax preparers receive taxpayer consent before disclosing taxpayer information to third-party individuals.SelectYesif you have received consent from the client.SelectNoif you haven’t received consent from the client.If you don’t see the7216 Consent Received?option, then skip to the next step.Confirm with your manager if 7216 consent has been granted for the specific client.Review more information on setting 7216 consent when creating binders.
 noteSelecting 7216 Consent asNowill prevent users assigned with 7216 access restrictions from accessing the binder. Additionally, you won’t be able to select 7216 restricted users as Owners or Assigned Members.
 - Fill out the new binder information by choosing the following options:
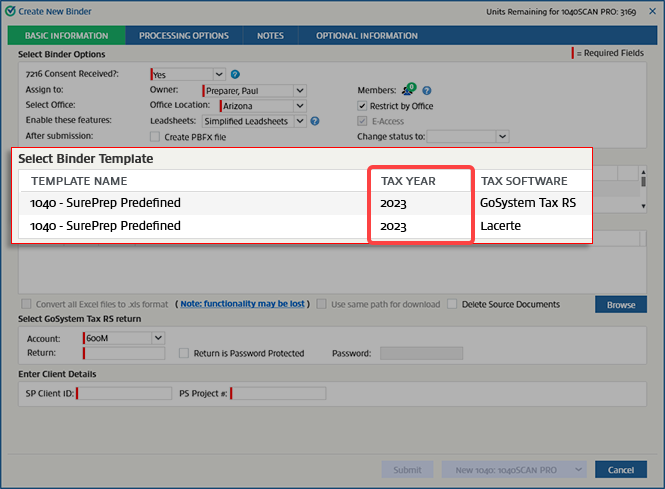
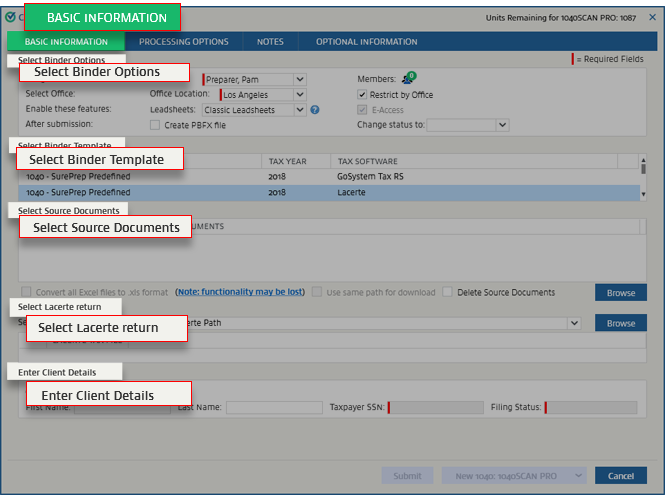 Create new binder sectionDescriptionSelect Binder OptionsApply the settings to your client's binder. For example, you can decide which firm user will be in charge of the client (that is, theOwner), and to which office location the client belongs.Review the selected options carefully, some options can't be changed once the binder is submitted (for example,Leadsheets).Select Binder TemplateSelect a template name to select a template that matches the tax return. Make sure you have the correct template selected by looking at theTAX YEARandTAX applicationcolumns.Select Source DocumentsSelectBrowseto select the source documents that you want to upload to your client's binder. For example, this can be a PDF of your client's tax documents.Select... return(for example, Select “tax application name” return)This section may vary based on your tax application. You may either need to enter a Tax Client ID or select your client's tax file.tipRename the 1st PDF the same as your Tax Client ID in the tax application. Example, if Tom Taxpayer's tax client ID in the tax application is '123“, then the first source document should be named '123.PDF”.If the name of the 1st selected source document matches the return (Tax Client ID), then the Return ID andSP Client IDfields will automatically populate based on the source document name. Saving you time from manually entering the remaining information.Enter Client DetailsYour client's information will be populated here after you complete the previous step of selecting the tax return.Once all the information is complete, selectSubmit.
Additional notes
- You can only create binders for thecurrent tax year and the previous two tax years. This applies to all template types, including SurePrep predefined templates and custom templates created by your firm. Templates from earlier tax years (beyond the previous two years) are unsupported and will be deleted—they cannot be used to submit binders.
- The units remaining for the selected service are displayed on theCreate New Binderwindow.

- UnderSelect Binder Template, to view aTax applicationtemplate, you must first connect/integrate the tax application with SurePrep. Once connected, you can select your tax application template based on the tax years that is currently available.
- Firms using GoSystem Tax RS: If you see aLocator in Usenotification, close GoSystem Tax RS and try again.
What's next?
Once a binder is submitted, it goes through a different stage of processing. The
STATUS
column in FileRoom shows you each binder's current status. Initially, you will see the binder status appear as SP Processing
.New tax year release date
Dates for the upcoming tax years are announced at the end of the year when they become available.
Related Content
-
Binder status
Format: Article
-
Binder upload status
Format:
Article
-
Notes
Format:
Article
-
Optional information
Format:
Article
-
Select consolidated return information
Format:
Article
-
Tax return PDF extraction
Format:
Article
-
Error messages
Format:
Article

