
How do I create and manage interface schedules?
Schedules
are simply the programming of the execution of interfaces. That is, in this functionality it is possible to program when and under which conditions each interface should be executed by In Out
.Adding an interface schedule
- Access the menuInterfaces > Schedules.
- ClickAdd
 .
. - According to the definitions, complete the fields on theSchedule Registrationscreen:
 * Required fields
- Interface*:Name of the interface to be scheduled to run.
- Active:When checked, this option indicates that the schedule is valid.
- Type:Periodicity of interface execution.
- Time (min.):The interface will run according to a number of minutes. For example, if the schedule is of this type, with astart timeof 2 PM and anincrementof 30 minutes, this means that, starting at 2 PM, the interface will run every 30 minutes.
- Monthly:The interface will run once a month, on the registereddayand start time.
- Annual:The interface will run once a year, in themonth, dayandstart timeregistered.
- Daily:The interface will run every day at the registeredstart time.
- Weekly:The interface will run once a week, at thestart timeand onday of the weekregistered.
- Occasional:The interface will only run once, on the registeredday, month, year andstart time.
- Schedule extra: Last day of the monthwhen checked, this option indicates that an extra run will be scheduled for the last day of the month of the original schedule, which can beweekly, monthly, orannual. For example, if the interface is scheduled to run on the 15th of every month and this option is selected, the interface will run twice a month: once on the 15th and again on the 28th, 30th, or 31st (depending on the month).
- Day:Day on which the interface will be executed, in the case ofmonthly, annualoroccasionalscheduling.
- Month:Month in which the interface will run, in case ofannualoroccasionalscheduling.
- Year:Year in which the interface will run, in the event ofan occasionalschedule.
- Day of week:Day of the week on which the interface will run, in case ofweeklyscheduling.
- Start Time:Time at which the interface execution schedule will start.
- End Time:Time at which the interface execution schedule will end.
- Number of Minutes for Additional Time:Number of minutes that determines the periodicity of the interface execution, in the case ofscheduling time (min.).
- Date Schedule:Date when the schedule was registered in the system.
- Responsible User:Identification of the user who registered the schedule.
- ClickSave.
To confirm the schedule registration, go to the
Data Imports/Exports
screen and search for the interface scheduled to run.Editing an interface schedule
- Access the menuInterfaces > Schedules.
- On theSchedulesscreen, fill in the filter fields with the schedule data you want to change and/or clickFilter.For occasional schedules to be included in the search, check theOccasional Listoption.
- In the table, click theEdit
 button of the record whose information will be updated.To delete a record, click theDelete
 button.
 - On theSchedule Registrationscreen, change the required information.
- ClickSave.Table data can be organized using theHide Filters
 , Show Grouper
 , and Show/Hide Columnsbuttons
 .
.
Viewing an interface schedule
- Access the menuInterfaces > Interface Registration.
- On theSchedulesscreen, fill in the filter fields with the schedule data you want to view and/or clickFilter.Important: For occasional schedules to be included in the search, check theOccasional Listoption.
- In the table, click theView
 button for the record to be queried.
The schedule details will be displayed.
attention
To edit, view change log, and delete the schedule, use the buttons located in the screen header.
tip
Table data can be organized using the , , and .
Hide Filters
, Show Grouper
, and Show/Hide Columns
buttons.Querying interface schedule change log
- Access the menuInterfaces > Interface Registration.
- On theSchedulesscreen, fill in the filter fields with the schedule data for which you want to view the logs and/or clickFilter.
- In the table, click theView button for the record to be queried for log.
- On theSchedule Registrationscreen, clickChange Log
 .
. - On theChange Logscreen, complete the filter fields and clickFilter.
Records of all activities performed by users are displayed in the table.
tip
Table data can be organized using the , , and .
Hide Filters
, Show Grouper
, and Show/Hide Columns
buttons.Exporting logs
You can export the table information to an Excel file. To do this, check the desired records and click  , for example: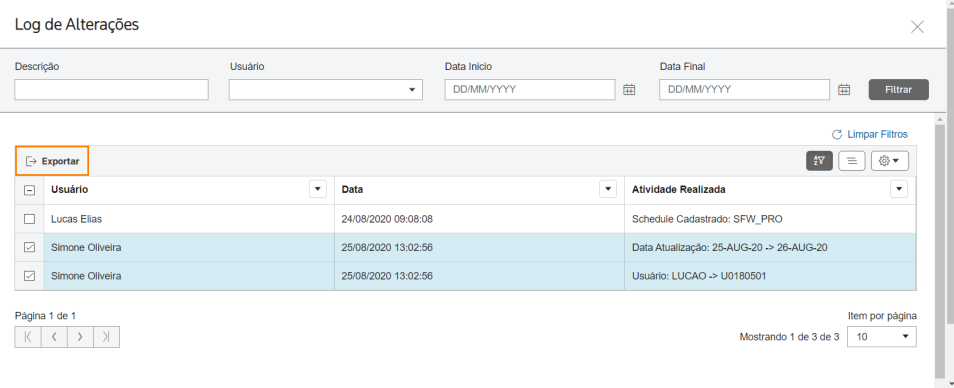
Export
, for example: 
attention
To export data from all rows in the table, this marking is not required.
Exporting an interface schedule
- Access the menuInterfaces > Schedules.
- On theSchedulesscreen, select the interfaces whoseschedulesyou want to export.

- To export data from all rows in the table, this marking is not required.
- Table data can be organized using theHide Filters, Show Grouper, and Show/Hide Columnsbuttons.
- ClickExport.
An Excel file will be generated with the 
scheduling data
for the desired interfaces, for example:Related Content
-
How do I create and manage interface groups in In Out?
Format: Article
-
How do I register and configure interfaces in In Out?
Format:
Article
-
How to monitor and manage data imports/exports in In Out?
Format:
Article
-
How do I check the status of the interfaces?
Format:
Article
-
How do I resolve data import errors in In Out?
Format:
Article
-
How do I take manual appointments of interfaces in In Out?
Format:
Article
-
How to register and manage machines in In Out?
Format:
Article
-
How do I set up notifications from users and entities in In Out?
Format:
Article
-
How do I manage In Out input interface tables?
Format:
Article