
How do I resolve data import errors in In Out?
This functionality relates to errors that occurred during the import of data (input interfaces) into the registered systems. This way, on the or
Data Import Errors
screen, you can edit reprocess
the runs of these interfaces with one or more error records.tip
What’s changed: click on the video below to see what’s new with this functionality.
Querying the number of times an import error occurred
- Access the menuInterfaces > Data Import Errors..
- Click
 Notes.
 - On theNotes Searchscreen, fill in the filter fields with the import error data you want to query for and/or clickFilter.
The number of errors will be displayed in the table

tip
Table data can be organized using the  ,
,  , and
, and  .
.
Hide Filters
, Show Grouper
, and Show/Hide Columns
buttons.Exporting Notes
You can export the table information to an Excel file. To do this, check the desired records and click  , for example: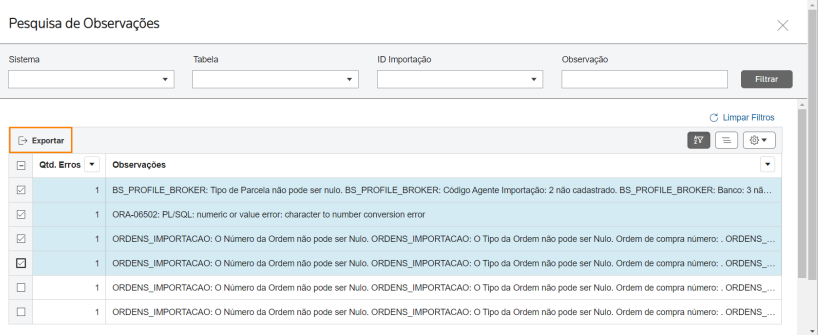
Export
, for example:attention
To export data from all rows in the table, this marking is not required.
Editing data import error information
- Access the menuInterfaces > Data Import Errors..
- On theData Import Errorsscreen, fill in the filter fields with the data for the import errors you want to change and/or clickFilter.
 To further narrow the search results, clickAdvanced Filters
 .
. - In the table, click theEdit
 button of the record whose information will be updated.
- To delete a record, click theDelete
 button.
 - To have records related to the primary error also displayed in the table, check theDisplay Associated Itemsoption.
- ClickShow/Hide Log Panelto display theLog Informationside panel. Change the required values.
- ClickSave.
Once this is done, the error can be
reprocessed
.
tip
Table data can be organized using the , , and .
Hide Filters
, Show Grouper
, and Show/Hide Columns
buttons.Batch editing
- Access the menuInterfaces > Data Import Errors..
- On theData Import Errorsscreen, select the interface, fill in the filter fields with the data for the import errors you want to change, and clickFilter.
- To further narrow the search results, clickAdvanced Filters.
- To have records related to the primary error also displayed in the table, check theDisplay Associated Itemsoption.
- When viewing the results, clickShow/Hide Log Panel.
- In the footer of theRecord Informationside panel, clickEdit Batch.
- Use theReprocess
 , Reprocess All
 , Delete,
 , Import
 and Export
 buttons as needed. These buttons are the same as those found on the default data import error screen.
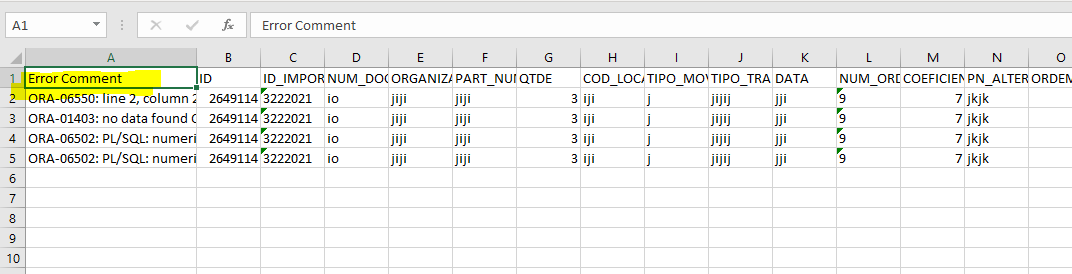
- In the batch edit screen, the only unique button is theError Report, which exports all data in the results table, including the Error Commentcolumn, into an Excel file. TheExport button does not consider this column in the export.
- Table data can be organized using theHide Filters, Show Grouper, and Show/Hide Columnsbuttons.
- Save the operation.Watch the video below to see in practice how to perform batch editing of errors.
Filtering comments on data import errors
You can select filters based on the specific results you need to find.
- Go toInterfaces > Data Import Errors..
- Select theComments button and choose the appropriate filters to show only the records that match your criteria:FieldInformationSystemThe system from which the data import originated.InterfaceThe specific interface or module used for the data import process.TableThe database table where the import error occurred.Import IDThe unique identifier assigned to the data import transaction.ObservationAny note or observation related to the import error that may assist in troubleshooting.Start DateThe start date of the period within which you want to filter the comments.End DateThe end date of the period within which you want to filter the comments.
- SelectFilterto apply your selections.
After applying the filters, the
Comments
pop-up will refresh to show only comments that match the selected criteria. tip
Check the boxes of the files you want to export to your local database and select the button to download an Excel file, similar to this:
Export
button to download an Excel file, similar to this:Exporting data import errors
- Access the menuInterfaces > Data Import Errors..
- On theData Import Errorsscreen, fill in the filter fields with the data for the import errors you want to export and/or clickFilter.To further narrow the search results, clickAdvanced Filters.
- In the results table, check the errors you want to export.To export data from all rows in the table, this marking is not required.
- ClickExport to download the filtered data to an Excel file.In some scenarios, you may need to export data from only a few columns. In this case, use theShow/Hide Columns
 button to select the columns you want.
An Excel file will be generated with all the information from the 
Data Import
.Deleting data import error logs
To keep the system free of resolved or unnecessary errors, you can delete individual records from the data import log. Follow these steps to manage and clear these entries:
- Access the menuInterfaces > Data Import Errors..
- On theData Import Errorsscreen, select the interface.
- Use the check boxes to select the records you want to delete.
- SelectDelete.
- Confirm the operation.
A confirmation message will appear on your screen.
Batch deleting
While the
Delete
button provides the ability to choose which data import errors to delete, you can follow the steps below to remove all records at once:- Access the menuInterfaces > Data Import Errors.
- On theData Import Errorsscreen, select the interface.
- Select theDelete All button.
This action will open a progress bar where you can see the percentage of completion. This window will close automatically once the deletion is complete.
Reprocessing data import errors
- Access the menuInterfaces > Data Import Errors..
- On theData Import Errorsscreen, fill in the filter fields with the data for the import errors you want to reprocess and/or clickFilter.To further narrow the search results, clickAdvanced Filters.
- In the result table, click theReprocess button of the record to have the error reprocessed. This reprocessing must be performed manually on each record.
- TheReprocess button allows you to reprocess the items selected in the results table. By selecting the check box in the header, you can choose all items on the current page. To reprocess all search items, simply use the Reprocess Allbutton, which applies to all records found, regardless of the previous selection.
- Table data can be organized using theHide Filters, Show Grouper, and Show/Hide Columnsbuttons.
Viewing details of a data import error
- Access the menuInterfaces > Data Import Errors..
- On theData Import Errorsscreen, fill in the filter fields with the data for the import errors whose details you want to view and/or clickFilter.To further narrow the search results, clickAdvanced Filters.
- In the table, click theAPI Details
 button or noteslink for the record to be queried.
 - On theAPI Error Detailsscreen, click the expand button
 to access the following error details:
- Simple and detailed message descriptions
- Actionrequired for potential solutions
- Flex fieldwith complementary information
- Customized message description
Table data can be organized using theHide Filters, Show Grouper, and Show/Hide Columnsbuttons.
Viewing unprocessed import IDs
It is possible to view the import IDs that have not yet been fully processed and to check the number of errors encountered by the system during the processing of these IDs. To do this:
- Access the menuInterfaces > Data Import Errors..
- ClickUnprocessed
 .
. - On theIDs not yet fully processedscreen, fill in the filter fields with theimport ID(or interface) data whose information you want to query and/or clickFilter.
- When the IDs are displayed in the table, use the header andActionscolumn buttons to:
- Reprocess: To rerun more than one ID at the same time, instead of clicking the Reprocess button for the records, select the desired IDs and click the respective action button located in the table header.
- Delete: To delete more than one ID at the same time, instead of clicking the Delete button from the records, select the desired IDs and click the respective action button located in the table header.
- Export: You can export the table information to an Excel file. To do this, check the desired records and click Export, for example:
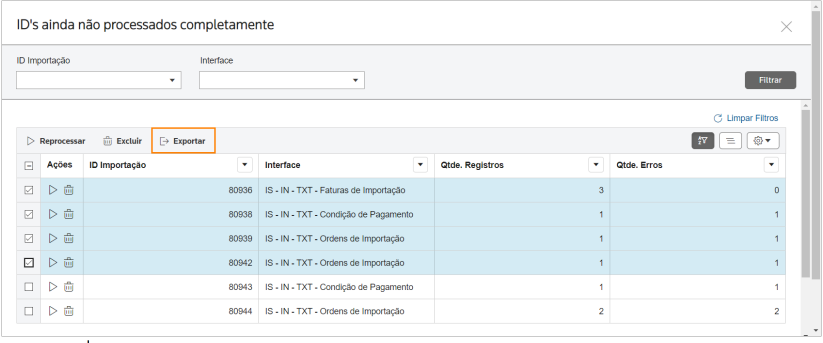
 attentionTo export data from all rows in the table, this marking is not required.
Table data can be organized using theHide Filters, Show Grouper, and Show/Hide Columnsbuttons.
Related Content
-
How do I create and manage interface groups in In Out?
Format: Article
-
How do I register and configure interfaces in In Out?
Format:
Article
-
How do I create and manage interface schedules?
Format:
Article
-
How to monitor and manage data imports/exports in In Out?
Format:
Article
-
How do I resolve data import errors in In Out?
Format:
Article
-
How do I take manual appointments of interfaces in In Out?
Format:
Article
-
How to register and manage machines in In Out?
Format:
Article
-
How do I set up notifications from users and entities in In Out?
Format:
Article
-
How do I resolve data import errors in In Out?
Format:
Article
-
How do I take manual appointments of interfaces in In Out?
Format:
Article
-
How to register and manage machines in In Out?
Format:
Article
-
How do I set up notifications from users and entities in In Out?
Format:
Article