
iSheet reference guide
A technical resource for the HighQ iSheets module
Introduction
This document is a technical reference for the iSheets module on HighQ, detailing its features and capabilities for Site Administrators. It is designed to assist with the creation of complex iSheets, highlight the module's potential, and aid in troubleshooting.
The iSheet module consists of two parts: administrator setup and end-user access. This document covers how administrators create and configure an iSheet, with examples from the user experience, such as viewing, searching, adding, and editing rows to highlight configuration effects.
Overview
An iSheet provides a way to track and collect information that can be shared with other people who have access to the same HighQ site. For example, an iSheet can track all of the commercial properties owned by a client or all of the pleadings filed in a case. A single site may contain multiple iSheets, each tracking different types of information.
Virtually any type of data can be included in an iSheet: text, dates, numbers, etc. Each type of data is referred to as a 'column' or 'field'. An iSheet may contain any number of columns. For example, an iSheet tracking real property could contain these columns/fields:
- Shorthand name for the property
- Address (which could be one field or multiple fields)
- Country in which the property is located (a pick list)
- Type of Property (from a picklist, such as office space, retail space or rental apartments)
- Property Manager’s name
- Purchase Price
- Purchase Date
- Sale Date
A set of columns related to a single thing covered by the iSheet (for example, a particular piece of real property) is referred to as an 'item', 'record', or 'row'. In essence, an iSheet is a database designed for laypeople, empowering everyday users to track data relevant to their work and their clients' businesses without requiring a programming background or involving the IT department.
Once an iSheet has been designed, certain users can be given the right to populate the iSheet with data and keep it up to date, while other users can be limited just to viewing this data.
Filtering data for different user types
A main benefit of iSheets is the ability to filter information, applying restrictions from the site level down to individual users. User groups and permissions are powerful security tools.
Each iSheet can be associated with one or more 'views'. A view typically includes a subset of all the columns in the iSheet.
note
Certain columns may be displayed only to certain users or under defined conditions.
Furthermore, certain types of data may be filtered out of the view. For example, a 'real property tracking' iSheet could include a 'UK Property Manager View'. This view would consist of only the columns needed by a property manager: i.e. the type of property and address, not other columns related to the purchase and sale of the property. This view would also be limited to properties located in the United Kingdom.
With security groups and permissions, property managers in the United Kingdom may be restricted from viewing other rows in the iSheet, such as those related to properties located in the United States.
iSheet types
There are two principal types of iSheets:
- Basic iSheets. These iSheets are self-contained and only list data added through the iSheets interface.
- Metadata iSheets. These iSheets allow additional fields of information in certain modules. Additional metadata can be associated with documents/files, folders and tasks, allowing administrators to tag, filter and manage items in HighQ.
Quick links:
End users and site admins:
Further depth:
Creating and configuring iSheets
Before your users can access or add records to an iSheet, there must be an iSheet to store this information. The iSheets module is usually active by default, but if it is not visible, check that the module is enabled and you have created an iSheet.
Enabling the iSheets Module
A system or site administrator can enable the iSheets module for a site.
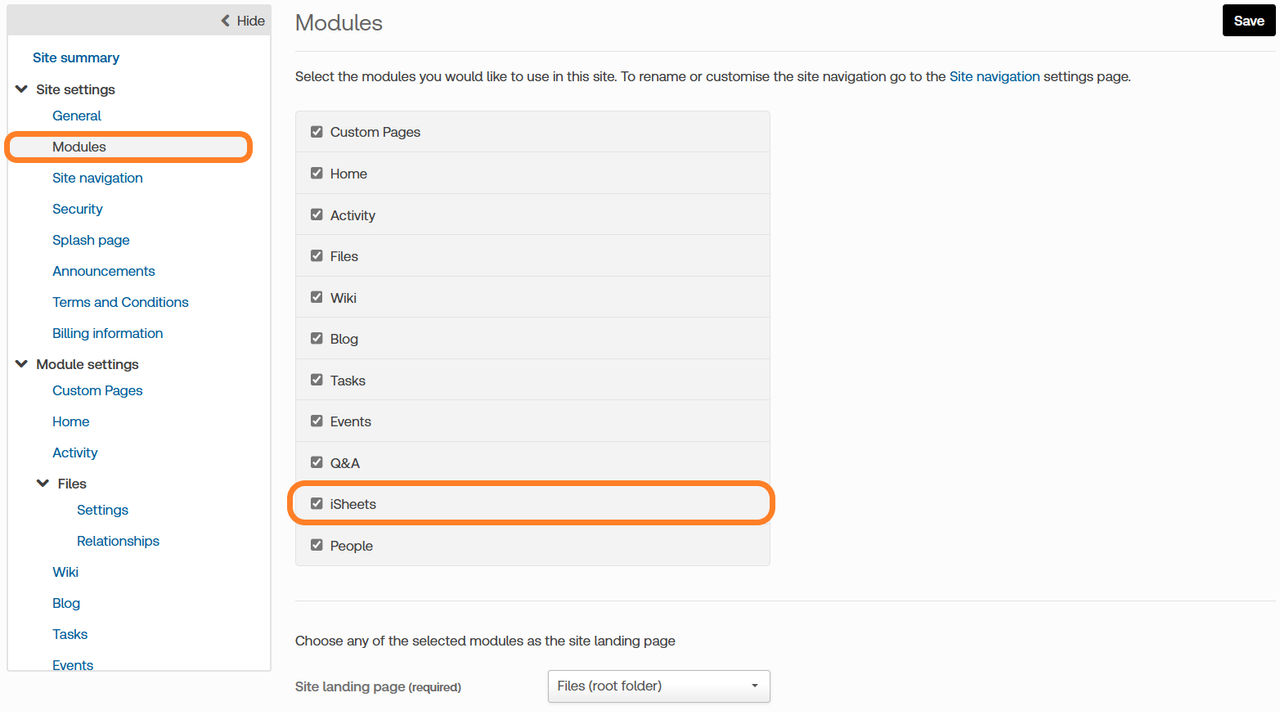
To enable the iSheets tab, go to the
Admin
tab, select the Modules
page, add a check to the box next to iSheets
and click Save
.
note
Even if enabled, the module is hidden until an iSheet is created; only administrators can create and modify iSheets.
An administrator can create and configure an iSheet from the
Admin
tab without enabling the iSheets module, but these iSheets are hidden until the iSheets module is enabled. Enabling and then disabling the iSheets module does not delete previously entered iSheet data; it just hides that information.
iSheet visibility
There are two conditions governing a user’s ability to see the iSheets module on a site if an Administrator has enabled the iSheets module:
- At least one iSheet.
- The end user must have access to one of those iSheets.
Once both conditions are satisfied, the iSheets tab is visible to the end user.
note
If the user has access to an iSheet but lacks access to any
views
of that iSheet, the iSheets tab is still visible, but the user sees a message: 'No views available'.Once the iSheets module has been enabled and made visible, the
iSheets
tab appears at the top of every page for that site.
Configuring iSheets
Once the iSheets module has been enabled, some settings can be applied to the entire module. Click
Active iSheets
in the Admin
tab. The iSheets page lists all of iSheets (if any) for that site:
note
See Configure the iSheets module for more information.
Setting up an iSheet
Setting up each iSheet requires two initial steps:
note
Columns can be added during setup or later, as required.
Other than system-generated columns (Created by, Created date, Modified by, Modified date), a new iSheet contains no user-entry fields. Metadata iSheets include additional default columns for documents, folders, or tasks.
Optionally:
- Create additional views.
By default, one view is created, including all columns in the default view. Additional views may be added, and any view can be set as the default.
note
Please note that design and configuration changes are likely over time.
Ensure the iSheets module is enabled; otherwise, only Administrators can see these iSheets.
Following creation, data should be entered into the iSheet by individuals with subject-matter expertise, not necessarily Site Administrators. As usage develops, modifications may be necessary (i.e. adding or changing columns, labels, and descriptions). Capturing comprehensive information early reduces later effort. The layout can be easily changed, but adding crucial data can be labour-intensive.
Creating an iSheet
Before you create a new iSheet, consider these questions:
- What is the purpose of the iSheet?
- What information do you need to track?
- What is the format of the data?
- Who will need to access the iSheet, and at which permission level?
- Is the data stored in the iSheet open to everyone?
The more planning you can do in advance, the less likely you are to need to modify your iSheet later, when it may not be easy.
Adding a new iSheet
Select
Admin
> Active iSheets
(in the Module settings
section).From the iSheet admin area, select
Add
> iSheet
.
note
If you have previously created, or have access to, an iSheet template, then you can also Import from a template
If you have an Excel sheet, then you can also add columns and records from an Excel file.
The
Add iSheet
page allows for initial configuration. Default settings may vary based on your organisation's global configuration.Configuring an iSheet
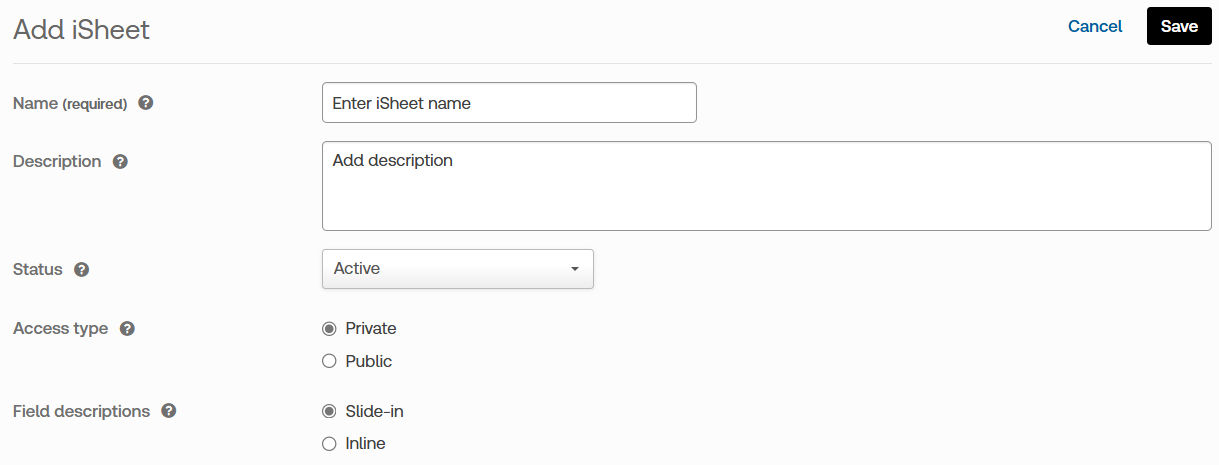
- Name:Must be unique on the site. Certain characters (\ / : * ? " < > |) are not permitted.
- Description:Optional; appears beneath the iSheet name.
- Status:Choose 'Active' or 'Pending'. Pending iSheets are visible only to Administrators via the admin page. Set to 'Pending' during development and switch to 'Active' upon completion. By default, all users with site access can view active iSheets.
- Access Type:'Public' iSheets are accessible for join or lookup across all sites; 'Private' iSheets restrict access within the same site unless altered by System Admins.
- Field Descriptions:Choose between 'Slide-in' descriptions (click the question mark to reveal) or 'Inline' (always visible beneath the column name).
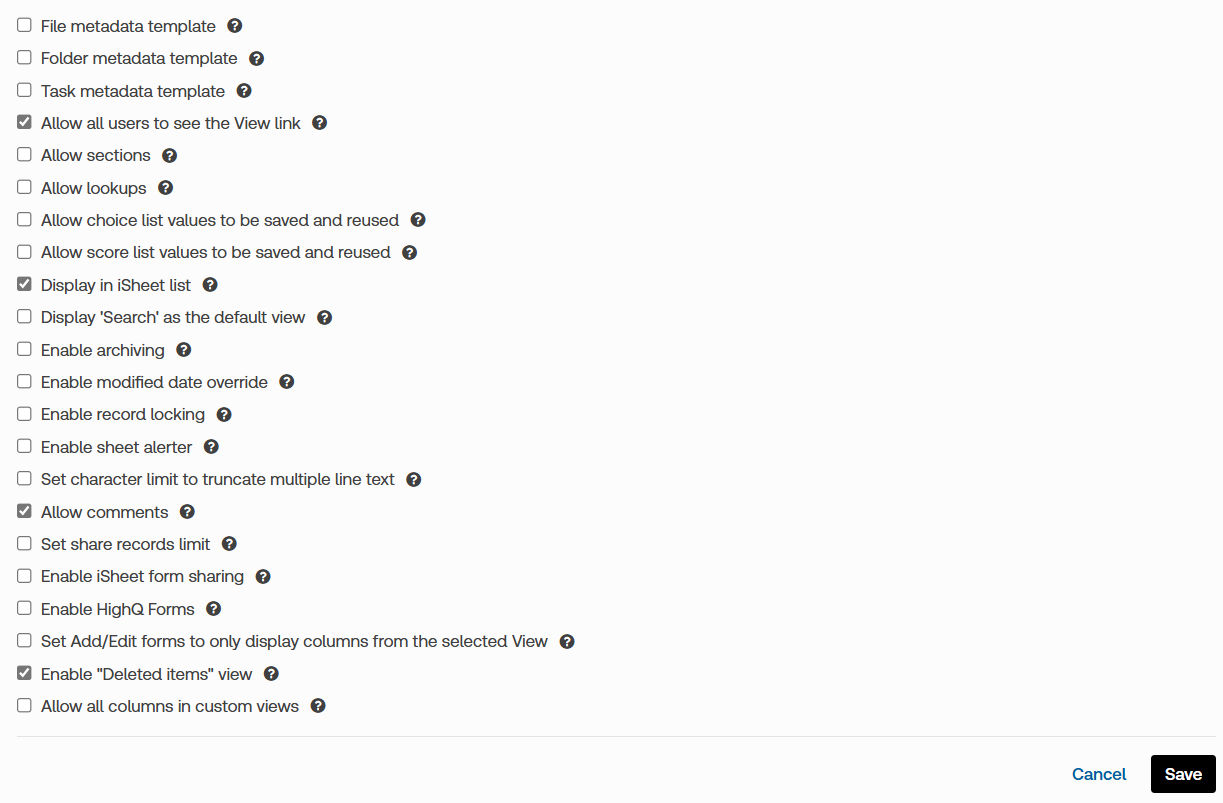
- File/Folder/Task Metadata Templates- Associate iSheet fields with the Files or Tasks modules.Only one of each type of metadata iSheet is allowed per site.
- Allow all users to see the View link- If unchecked, non-admin users will not see theViewdropdown. Use column-level security to control access to specific columns.
- Allow lookups- Allow the iSheet to be referenced in other iSheets for lookups, joins, or links.
- Allow choice/score list values to be saved and reused- Save/export choice and score values for reuse in other iSheets.
- Display in iSheet List- Deselect to hide the iSheet from non-admin users if it serves only as a reference. Alternatively, you may hide an iSheet via permissions.
- Display 'Search' as the default viewIf enabled, the search form appears as the default view.
- Enable Archiving- Allows administrators to save snapshots and download versions as Excel files.
- Enable modified date override- Permits edits to modification dates; recommended only when necessary for migrating data.
- Enable record locking- Prevents concurrent edits on the same record.
- Set character limit to truncate multiple line text- Truncates long entries for improved readability.
- Allow comments- Enables commenting on records.
- Set share records limit- Restricts the number of records that can be shared in a single action (this does not apply if sharing the entire iSheet).
- Enable iSheet form sharing- Send requests for information via iSheet-based forms linked through email or direct link, which add new records upon submission.
- Enable HighQ Forms- Allows the creation of client-facing HighQ Forms, without coding requirements.
- Set Add/Edit forms to only display columns from the selected View- Restrict Add/Edit/shared forms to display columns defined only in the selected View.
- Enable "Deleted items" view- Retains Deleted records for 30 days. Without this feature, deletions are permanent and unrecoverable.
- Allow all columns in custom views- Allows inclusion of all columns in custom views.
Save
to create the iSheet. Future modifications can be made via the Edit iSheet
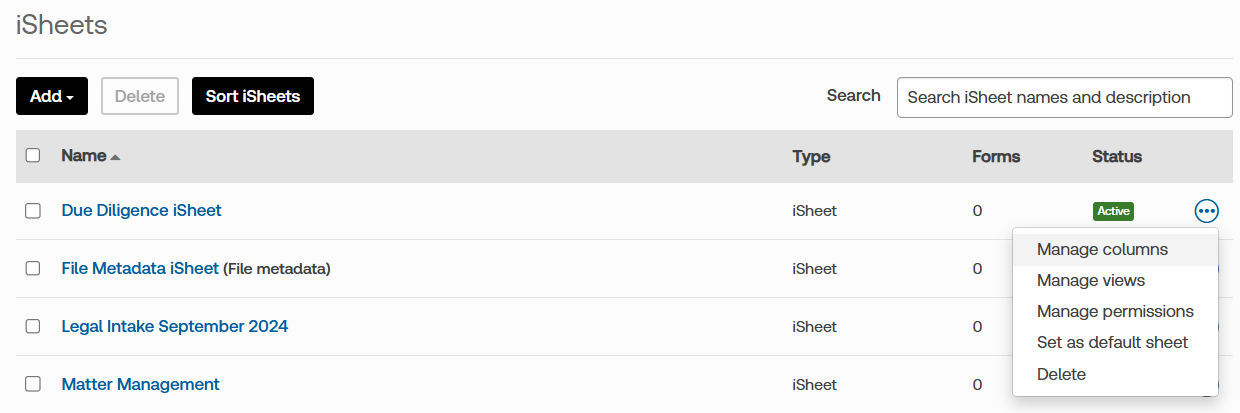
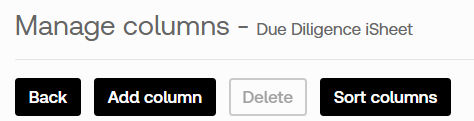
page, accessible by selecting the iSheet name in the Active iSheets list.Manage columns in an iSheet
To manage columns, navigate to
Admin
> Active iSheets
. On the administration page, choose More actions
for the relevant iSheet:
- Manage permissions- adjust iSheet permissions.
- Set as default sheet- Make an iSheet the default landing screen in the iSheets module.
- Delete- Delete an iSheet from the module.
note
Deleted iSheets remain in the
Deleted iSheets
section (recycle bin) for up to 30 days, allowing restoration along with associated data, attachments, permissions, workflows, rules, filters, etc. After 30 days, they are permanently deleted.Only
Metadata iSheets
may be permanently removed before the 30 days.Legal Tracker iSheets
are excluded from the recycle bin due to technical constraints and are immediately and permanently deleted upon removal.An iSheet cannot be deleted if referenced by another iSheet (lookup, join, or link). References must be removed before deletion. The
iSheet references
tool in System admin > iSheet admin
identifies such dependencies.Adding a new column
To add a new column, select the
More Actions
menu for the iSheet, then Manage columns
:
Click
Add
at the top of the page, then Add column
.
note
The Manage columns page lists the column type of all columns in the iSheet, and if the column is mandatory.
System-Generated Columns
All iSheets include essential system-generated columns, with values that can only be updated by an Administrator.
See System-generated columns in iSheets or System-generated columns in file and folder metadata iSheets for more information.
The
Add column
page opens. Available fields vary by column type. For more information, see Types of columns.Column conditions and permissions
Conditional columns enable dynamic forms that display relevant fields based on user input and business logic. These columns display in both Add/Edit item pages, but always appear in table and search views if included. Columns functioning as conditions for others cannot themselves be conditional, see Configure column conditions .
note
Column Permissions apply if enabled at the iSheet level; by default, columns inherit parent iSheet permissions.
Types of Columns
Define the behaviour of a new column by setting the
Column type
: 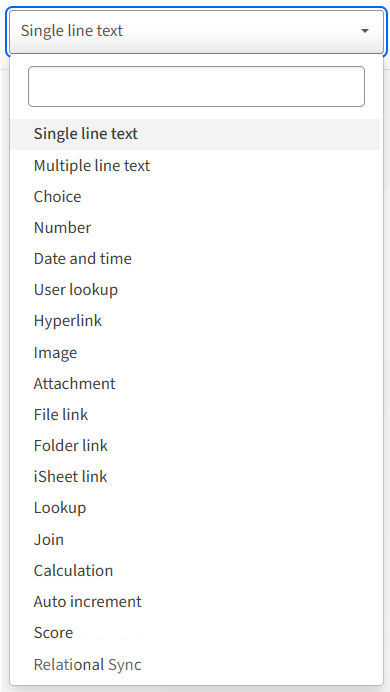
Below is a description of each type. Most of the column types include additional configuration settings as compared with the default Single Line Text column type:
- Single Line Text. The most basic type of column. The only extra field of information available is theMax. characterssetting.
- Multiple Line Text. This creates a textbox with line wrapping, allowing multiple lines of text to be entered. You canAllow rich HTML textwhich enables a text editor for basic text formatting.
- Choice. A choice field allows the user to pick from a selection of pre-defined options. The options can be defined with coloured text and images. A Score column is a variation on a Choice column.
- Number. Number fields can be used to indicate values, and in Calculation formula. Options allow you to add currency symbols or thousand separators. If a default value is entered, it must be a number.
- Date and Time. The user can use a date picker to choose a date, includingToday's date.
- User Lookup. The user lookup column type is used to select an individual user from different groups of users in the system. For example, if an item in an iSheet is assigned to someone, that person can be selected from a list of agents in a lookup column.
- Hyperlink. The hyperlink column type allows a user to enter both a link and the display text for the link.
- Image. The image column type allows a user to add an image to an iSheet, which will be displayed and can be downloaded. All standard image file types are supported.
- Attachment. The attachment column allows users to add individual attachments to an iSheet: Any file type can be uploaded, with no size limitation. Multiple files can be uploaded in each attachment column.
- File Link and Folder Link. These column types are similar to each other. They allow a user to reference any document(s) or folder(s) in the Documents module of the same site. Multiple documents and folders can be referenced in the same column. Each reference provides a pointer to the document or folder for easy access.
- iSheet link. The iSheet link column allows users to create links to one or more records from other iSheets.
- Lookup. A lookup column allows a user to select data from another iSheet and display that data in the current iSheet. For example, create a list of countries and related information in one iSheet, then reference that data in one or more other iSheets to include the country data. The country information is viewable in those other iSheets. This allows a user to manually select one or more items from another iSheet and associate them with an item in the primary iSheet. For example, if the injected iSheet contains a list of the firm’s clients and the primary iSheet tracks events, then for each event it is possible to select one or more clients from the injected iSheet who have been invited to the event.
- Join. The Join column sources data from another iSheet into the current iSheet. The basic idea is to automatically select one or more items from the joined iSheet and associate those with the primary iSheet item by joining on common data elements. For example, if the joined iSheet contains a list of every case the firm has ever worked on, including the judge for each case and the type of case, and the primary iSheet tracks information on new cases, including the judge in the new case, then the two iSheets can be joined on the judge column.noteLookupandJoincolumns are similar in purpose but different in practice. Below is a list of the key differences between the two column types and suggestions for when it is more appropriate to use one column type over the other. If there is a need to create an iSheet that will be referenced as a join or injection, but the joined/injected iSheet should not be visible on its own, a best practice is to hide that iSheet by unchecking the Display i-sheet setting. The iSheet will no longer be listed. The alternative is to use permissions on the joined/injected iSheet, but that also limits who can view the contents of that iSheet when it is used for a join or injection.Joined iSheets typically do not act as static reference data but contain dynamic data, whereas a Lookup iSheet often contains reference data (like a list of states).
- Calculation. The calculation column type allows for the creation of numeric calculations based on anynumberorscorecolumns in the iSheet (i.e., not lookup or joined numeric data). A calculation may include: one or more number or score columns in the same row of data, numeric constants and mathematical operators. Available number or score columns are listed in a table, along with a shorthand name (the Operand) for use in the formula field.noteAdditional tools are available for calculation or display: useToday's datein calculations to set schedules, ignore weekends when setting schedules, define the number format (set the thousands separator and unit symbol as a currency or percentage).Please note that 'today's date' is only available in calculation columns, not data visualisation or workflow.
- Auto Increment. The auto-increment column type provides a unique integer for every record in an iSheet, starting from 1 (or any number you choose in theStart valuefield) and incrementing by 1. If an auto-increment column is added after rows have been inserted into the iSheet, every row still has a correct and unique number.
- Score. A score column is similar to a choice column, but stores numerical values which may be manipulated and displayed in calculation columns.
- Relational Sync. A Relational Sync column allows an iSheet to pull data from other iSheets on your instance, and then seamlessly use that data. This data is pulled from the source iSheet and updates when the iSheet is refreshed.noteRelational Sync columns are only available with the modernized iSheets UI. Please click here to check if 'Enable modernized iSheet = TRUE'. If it is FALSE, please contact your system admin.
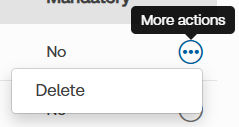
Editing and Deleting Columns
After a column has been created, it can be edited or deleted. Go to the
Admin
> Active iSheets
then select More actions
and Manage columns
for the iSheet you need to edit.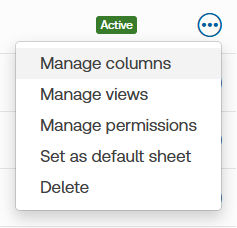
This page displays a list of all of the columns for that iSheet. From here you can click on the
More actions
icon for the column you wish to delete and then select Delete
.
The
Edit Column
page is identical to the Add Column
page used initially for creating and configuring the column. Nearly all column configuration settings can be changed, except for the Type of column
.note
If there is a need to change the type of column after items have already been added to an iSheet, first create an entirely new column with the correct column type, then move the data from the old column into the new column.
System-generated columns in standard iSheets
By default, every iSheet includes four
system-generated fields
, which are automatically populated columns which cannot be manually updated. There is one exception detailed below.
System-generated columns are listed at the end of the Manage columns
page.
These system-generated fields include the following:
- Created by- The name of the user who created the item. This is a user lookup column
- Created date- The date and time when the item was created. This is a date and time column
- Modified by- The name of the user who last modified the item. This is a user lookup column
- Modified date- The date and time when the item was last modified. This is a date and time column
note
If
Enable modified date override
is ON
for the iSheet, any user with edit rights to an iSheet item can edit the default Modified date.Although the values in these fields cannot be edited, except for the modified date exception detailed above, the properties of these fields can be configured like other columns, including:
- Choosing whether to include these columns in views
- Allowing these columns to be searched
- Changing the column's name
- Changing the column width
- Any other changes applicable to the particular type of column, such as changing the date format for the Creation date or changing the field display to an email address or username for Created by
System-generated fields appear at the bottom of iSheet items when viewing or editing record details. If an iSheet has sections configured, system-generated columns are displayed at the end in a
Default
section when viewing or editing the record: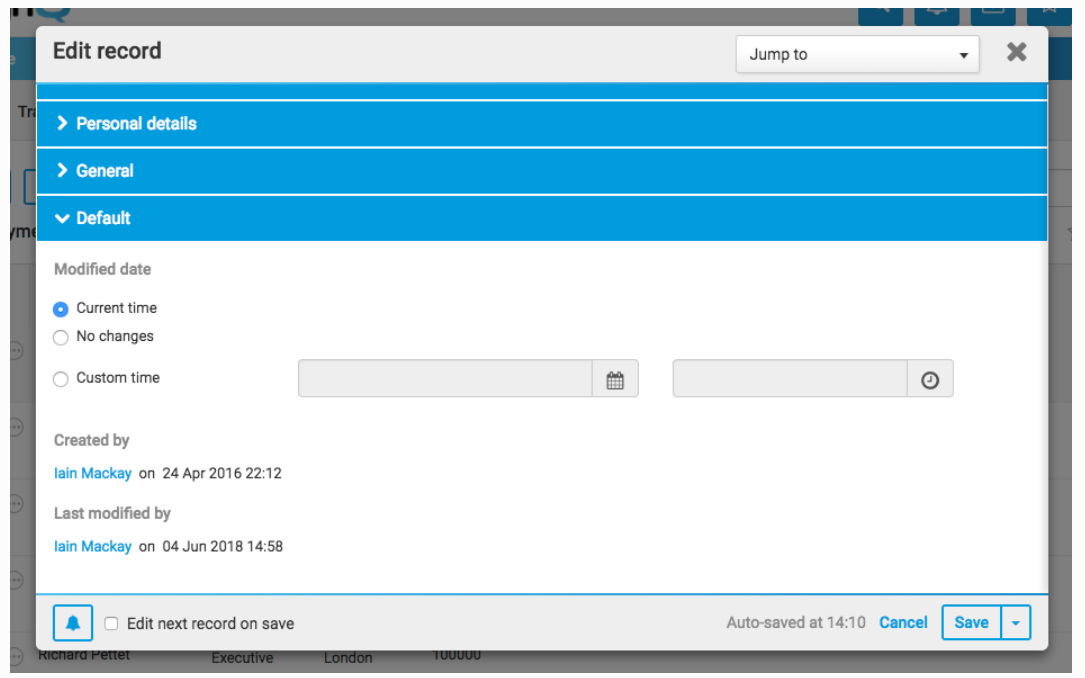
There are additional system-generated columns for file and folder metadata iSheets.
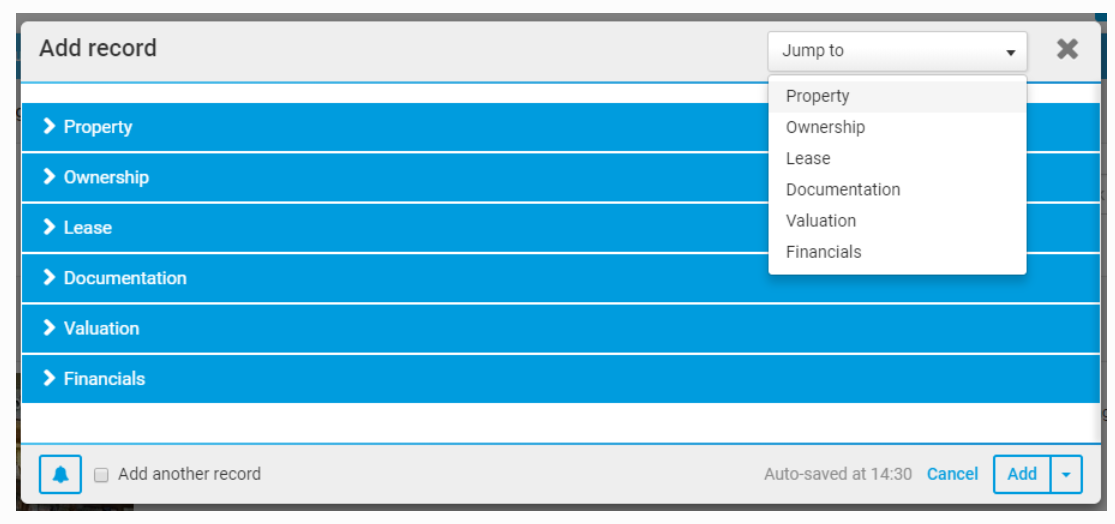
Use sections to group and view columns
Related columns can be grouped into
Sections
, allowing users to navigate the Add item screen more efficiently. Users can expand sections and use the
Jump to
dropdown menu to go directly to a section:- Add and Edit item pages, including metadata iSheet edit pages.
- HighQ Forms.
- View item pages.
- File metadata iSheet document view review panels.
note
Sections do not appear for iSheet views, which are always displayed in table format.
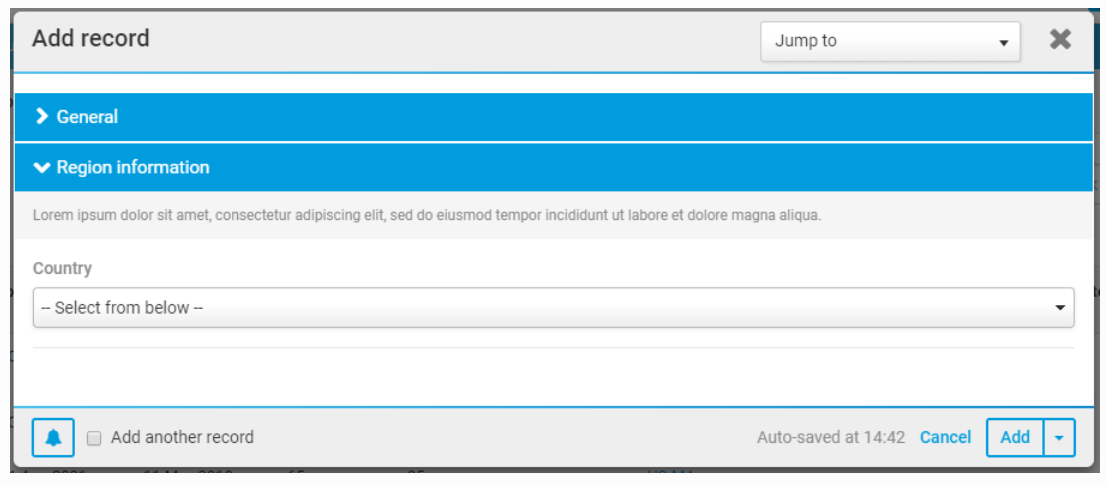
An admin can add descriptions to sections; descriptions appear directly under a section title when it's expanded:
Enable sections
To add a section to an iSheet, open the
Edit iSheet
page in site Admin
, and enable Allow sections
. note
Enable sections when an iSheet is first created, or at any time: click on the iSheet title from the
List of iSheets
page in the Admin
module.The
Manage columns
page is accessed for that iSheet, there are two section options: Add new section
and Sort sections
:
note
If sections are enabled in an iSheet that already has columns, then existing columns are added to a
General
section.Add and configure sections
To add a new section, select the 
Add new section
button in the Manage columns
page. You must add a
Section name
, then optionally, a description. Select Save
to finish.
note
Each section name must be unique within that iSheet
Manage columns
The new section appears in the
Manage columns
page. Each section name is a link to an Edit section
screen.Click the linked section name to edit its name, description, or the order of the assigned columns. Select
Save
to finish.
Click and drag the columns into the desired order.
note
If Sections are enabled, at least one section must be present, i.e. you cannot delete the
General section
. However, you can rename the General section
, as described above. To delete other sections, remove any columns and select Delete
from the More actions
menu for that section. Adding Columns to a Section
By default, all columns created before sections are enabled are in the
General
section.However, columns created after sections are enabled
must
be assigned a section when they are created. With sections enabled, a new Select section
field is added to the Add column
page. Use the drop-down to assign the column to a section.

note
Open Edit column to change the section for a column.
Sorting Sections
Once sections are added, you can reorder them in the iSheet. Click on the
Sort sections
button.
Notes
- If a section does not contain any columns, it is not displayed.
- If a group of columns is conditional, based on the value of another column, and all of those columns are organised into a single section, then the section (and its columns) do not appear until the condition is satisfied.
note
See Adding columns to a section for more information.
Overview of iSheet Views
Each iSheet can have multiple
Views
, showing different columns and data subsets based on conditional filters and user permissions. Users switch between available views using the View
dropdown menu. 
note
A
Default
view is automatically created and includes all new columns, unless otherwise specified in the column configuration.Sorting and Default View
Views appear in a dropdown for end-users, with the default view always at the top. Set a new default by selecting 'Set as default view' for your chosen view. A 'Default' label appears next to the current default, and it is moved to the top of the list.
To change the order of other views, use 'Manage views' in the iSheets section in site admin.

You may set a default sort order for each view. Filters can be added to views to determine which iSheet items should appear.
note
If a user can't access the default, they see the first view available.
If 'Display Search as the default view' is enabled, the Advanced search window opens when the iSheet is accessed.
Adding, Cloning, and Configuring Views
To add or clone a view, open the iSheets admin page and select
Manage Views
from the More actions
menu. New views require a name (up to 80 characters) and a selection of columns. Columns can be reordered and system-generated columns included. note
Custom column permissions are respected for new columns.
Adding a View
In the
Manage Views
screen, select Add View
.
Cloning a View
In the
Manage Views
screen, select More actions
and select Clone view
:
note
If you clone the default view, the new view does not inherit the default view status.
Configuring a View
Multiple configurable options are available in the
Add View
screen, including the View Name and assigned Columns.
note
View names can have a maximum of 80 characters.
note
You may add system-generated
File status
columns to a View, such as approval template status (approved, rejected or awaiting approval), Contract Express status (ready or incomplete), or DocuSign signature status (sent for signature or signed).Editing or deleting a View
To edit or delete a view, open
Manage views
from the iSheet admin page. Click the name of the new view and follow the instructions in Edit Views.
note
See Edit and delete views or Adding and configuring viewsfor more information.
The system created
Draft items
view may also be edited in certain limited ways. See the Modifying the draft items view
section in the Item drafts article for details.note
You cannot delete a default view (first assign another view as the default).
The view menu must contain at least one regular view and the Draft items view.
Setting Permissions
Custom permissions can be set, if enabled, to restrict view access.
See Set permissions for Views and iSheet permissions for more information
note
Views will respect any permissions applied to a column. If a user has access to a view which includes a restricted column, it will not appear in the view for the user.
note
Users with limited permissions only see the 'Print' and 'Export' options.
Mandatory Columns
Ensure all required columns are included in a view, especially if you enable Add/Edit forms to display only columns from the selected view. An alert appears if a mandatory column is missing.

note
To enable mandatory columns, open
Admin
> iSheets
(under Module settings). Click the name of the iSheet and enable Set Add/Edit forms to only display columns from the selected View
:If enabled,
Add record
, Edit record
and shared forms only display and request data for columns defined in the selected View.note


You can check if a view includes all mandatory columns. Open
Admin
, iSheets
, then select Check mandatory columns
.If necessary, select the iSheet to check. A list of views opens.
Select
Show
to see a list of mandatory columns that are missing in the view. Select More actions
then Add mandatory columns
to automatically add all missing mandatory columns to the view.Alternatively, select all views you need to update, then select
Update selected views
in the top-right corner.Inline editing in views
You can enable inline editing in the Columns section. However, you also need to enable inline editing on the View. When viewing the list of iSheets click on
More Actions
and then choose Manage Views
. In the Columns
section set Enable inline editing
to Yes
.
Metadata iSheets
Metadata iSheets let you create custom metadata fields for files, folders, and tasks in HighQ, supporting better organisation, easier searching, and improved reporting.
Each site can only have one Metadata iSheet of each type (Files, Folders, and Tasks), which helps keep metadata management simple and consistent.
Admins can customise these fields to match site needs, making document tracking and retrieval more efficient. As sites grow, iSheet metadata makes it easier to locate specific documents and folders.
note
Each metadata iSheet serves a single, defined purpose and cannot be repurposed for different uses.
Types of Metadata iSheets
- 'File metadata iSheets' (also called 'Document metadata iSheets'): Designed to add custom fields to files in the Files module.
- 'Folder metadata iSheets': Add extra metadata fields to folders, providing greater context and organisation.
- 'Task metadata iSheets': Enhance the Tasks module by enabling the addition of custom fields for tracking and analysis.
note
Identifying Metadata iSheets
In a list of iSheets, metadata iSheets are identified with a prefix:
- [DM]: File metadata iSheet (‘Document Metadata’).
- [FM]: Folder metadata iSheet.
- [TM]: Task metadata iSheet.
For more information, see:
File and Folder Metadata iSheets
A file metadata iSheet can include various columns such as:
- Document type: A mandatory choice column, which can include an image for each option.
- Matter ID: A single-line text column for unique identification.
- Date: A date and time column to track relevant events.
These columns are displayed in the configured view, which can be set to show in specific folders (using
More actions
> Edit details
> Settings
> File view
). Other system-generated file status columns, such as approval status, Contract Express status, or DocuSign signature status, can also be added to a view.
Adding Files and Folders with Metadata
When a file metadata iSheet is created, it is associated with files on the site. When uploading files, users have the opportunity to fill in the custom metadata fields in the Metadata tab. Similarly, when a folder metadata iSheet is set up, new folders in the Files module can have their metadata fields completed in the Metadata tab.
note
For bulk uploads via zipped files, a File View can be selected and applied to all folders. If no view is chosen, the default view applies.
Creating File or Folder Metadata iSheets
To associate an iSheet with files or folders, activate the File metadata template or Folder metadata template from the iSheet configuration page (
Admin
> Module settings
> iSheets
). These templates can be enabled at creation or later. Once enabled:- iSheet-level permissions cannot be customised; permissions are inherited from the Files module.
- System-generated fields specific to files or folders are added.
System-generated Fields
Additional system-generated fields appear in file and folder metadata iSheets. For folders, a Folder column is added; for files, both Folder and File columns are included. These columns contain links to the related file or folder, and, if permitted, a download icon appears. Admins can adjust certain configurations for these columns, such as width and inclusion in search. Metadata iSheets retain all standard iSheet features, including conditional and mandatory columns, lookup sources, and email alerts (which can include links to files if configured).
System-generated Columns and Metadata Management
System-generated fields in these iSheets are populated as follows:
- Created by and Created date: Set when the file or folder is created or added.
- Modified by and Modified date: Updated by the last user who edited the file/folder in the Files module or the iSheet record. If a file/folder is linked to an iSheet after creation, the Modified date reflects the association date.
Editing iSheet metadata does not generate new file versions or affect version history. These fields are associated with every version of a file.
System-generated file status columns, such as approval status, Contract Express status, or DocuSign signature status, can also be viewed.
Viewing Metadata iSheets
File and folder metadata iSheets can be accessed in the iSheets module, allowing users to view all files or folders regardless of their physical folder structure. Advanced searches can be performed based on metadata. Users can select configured views, sort data by columns, and carry out quick or advanced searches. For file metadata iSheets, files can be opened directly in the viewer, and metadata can be edited from the adjacent panel.
note
Smart folders, identified by a folder with a cog icon, are virtual collections populated by queries and can be used to view files meeting specific criteria.
Editing Metadata
Editing file and folder metadata is possible from multiple locations, given suitable permissions:
- iSheets Module: Use the More actions menu to edit records, which opens an Edit record window for updates.
- Files Module: Use More actions next to the file or folder and select Edit details, then update fields in the Metadata tab.
- Document View: For files, click the Edit icon while viewing the document to update metadata directly.
- Bulk Updates: Use the iSheet import process for bulk metadata changes.
Searching Metadata in iSheets
Searches can be conducted on file metadata, iSheets and files in attachment columns from the iSheets or Files modules. Custom metadata fields appear alongside system-generated search fields, and configured sections are included in search displays.
By clicking the Filter icon and selecting
Advanced search
, users can search by:- Files and folders: Combine text searches in files (e.g. Word, Excel, PowerPoint) with custom metadata filters.
- iSheet attachments: Search files stored in attachment columns within selected iSheets, except Document metadata iSheets (DMD), which are always included in the Document metadata section.
note
Advanced search allows filtering based solely on iSheet metadata fields, such as document and folder titles, but not full file text. Use the Files module for full-text searches.
Viewing File or Folder Metadata
Metadata columns for files or folders can be viewed:
- Beside the file in the online viewer.
- Via More actions > Edit details > Metadata.
- Within the files module column view, if configured.
These views also allow metadata editing if permissions allow. System-generated status columns, such as approval status, Contract Express status, or DocuSign signature status, are included in the metadata display.
Default metadata views can be set to display metadata across all documents or folders in the Files module. By configuring default views in Admin > Module settings > Files, these can be applied to all existing and new files or folders. Multiple views can be created and assigned to different folders as needed, though only one file or folder metadata iSheet can be active at a time.
Views with filters restrict the list of files or folders shown, depending on filter criteria (e.g., only files with 'Document type' set to 'Contract'). Users can switch views to see other items as required.
Conditional Columns in Metadata iSheets
Conditional columns allow different input fields to be displayed based on user selections. For example, a site managing real estate leases may have folders for commercial and retail leases, each requiring different data fields. A choice column for 'Type of Lease' can display the appropriate fields, organised into sections and views tailored to each type.
Task Metadata iSheets
The capabilities of the Tasks module are greatly extended with Task metadata iSheets. These allow users to:
- Add custom data columns to tasks, enabling tracking of key metrics and capturing detailed information.
- Show, hide, and reorder default and custom columns to tailor views for different audiences or requirements.
- Set conditional columns to build in business logic.
- Group task fields for improved clarity and user experience.
- Control access using permissions for specific groups.
- Search and filter task metadata for quick retrieval.
- Export and import tasks to and from Excel to enable bulk updates.
- Integration with the Workflow and Data Visualisation modules enhances project management.
These features enable more effective categorisation and organisation of tasks, as well as the ability to provide insights to project team members. Examples include assigning tasks by region or country, tracking estimated and actual hours, and presenting visualisations, such as task status by jurisdiction.
Enabling and Configuring Task Custom Metadata
To enable Tasks custom metadata, create a task metadata iSheet via Admin. In the
Add iSheet
screen, select the Task metadata template
option. Once created, configure views to display custom columns by default in the task list view (Site admin > tasks > Default task metadata view).note
Views can also be applied to individual task lists (Site admin > tasks > More actions > Set metadata view) to display the relevant custom columns for all tasks in that list.
Configuring Task Metadata iSheets
By default, the Task metadata iSheet includes system-generated columns linked to the Tasks module, such as Created by, Created date, Modified by, Modified date, Title, List, Status, Priority, Parent task id, Start date, Due date, and Assignee. Additional custom columns, such as Jurisdiction or Billing Code, can be added for more specific data capture and analysis (Admin > Module settings > Active iSheets > More actions > Manage columns).
note
Task metadata iSheets support most standard column types, excluding the Join column. Custom fields are shown in the Tasks module for data entry. Some fields, like assignee, are available only in certain chart types.
Grouping and Conditional Tasks Custom Metadata Fields
Custom metadata fields can be grouped into sections (
Admin
> Module settings
> iSheets
> iSheets
> Allow sections
). New sections can be added, and fields can be organised within them. Conditional logic can be applied to columns, so fields are shown or hidden based on other values (e.g., displaying Billing Code only if Client ID is filled in).Deleting and Managing Task Custom Metadata Fields
To remove fields, use More actions > Delete in the Manage columns page. Custom views can be created and applied as the default for the Tasks module or specific lists, dictating which custom metadata is visible to users based on permissions.
Custom Views and Permissions
Custom views for Task metadata iSheets can be managed and applied site-wide or to individual lists. This flexibility allows different groups to see only the metadata relevant to their role (useful in projects spanning multiple jurisdictions). Permissions can be set to restrict access to specific fields as needed.
Task metadata iSheets function like standard iSheets; views created in Admin are available in the Tasks module and can be selected as default or list-specific metadata views.
Adding or Editing Custom Metadata
When creating or editing tasks, custom metadata fields from the Task metadata iSheet appear in the task window. Data entered here is saved directly to the iSheet.
note
Managing Sub-tasks Visibility
Sub-tasks can be hidden in an iSheet view via the Admin menu. By adding a filter rule ('Parent task id is equal to 0'), sub-tasks are excluded from the selected view.
Searching and Filtering Custom Metadata
The Tasks module includes a search box for finding specific tasks, searching across all relevant metadata. Filters are also available to narrow down by list or other criteria; when filtering by list, only the metadata configured for that list is shown. Additional filtering can be applied after the initial selection for even more targeted results.
An introduction to end-user features
An iSheet provides various features for end users. Depending on a user’s access rights, a user sees the default iSheet when they open the iSheets module:
note
End users don't have to use the iSheets module; if users only need to add or update records, an admin can set up forms.
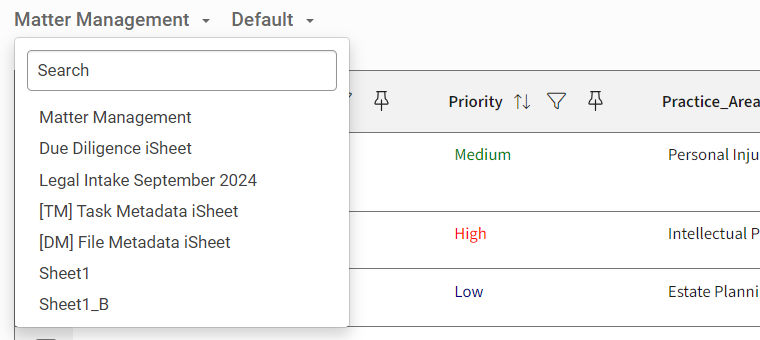
Click the name of the iSheet to see the available iSheets:
Next, for each iSheet, click
Add
to see the form to enter a new item:
The standard form looks like this (the actual fields vary):
-in-iSheets/image_200__5819.png/_jcr_content/renditions/cq5dam.web.1280.1280.jpeg)
note
Not all users have permission to add new items to an iSheet.
HighQ Forms provides a more flexible interface for adding records, including the ability to embed the form in a website or email to capture information or requests from customers.
A user can also view items that have already been created. Multiple items are displayed in a table format, which in this case shows all of the columns in the iSheet:
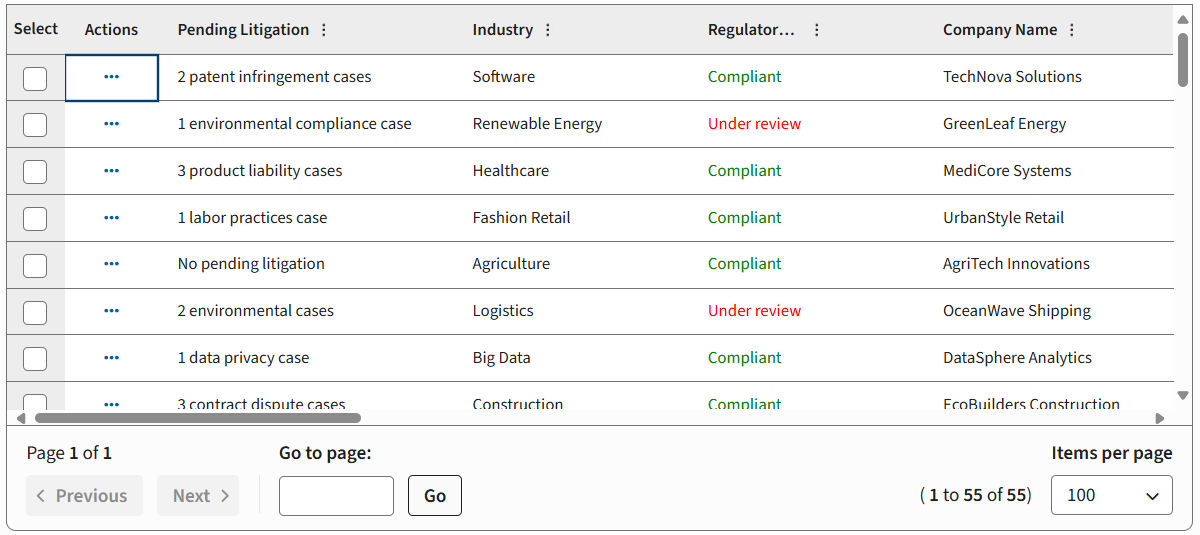
note
Views
There can be different 'views' of the iSheet table, with some views showing a subset of the available columns.
Using HighQ Forms
HighQ Forms helps legal professionals create user-friendly Forms for clients with minimal to no coding required.
This tool transforms your iSheet form into a user-friendly, branded experience. Use it to publish a web page, embed a form on an existing page or add a link in an email; include an introduction, header, footer and style with your forms.
note
The HighQ Forms feature is enabled by default at the system level, but must be enabled
for each site
and for each iSheet
that requires a form. HighQ Form management
HighQ Forms allows you to create multiple forms based on an iSheet.
To use the HighQ Forms designer, first:
- Create an iSheet that contains columns for the data you need to collect.
- Check if HighQ Forms is enabled at theSystemandSitelevel (under iSheet module settings).
note
When HighQ Forms is enabled for an iSheet, a default form is automatically created.
Access a form
Open
iSheet
settings in the Admin
module.Click
More actions
for the iSheet, then select Manage forms

Click the name of the form you want to edit in the
Manage forms
list.
Edit a form
The
Edit form
window provides the tools needed to design and configure your form.Tabs divide the configuration into five steps:
- Layout- design the form layout, including a header and footer.
- Confirmation- define a confirmation message, displayed after the form is submitted.
- Notifications- add a notification to inform team members that a form was submitted.
- Styles- create and modify styles that are applied to the form and buttons.
- Settings- define a name and description for the form for internal use, and generate a link to the form.

note
If you need to embed the form, the embed code is available in the
More actions
menu.Additional features
Additional options allow you to divide the form into multiple pages, define a confirmation message and send notifications when a form is submitted.
Use
Styles
to apply your brand colours and graphic design to the form, including custom CSS.note
A form can use different styles depending on how it is published, either as a stand-alone page or as an embedded element.
note
See Introduction to HighQ Forms for more information.
Bulk uploads
You can use an Excel file to bulk upload data to your iSheets. You can either import new or updated data into an existing iSheet or create a new iSheet.
Use an Excel file to:
- Create a new iSheet - Create a new iSheet and columns from an Excel file.
- Import records to existing iSheets - Update existing records or add new ones in bulk from an Excel file.
Creating an iSheet from an Excel file
You can create an iSheet directly from an Excel file.
note
An Excel file with no data can be used to create an empty iSheet (defining just the columns).
You can create a metadata iSheet (File, Folder or Task) from an Excel file; a metadata iSheet will not import data.
You can:
- Automatically create an iSheet column for each Excel column.
- Assign a content type for each column.
- Add data (optional).
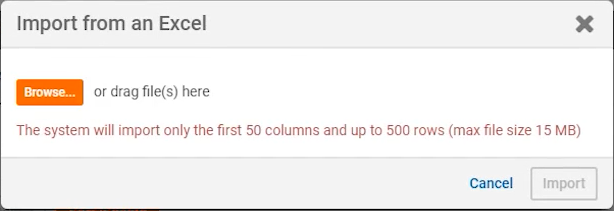
Check your Excel file
Before importing the file, check the Excel file to confirm that the contents are supported.
note
Compatibility
Up to 50 columns and 500 rows may be imported. The maximum file size is 15 MB.
Supported data types from Excel cells
Only
text
, email address
, number
, date
and choice
data types are supported.Cells
can
use other formats, but the data is not imported.Merged cells
The contents of merged cells are imported as if they were all in the top-left cell; other cells in the merged area are left blank.
Upload an Excel file
- Upload an Excel file throughAdmin>iSheets>Add>From an Excel file
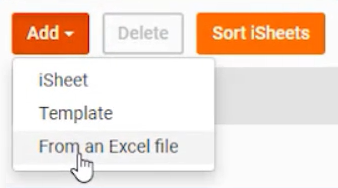
- Add the Excel file:
- When the file is ready, clickReviewto review and configure the iSheet details (name, status, type and column headers).
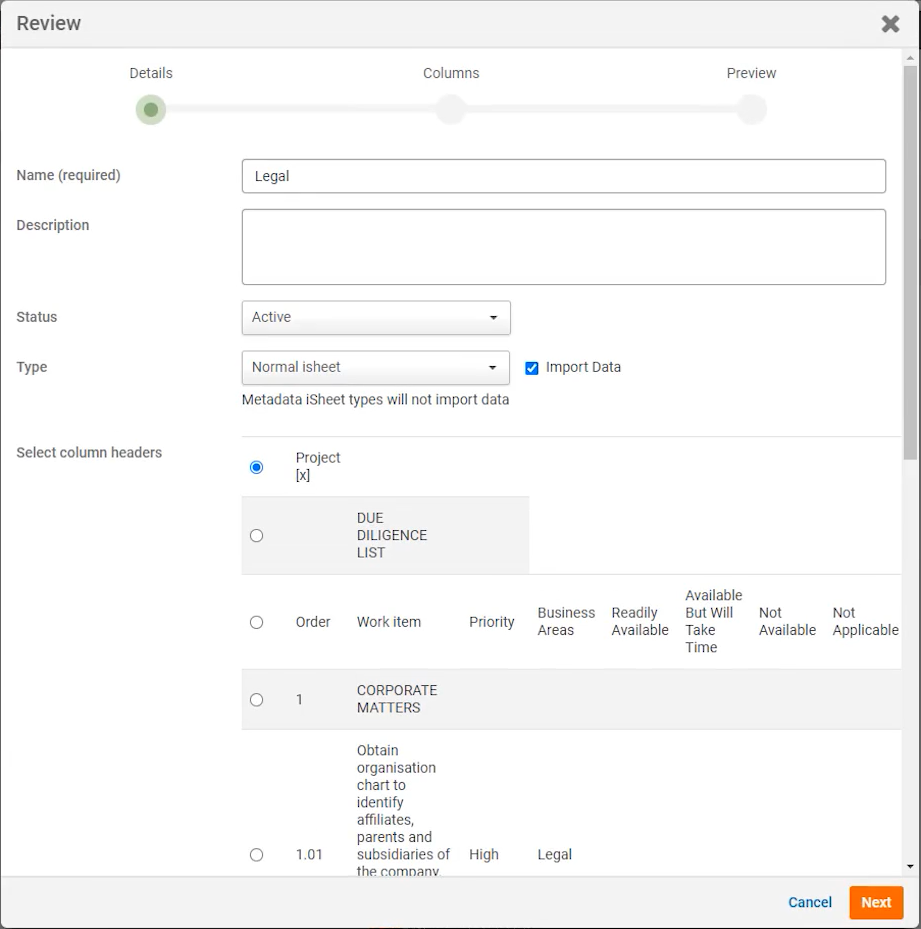
- Check and revise the column name and type for each imported Excel column in theColumnssection.
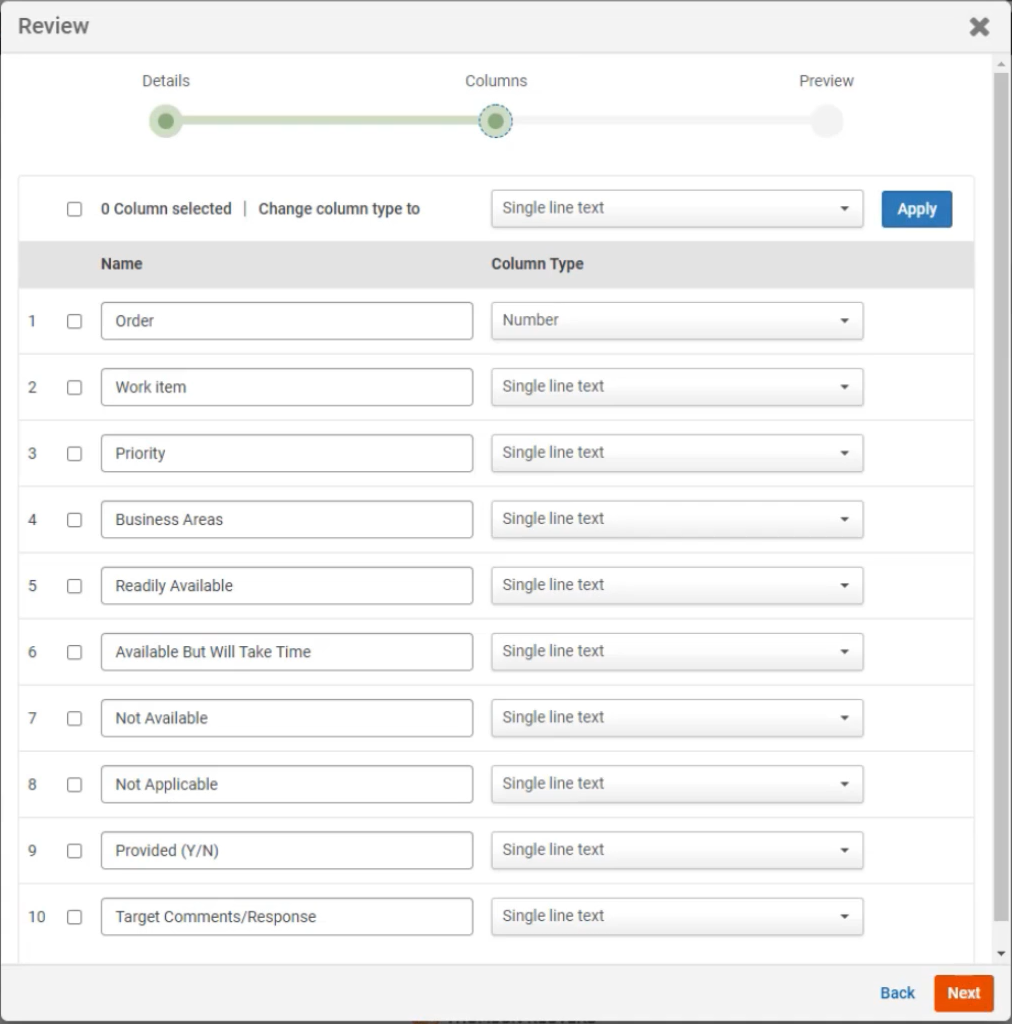 noteBy default, columns are defined as Single-line text, Number or Hyperlink. Select the best match from: Single lineMulti-lineChoiceNumberDate and timeHyperlink.
 - Check the preview before finalising the import.
A notification indicates the import progress.
note
Records that fail are left blank in the created iSheet. After the import has finished, we recommend that you add records manually or delete as required.
If an iSheet is not created, please check compatibility.
Check the imported iSheet
Open the iSheet in the iSheets module to check the output.
You may also check each column. Open
iSheets
in the Admin
module, and select Manage columns
for the imported iSheet.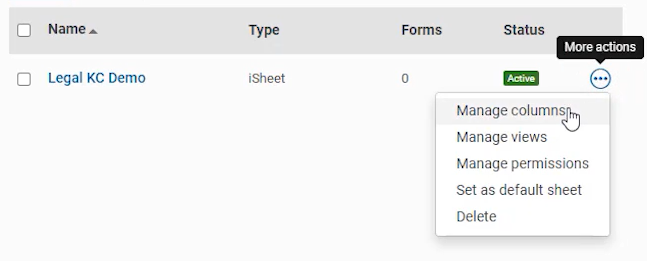
note
For example: add descriptions, default values, colours for values in a choice column, etc. See Column types in iSheets and Column settings in iSheets for more information.
Note that it is only possible to change a column
type
in very limited circumstances; for tips on how to change a column type, see Edit and delete columns in iSheets.Email alerts for new or updated records
You can configure Workflow to send out email alerts when new items are added to an iSheet, or when existing items are updated.
note
The
Send Email
rule in Workflow replaces the deprecated iSheets email alerts. Managing iSheet Templates
System admins can save any iSheet as a template, allowing site admins to quickly deploy standardised, empty iSheets and maintain consistency across sites. Templates preserve key configurations but do not retain permissions or document automation templates.
Preserved
- Main iSheet setup, columns (including configuration), views, sections, and column order.
- Lookup and join columns are included but may need reconfiguration after deployment.
Not preserved
- Custom permission settings (iSheet, Views and Columns) and document automation templates.
Creating an iSheet Template
- System Admins can open the iSheet configuration page (SiteAdmin>Active iSheets), select the iSheet, and clickSave as template.

- Provide a unique template name and adjust the configuration if needed, thenSave.
note
Changes to the original iSheet (after it is saved as a template) do not update the template.
Managing iSheet Templates
- System Admin access viaSystem admin>iSheet admin.

- Edit, delete, or change template status.
 Templates with deployed, linked iSheets cannot be deleted.
 - For SQL Connector users, 'Template parameters' are defined in 'Edit iSheet template'.

note
Changing a template’s status does not affect already deployed, linked iSheets unless manually updated.
tip
Set a template to 'Pending' to hide it from site admins.
Deploying a Template as a new iSheet
- Site/System Admin: Go to iSheet Admin (SiteAdmin>iSheets), clickAdd, then selectTemplate.

- Choose a template and views to include, thenImport.noteIf you do not see any templates, you must first create a template.

- Decide whether to link the new iSheet to the template:
- Not linked: Editable on the site after deployment.
- Linked: Editable only by system admins via System admin > iSheet admin; site admins cannot modify.

note
Once deployed, iSheets (linked or not) cannot be switched between linked/unlinked. Linked iSheets reflect any updates to the template.
note
iSheets created from templates inherit permissions from the selected View. File/folder/Task metadata iSheets follow module permissions, and only one such iSheet can exist per site.
iSheet and template admin
iSheets that were deployed from a template are shown on the
Active iSheets
page in Admin
. The list shows templates and deployed iSheets together.
note
A label indicates if the iSheet is linked to the template.
Template Tips and Special Cases
- Linking: Use linked templates for consistency and central management across multiple sites; use unlinked for site-specific customisation.
- Deleted Items: Disabling the 'Deleted items' view in a template will permanently deletealldeleted items inalllinked iSheets.
- Pick Lists: Unlinked templates can serve as reusable sources for common columns, such as country or US state pick lists.
Importing and Embedding Data
Bulk import data into iSheets using Excel for efficient updates.
- You can use Excel to import new or updated data into an iSheet, making it faster to add or modify multiple rows compared to manual entry. Data can be exported from a database, formatted in Excel, and then imported, which allows users without site access to review or edit iSheet information before an administrator uploads the changes.
- This method is useful for updating iSheet fields on documents uploaded in bulk, as editing each document individually can be time-consuming. Instead, complete the bulk upload, update relevant fields in Excel, and re-import the file through the iSheets module.
iSheet configuration in Site templates
HighQ enables system administrators to create site templates, which can serve as the basis when creating new sites. When a new site is requested, instead of creating it from scratch, a site creator can use one of these templates as a starting point.
Site templates make it easy to reuse common site structures and can vastly increase the productivity of using HighQ by minimising the time spent configuring new sites. Site templates also encourage the use of site best practices, developed by HighQ experts.
A site template can determine almost every aspect of how a new site will look and behave, including:
- General site configuration settings
- Which modules are enabled and how each module is configured (for example, if autonumbering is enabled in the Files module etc.)
- Security groups on the site and the access rights the groups have to site content; this includes system groups added to the site
- The users on the site and any roles that they have
- The structure of folders in the Files module
- Categories in the Events and Blog modules
- Lists in the Tasks module
- Q&A topics
- The Home module
- Workflow rule configuration
- Approval templates configuration
- iSheets, including columns and views, but without data
- HighQ Forms configuration
- Contract Express configuration, including the CE templates associated with a site and their linked iSheet mapping and Output iSheets
- Document Intelligence configuration, including folder settings and iSheet column mapping configuration
However, any content that is added to a site template will not be included in a site that is created based on the template, including:
- Files and attachments
- Wiki pages, blog posts, events and tasks
- iSheet data
note
Note that this is separate from the iSheet template feature that permits the re-use of one or a group of related iSheet designs.
Save a site as a template
The templating capability in HighQ enables clients to copy sites and their configuration to create repeatable, portable solution templates.
With this powerful feature, you can copy sites and their configuration, including:
- iSheets and iSheet Views, including Document Automation configuration
- Home page and site navigation configuration
- Re-pointing of data visualisation and navigation links
- Site and module configuration plus folder structure
- User groups and permissions
- Workflow, including triggers and actions
- HighQ AI engine configuration
note
Some items cannot be saved. For example,
Associations
in Doc Auto
documents must be reapplied after you create a site from a template.To save an existing site as a template, open the site, then open
Admin
:
The
Site summary
opens. Click Save as template
: